Showing posts with label #Myhouse. Show all posts

Wednesday, December 11, 2013

Oh Christmas Tree...

....In my front yard,
finally I don't hate you!!
(to the tune of O' Christmas Tree)

OK, hate is a strong word, but I've been waiting for this day for nearly a year; the day the giant Christmas tree in my front yard was relevant. For those of you who have been following along since Brent and I purchased our first home last December you know that I've had a serious love-hate relationship with said Christmas tree. But, finally the time came for us to decorate the beast along with the rest of our house.

In truth, Brent and I have been scheming and planning for this decorating escapade for awhile now. Tossing around ideas, pricing out various decorations and picking up supplies here and there. With less days between Thanksgiving and Christmas this year we wanted to be on our A-game to ensure we got to enjoy these decorations for as long as possible. With that being said don't judge me too hard when I say we started our decorating INSIDE the house the weekend before Thanksgiving.

Yes, we are those people. Let me show you around...

The dining room:


Doesn't Brenta the horse head just make the table? :)

I love the texture and color of the wreaths on the hutch. 

The Living Room: 


Holiday explosion! As I mentioned we bought our tree the weekend before Thanksgiving and our house has been smelling heavenly ever since. 


We jolly - ed up the couch....


and hung our stocking on the mantle with care...


Happy Mail Home fiasco aside, I still decided to throw a wreath the pantry door's way. 


And what outdoor kitchen is complete without a Egg Claus? Ho Ho Ho


Front facade:

The day after Thanksgiving we drug all of our supplies outside and got the party decorating started, but not before we snapped this picture to show most of our loot.


To begin we de-Fall-ified the front porch, something just didn't feel right about introducing a new season while another one still lingered. Bye, bye pumpkins, hello garland!


While Brent worked on the front porch, I was on wreath duty. 


Brent polished off the front porch with a big ol' wreath of his own. 


Next, up on the ladder again, Brent hung lights along the roof line on the front of the house. 


With the front of the house decked out it was time to focus on THE TREE. You know the one....


My Dad and Brent climbed high atop their ladders and began hanging lights.


I hung the first ornament to show everyone how it's done. 


My Dad caught on fast and hung some of the highest ornaments. My Mom was his coach. 


I love this picture! The entire process was a huge team effort, that tree was a tough cookie, but he grew more and more appealing with each added piece of decor. 


The final step was the garland. From the day I knew a white picket fence was in my future I began dreaming of this fence adorned with real garland. The smell! The texture! The charm!

Speaking of charm....


A night shot...


And an up close of the tree, complete with little glowing presents. 


You can see the sparkle from our yard as soon as you turn on to our street! Confession: sometimes we purposefully pass the house just to get the whole experience as we are coming home.The house just feels so cheerful! 

I guess it's official, these decorations can never come down, everything feels too cozy and happy. Yep, you're hearing right we will now have Christmas decor up year round. Funny how quickly we can go from classic charm to redneck, eh? 

Merry Christmas & Happy New Year from the Shearers and The Cow!

All photos are my own. 

Sunday, November 24, 2013

Happy Mail Home.


I love happy mail. Non junk mail. Non-bill = happy mail. 

There's nothing better than fetching your mail after a long day of work to find an unexpected piece of mail that instantly makes you smile. Over the last few years my mailbox has been inundated with all kinds of said happy mail - between engagement parties, baby showers, graduation announcements, wedding invitations and birth announcements my mailbox often smiles.


As much as I love receiving these announcements and invites, the question quickly becomes what do I do with them? Because these pieces typically include pertinent information regarding RSVPing, times, directions, etc... I need to keep them in an easy to find place that doesn't include laying on my kitchen counter or collecting dust on my nightstand. I know a lot of people hang these invites on their refrigerator but my refrigerator is panelized, A.K.A. has wood cabinet panels instead of stainless steel, thus no magnet will adhere.

What to do, what to do? Then it hit me. The pantry! The house came with a built-in pantry in the hall, right off the kitchen.


This piece has been huge for us. As I've mentioned before, our kitchen, while much improved from it's original state is by no means large, and storage space is tight.


We keep most of our food in the upper part of the pantry and all of Luke's food, medicine and bones in the bottom section. With the insides of this bad boy being so useful, why not allow the door to work for the cause too?


To kick off project transform plain pantry door into the holder of all fun mail, we picked up some supplies at Home Depot including Rust-Oleum's Magnetic Primer.


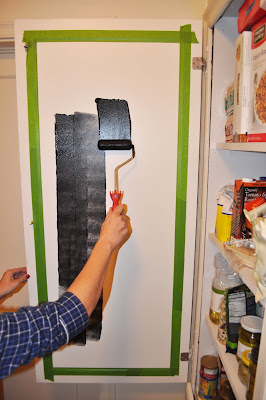
Once home, we taped off the center panel of the door. 


Next we poured the paint into a tray and mixed it up really well. The magnetic component is super thick so it's very important to mix it up thoroughly and often.


Once everything was mixed together I applied one coat of the paint using a small foam roller. 


The directions said to apply a coat, wait 30 minutes and apply another. So, we did just that and applied 5 coats total.


The next morning we tried to attach a magnet to the door and....nothing. It didn't work. RAGE! 

Disappointed and annoyed, I did what any normal person would do and googled this dilemma. Turns out this has happened to others and the suggestion was to paint coat after coat until the magnets start adhering.  Different number of coats worked for different people. So...back we went to paint and wait, paint and wait. Luckily the surface we were painting was small so this wasn't a huge time commitment. 

During the intermission between painting I went to town creating my own magnets. My supplies:


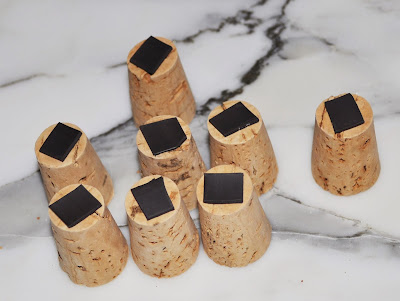
A few corks and some magnet tape.

What happened next gets very technical so pay close attention to the details...I cut small pieces of the magnet tape and stuck it to the bottom of the cork. 


I know you're tired from just reading about the work that went into that one....tough DIY, right there. :)

With my cork magnets ready to go and the happy mail gathered I was ready to get this party started. Sadly, 12 coats later and the magnets are still not adhering. We've been working on this project off and on for 5 days and while we can feel the magnetic pull getting stronger it's still not strong enough to hold the magnets. This was supposed to be a fast and easy project, but it has turned into a bust. We are going to continue applying coats so I will keep you posted on the status in the coming weeks. But as of now, 5 days and 12 coats later, I wouldn't recommend Rust-Oleum's Magnetic Primer.

So, that's that. There is no pretty finished photo on this one. Sorry folks, but I guess that's how the cookie crumbles sometimes. It's frustrating, but I'm determined to make this idea or some form of it, work for us. I know this pantry door is the perfect place for this type of organization, now it's game on to figure out how to actually make it work. Stay tuned....I'm on a mission, I WILL HAVE MY HAPPY MAIL HOME!

All photos and frustrations are my own, and Brent's. 

Thursday, July 25, 2013

Homemade Bar

A few months ago we were riding around when we passed an antique store we had been in a few times. We decided to pull in and see what was new. As we got out of the car we saw this cool armoire sitting outside in front of the store. We checked it out and found it was an old TV cabinet with drawers and a turn table for the television inside.

The finish on the piece was really cool and it had these pretty metal X's in each frame of the door. The storage capacity was great in that there were three drawers, open shelves and a large open area at the top that Brent knew he could fill in with more shelves, depending on what we wanted to store in there. Overall it was a pretty nice piece, but would need some TLC to clean it up a bit. We weren't sure exactly what we would do with it but it seemed like a piece we could definitely use, in our living room, in a guest bedroom, somewhere.


So, we did the haggle dance for a few minutes and ended up buying the piece for $125 dollars.


We loaded her up and we were on our way. 

This was right in the middle of our major renovations so the piece sat in our solarium for months while we worked on the house. Every now and then we would admire the piece and talk about what we would do with it. Then, one day Brent had the brilliant idea to turn it into a bar. At the time we were in the thick of finalizing our cabinetry layout in the kitchen and we both realized we would not have a lot of extra space in the kitchen. In fact, we knew we would be storing a lot of our dishes in a china cabinet, so there definitely wouldn't be room for bar ware and alcohol in our kitchen cabinets. 

So, we held on to the bar idea and went on with our renovations. After we started moving furniture into the house we decided the armoire/bar would go in the living room and would flank the door heading into the solarium which leads to the deck. We figured when we entertain it would be nice to have the bar set up in the living room so everyone can have easy access whether they were over for a cookout on the deck or watching a UGA game in the living room. And when entertaining was not going on we would keep it closed and it would just be a nice piece of furniture to add to our space.


Now that we found the piece a home in our living room it was time for project re purpose TV cabinet into Bar. 

It started out like this:


We wanted to cover up the back of the piece with a mirror, not only to cover up the hole, but to give the piece some depth. We lucked out and found a piece of plate glass mirror at Home Depot that was the size we needed.  Brent covered the back of the armoire and the back of the glass with Liquid Nails. 


   and set the mirror in place. 
Once the mirror was in place it was time to frame it out. We bought some little rosettes and fluting at Home Depot. 


And Brent installed them around the plate glass mirror to create a frame. 


Because this piece needed to look as good open as it does closed we wanted to jazz up the frame a bit so we applied a nice gray stain that we thought would compliment the interior of the cabinet nicely.


We got a little stain happy and decided to paint the turn table as well. 


Wah lah! Isn't the contrast nice?

Our next step was to add some pieces to enhance the storage and make this piece look more like a bar. First we installed wine holders on each side of the cabinet. I was afraid adding these would make the bar top area seem crowded, but I was happy to see the space was still nice and open after these pieces were installed and our wine was in place.


 We ordered some wine glass holders and installed them on the top of the inside of the cabinet. 


Several of our friends and family members gave us wine glasses for wedding gifts, and now we have the perfect place to display and store them. 


We went to work organizing and storing bottles of various liquor and mixers on the shelves below.


Wait, I'm not finished yet.

What happened next was all Brent. As if turning this cabinet into a bar was not enough, we had to  take it to the next level. It all started one day when he put a dibs on one of the drawers.

Urban Dictionary's definition of Dibs:

"Dibs - the most powerful force in the universe, it is used to call possession of a certain object or idea. There are very few things that trump dibs." 


We had plans to store coasters, coozies, aerators, etc...in some of the drawers, but didn't have an exact plan for all of them. But all that changed the day Brent decided to turn one of the drawers into a humidor for his cigars. Yes, a humidor. By the time he mentioned the idea to me he had it all planned out in his head.

He took the measurements of the drawer and lined the inside walls and bottom with cedar wood. 


Next he cut a top for his drawer humidor. 


Once the top was in place it was time to add hinges and hardware.


And finally he stained the inside of the box using the same finish we used on the mirror frame and the turn table. 


How cool is that? He's crafty that Brent.

The humidor/drawer is the first drawer in the stack and such a genius use of the space. I'd say we got our money's worth out of this piece of furniture. We've tried the bar out a few times and it works well. We still have a decent amount of space left inside some of the drawers and the shelves. It's crazy how exciting it is to be organized, even if it's only party gear organization, it counts :) CHEERS!

All photos are my own.