Showing posts with label New House. Show all posts

Sunday, October 18, 2015

So This Just Happened...


So, I have some big news to fill you guys in on...
On Friday we officially sold our first home. 
You know the one....


Crazy, right!?  Lord knows we loved that house and poured our hearts, sweat, tears and imagination into every square inch, but on August 30th a new plan unveiled itself to us and we had to jump. In a nutshell, another house in our neighborhood that we had long admired went up for sale and we decided to pop into the open house on a whim. Well, one thing led to another and by the end of that week we were under contract on the new house with the contingency of selling ours.

A "Coming Soon" sign went up in our yard and before the house officially went on the market it was under contract.

W H I R L W I N D


It's hard to believe how fast this whole thing has gone down. While all of the paperwork, inspections, appraisals, etc...were happening between the two houses we kind of went along, living our lives business as usual. You know, working full time, being pregnant, all that fun stuff. Then, last Sunday we got busy packing, wrapping and getting everything organized for the big move. For such a small little house we sure managed to acquire some stuff, so thankfully Brent's Mom, Cindy, was in town to help us get everything done. I've learned one is not nearly as useful and or productive whilst donning a major gut (me and my baby bump).

The plan was to close on both houses on Friday, meaning we had to be out of house #1 by 10:00 a.m. Friday morning. Thus all of our moving happened on Thursday. It was crazy fast paced and we spent all day Friday, Saturday and some of today getting unpacked and organized. My family came by yesterday and everyone pitched in to empty as many boxes as possible and things are really starting to feel relatively calm around here.

Speaking of "here" the new house is in the same neighborhood, only 10 houses down from our first house! It is the perfect spot for us to really settle in and raise a family and we are still pinching ourselves that it's ours! I can't wait to give you the formal tour, but for now here is our obligatory, WE JUST BOUGHT A HOUSE PICTURE for our Second Home:


All photos are my own.

Wednesday, July 10, 2013

Front Porch Love.

Y'all, I'm becoming so domesticated. This new house has me interested in doing things I never before thought I would care about. Like yard work for example. A few weekends ago it was numero uno on the ol' "to do list." Numero uno as in before shopping, exercising, catching up on the DVR and hanging out with friends. WHAT'S HAPPENING TO ME!?!

Here's the thing, I'm a proud homeowner. No, seriously a PROUD, obsessed homeowner. I've never owned a house before and I want this one to speak to you as much from the outside as it does from the inside. It's all about first impressions people. Think about it:

First impressions happen all the time. Whether you are meeting someone new, considering a book on the shelf, passing by a display in a window or find yourself mesmerized by the preview for next week's episode of the Bachelorette, first impressions are uber relevant and ultimately set the stage for things to come. Or, maybe more importantly first impressions set the stage for your overall interest based on your first glimpse of what could be. Deep I know, that's why they call me Yoda - HA. God knows the inside of our house has gotten it's fair share of love over the last few months, so what a shame it would be if our front porch didn't give people the right impression of allllll the hard work that has happened inside.

Below is a before shot of the front porch. 

Yes, that is Brent shirtless in the reflection. We have since spoken about wearing shirts for photos taken for the blog. OY VEY. :)

The house came with the cheery red front door, that may or may not stay. Still debating that one.....But do notice the engraved door knocker we got as a wedding present.


Awhile back I used some of our Crate & Barrel gift cards and snagged two metal planters. I loved the color and the size was just right for our little porch.

While shopping for our flowers, we went up and down each and every isle, noting our favorites and discussing various grouping options. Not sure if I mentioned this, or if you could of guessed, but I know NOTHING about plants and chose everything strictly based on it's pretty factor. Brent's a tad more knowledgeable, but ultimately we just plan to fake it till we make it in the gardening department. Finally, we settled on four different plants that would all share the space inside our planters.


We started with some soil .


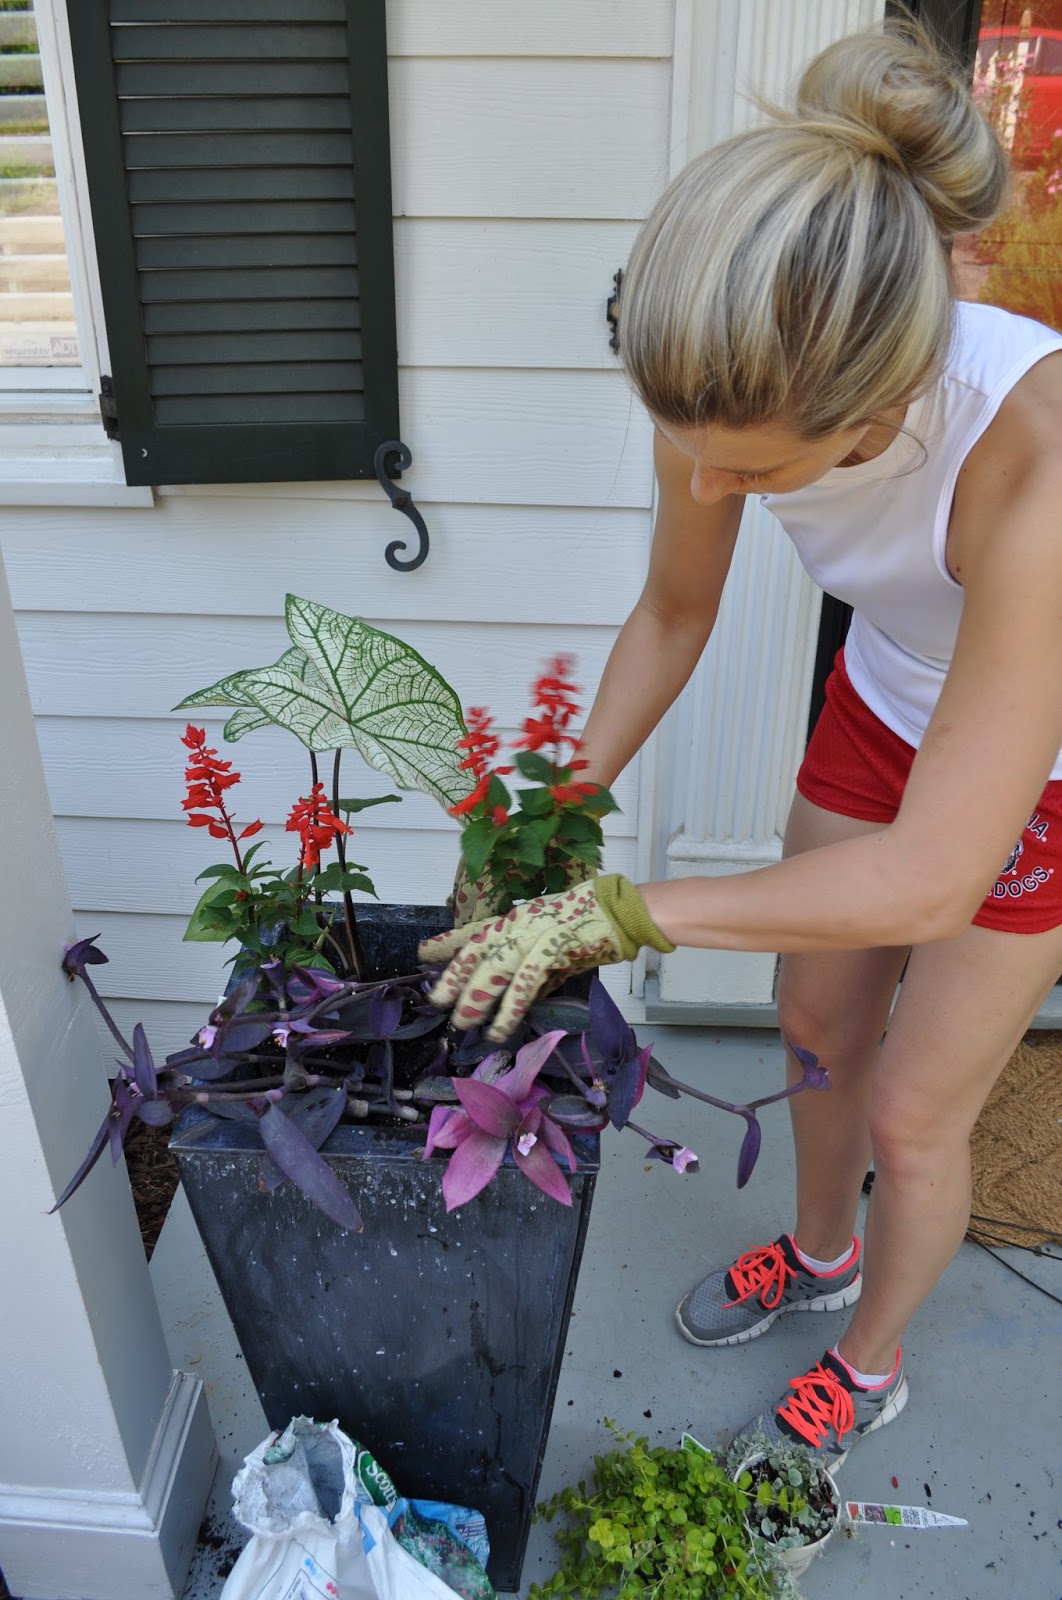
And then began loading in the various plants, one at a time.


Arranging and finagling the little devils into place.
  

A little pop of red.


Adding some Kool-Aid....
JUST KIDDING, it's some kind of flower growth potion.


And finally....................TA DA!!! A Green thumb is born.


Pretty snazzy, huh?


Pretty planters filled with beautiful flowers - check! But that door mat was not working for me. While our front porch is by no means large, the door mat looked drawfed up there on the stoop. It was out of scale and needed to be larger. Unfortunately the door mat was new-ish with all tags ripped off and the receipt long lost, so I decided to be extra careful with my selection of door mat #2. I searched and searched until  I finally found just what I was looking for at Pottery Barn.  My final selection: a black picture frame EXTRA LARGE 30" x  48"doormat. 


So much better, right?


Now that's one happy porch right there! 

Confession time... We actually planted these flowers about a month ago, but I couldn't publish this post because I was on the hunt for the door mat.  It's been hot here in Georgia, so we feared for the lives of our new plants. But, one month in and I'm happy to report that because of watering the plants diligently, the growth potion (Miracle Grow) and the monsoon we got over the 4th of July weekend, our plants are plush and still intact. GREEN THUMB CITY RIGHT HERE. :)

All photos are my own.

Sunday, February 24, 2013

Blown Away


Back on the home front, things have been chugging along. We have finally moved out of dust heavy projects and right into projects that provide instant gratification, like painting! HALLELUJAH - I can see the light at the end of the tunnel. Speaking of light, the living room didn't have one and that bugged us. Early on we decided adding a fan/light in the living room was a must.  Over the past few weeks we have been deliberating over what style of ceiling fan we wanted. There are a lot of options out there with varying styles and colors to choose from.


 Like I said, A LOT of choices....yikes!!

Because we had a completely clean slate/ceiling we knew we could literally choose anything, but as is the case with a lot of people, infinite options really paralyzed us. Like so many products, you don't really have a great depth of knowledge about things like ceiling fans until you are in the market to get one. So, we researched.

We knew we wanted a fixture that would not only serve as a functional component but would add another layer of interest to the space. I mean, if you're going to do it, you might as well do it right. Right? The living room is long, so we were afraid a regular ceiling fan might get swallowed up by the ceiling, adding zero interest to the space.


One day, while cheating on Home Depot (browsing at Lowe's), we came upon this allen + roth twin breeze fan.
We really liked the unique design of this fan and thought the linear build would work nicely in the long living room, but before we pulled the trigger we decided to continue looking to ensure we covered all of our options.

While we chewed on the idea of the twin breeze, we decided to get the space ready for the fan, electrically speaking. Since we didn't want to do any patch work to the plaster walls, we had to use the existing switches that were in the room. Originally one of the switches was wired up to some of the outlets in the room. With a little help from an expert (thanks Shawn & Sally) we bypassed the switch for the outlets in the room and used that switch to run our wire for the fan/light. As I have mentioned before, typically these older homes were built with no exterior insulation which worked in our favor in this case because it made it easier to snake the wire down the wall. We decided to run a 3-wire (black, white, red) from the switch to the fan. Although we decided to keep the fan and light on one switch, this will give us the option to break out each function on it's own switch if we choose to in the future.

Once we had the wire run the next step was to figure out exactly where we wanted the fan. Because we did not want to have to do any patch work in the ceiling we wanted to get this right the first time. We both agreed centering the fan/light would be best. To find the center, Brent first measured the room along the floor, width and then length. He marked the center of the space with a dime. Next, he tied a string to a weight to create a pendulum. He held the string to the ceiling to see where the weight fell.


When the weight hung directly over  the dime, he knew he was in the center. So he marked a small "x" on the ceiling.


We purchased a fan mounting kit from Home Depot. Note: if you are trying to mount a fan, the normal mounting brackets are too weak, don't meet code and won't support the fan. For pre-existing construction we were told the brace pictured below is the best option.


Brent then took the electrical box and traced it around his center point in the ceiling to determine how big of a hole was needed. Using a drywall saw, Brent cut the hole and inserted the mounting bracket between the ceiling joists and ran the wire into the electrical box.


With the hole cut and the electrical set up we were ready to move forward with buying and hanging our fixture. We both agreed, the twin breeze was our favorite option so we headed to Lowe's to pick it up.


Once we got the fan back to the house it took about an hour to put it together and get it hung.


TA-DA! We are are very pleased with the end result. The addition of the fan already makes this room look and feel more complete.


So, there you have it, another little piece of progress. We can't wait to finish the painting and start getting some furniture moved in. With each project we complete this house feels more and more like a home!

All photo are my own. 

Monday, February 4, 2013

You May Get Dusty Just Reading This Post

Sheetrock dust is serious stuff. I would know because I've been covered in it for over a month. I find it everywhere; on my clothes, in my hair, it's even on the floor mats of my car. The one redeeming quality sheetrock dust has however, is that where there is dust, there is progress. It seems projects typically get really ugly before they get really pretty. Like most people, projects go through that "awkward stage"... the human equivalent of having braces, massive bangs, glasses, acne, etc...My house is no exception. For a few weeks our house was that kid who ate glue, a work in progress, but in shambles. To say we've been busy since my last new house post would be the understatement of the year. Truly, it's only February 4th so that's possible right?  Anyways, we've been busy and we are slowly but surely inching our way towards a finished product.


In true Brent & Courtney fashion a mere 5 days after closing on the house we began renovations.

Brent, his Dad and his brother Scott got things started with a little demolition. First thing on the agenda was to remove the wall that separated the kitchen and the dining room.

This wall ....


Things got messy real fast. The next day my parents and I showed up just in time to finish off the wall.


I even got in on the action. I figure there's no point in having huge muscles if you're not gonna put them to good use.


And finally: BOOM - wall demolished!


With the wall gone the space really opened up, but we had one more major change we wanted to make that would give us additional kitchen space.


Our new kitchen layout called for us to remove this exterior door. The door was kind of random and lead to a small concrete pad on the side of the house.


While the concrete pad was fine, it really offered nothing in terms of function and the door took up valuable real estate within the kitchen so it had to go.


Back inside the house we decided to remove the plaster walls inside the kitchen.


Removing the existing cabinetry had revealed holes in the wall that needed to be patched. Upon discussions of what would be best for the project we decided to go ahead and remove the interior walls for multiple reasons:

  1. To create a smooth surface.
  2. To replace the old cloth wiring. 
  3. To add insulation (which most houses built in this time do not have).
The issue with removing the walls was that the existing walls are plaster while the new walls would be sheetrock. The challenge we faced was the varying depths of the walls where sheetrock met plaster. To be honest if we had to blend the walls we may not of taken on this challenge, but since the transition between plaster and sheetrock would be covered with new cabinetry the varying depths became a non-issue.


Luke tried to help mop up the dust with his fur!

This is what he looked like when we left.....


 .....JUST KIDDING! 


The space looked something like this when we left it yesterday. We cleaned (massive dust piles) and got everything ready for the floor guys to begin re-finishing the downstairs hardwoods this morning!

All photos are my own.