
I'm back with more updates over on the laundry room front! Today is all about our vintage sink and DIY countertops.
Last we talked I explained that Brent made a wood top and back splash/ledge to cover the dryer outlet + the access hole on the side of the washer/dryer cabinet. Well, we got the wood top secured into place and then set out to DIY ourselves some concrete countertops.

The plan was to use the Ardex Feather Finish to achieve the look. It's a pretty simple process, mix the powder with water, stir and then apply over top the wood tops.

The entire wood top + the back splash/ledge (separate piece) was covered with the Feather Finish and then left to dry.

As you can see the texture is kind of bumpy and rough, but once it was all dry the next step was to sand everything smooth.


We have DIY'ed ourselves some real concrete countertops with our outdoor kitchen (read all about that here...Croix ate concrete at 6 months old... GASP!) and it was BRUTAL. This was way easier, cheaper and honestly, gives a much more finished look.

Let's bounce to the other side of the room.

We found two whole rows of options in various sizes and condition and plumbing orientation.

While several of the options would of worked we really liked the 51" cast iron sink with side washboard. A classic. It was listed as $425 but Brent was able to get the guy down to $300. Way, way less than a brand new sink and this one was a true vintage piece with history and grit. It was perfect and we were so excited to get it!

Once home we started working on getting it all cleaned up. We started by simply wiping it down with soap and water. Then, we used CLR to remove all the rust. Once this step was done the plan was to get the sink mounted and then paint it with porcelain paint in place.
This sink is HEAVY so we really had to think through the best approach to secure it to the wall. Obviously attaching to the studs was the name of the game, but we didn't want the stud locations to dictate our placement, so Brent made a brace, spanning the entire length of the sink. It attached to 3 studs and the sink itself is able to lip right on to it for ease of moving. Well, I say ease. The sink is probably 100lb so it's not easy per-say, but you get what I'm saying...
In the photo below you can see the brace I'm referring to. The piece of wood underneath that was another issue we had to over come...
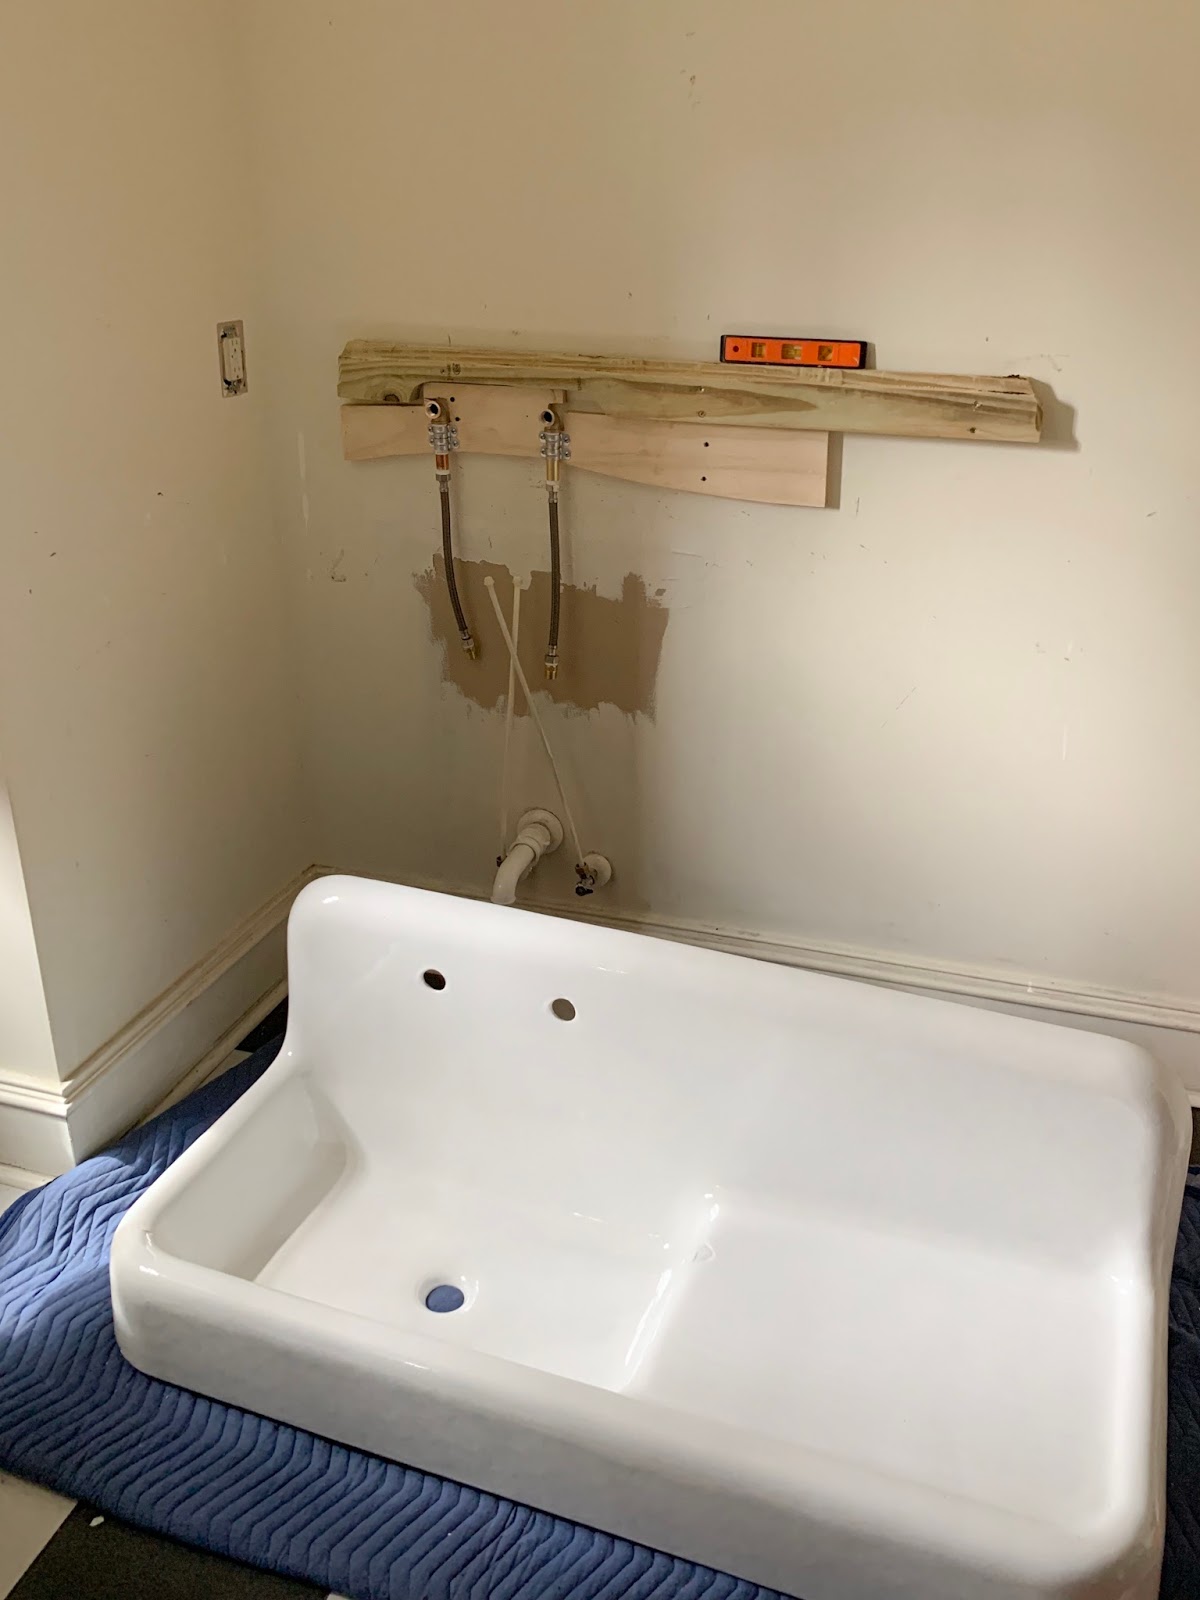
When a sink is planned to be wall mounted from the beginning all plumbing lines are installed in the wall. Because this sink was originally a standard sink, the plumbing lines came from underneath which didn't work with our faucet holes coming from the back of the sink. So, Brent had to create another wood piece to mount the plumbing supplies to. The sink was off and on the wall a few times during this whole thing. In order to get the exact location of the holes Brent laid underneath the sink and held up a piece of wood behind so I could mark the center of each hole. Then, he used that mark to mount the plumbing parts. After that, the sink had to come down so the new board could be mounted. Once the new board was in place we had to mount the sink again to make sure all was lining up...

... and thankfully it was! With all the rough-in plumbing in place it was time get the faucet hooked up. We found the perfect vintage-esque polished wall mount faucet here.
Not only does the sink give off a really cool retro vibe but it provides another counter space for me to stack folded clothes on AND it's the perfect location to sit my plants that need to drain when I water them once a week.

I mean gosh, does it get more charming?


3 Appreciated Comments :
No! It does NOT get more charming! Continue to marvel at what you and Brent can do. SO INTERESTED in the paint you used to revive the cast iron sink. I have the original 2 bowl ginormous sink in the basement of our 1920's house, but it's so rusty and yucky I tend to look the other way rather than use it. Your laundry room may turn out to be your favorite room in the house!
Need help with mine, a huge one in my 1915 house in an unfinished basement
Post a Comment