Showing posts with label DIY Concrete Countertops. Show all posts

Tuesday, April 2, 2019

Laundry Room - DIY Countertops + Vintage Sink


I'm back with more updates over on the laundry room front! Today is all about our vintage sink and DIY countertops.

Last we talked I explained that Brent made a wood top and back splash/ledge to cover the dryer outlet + the access hole on the side of the washer/dryer cabinet. Well, we got the wood top secured into place and then set out to DIY ourselves some concrete countertops.
The plan was to use the Ardex Feather Finish to achieve the look.  It's a pretty simple process, mix the powder with water, stir and then apply over top the wood tops. 
The entire wood top + the back splash/ledge (separate piece) was covered with the Feather Finish and then left to dry.
As you can see the texture is kind of bumpy and rough, but once it was all dry the next step was to sand everything smooth.
With this product you can apply, sand and then apply again and sand to get your desired finish. Lucky for us, we were happy with the end results after only one coat and one sanding spree.
We have DIY'ed ourselves some real concrete countertops with our outdoor kitchen (read all about that here...Croix ate concrete at 6 months old... GASP!) and it was BRUTAL. This was way easier, cheaper and honestly, gives a much more finished look. 
Let's bounce to the other side of the room. 
The room originally came with a plastic utility sink. It was a good sink and we used the heck out of it, especially when washing out paint brushes. When we got the room cleared out for the tile demo we decided to remove the sink and start the process of looking for a replacement. We talked about several options, the two primary ideas being - making or having a cabinet made to hold an apron sink or purchasing a wall hung sink. We liked the idea of the added storage with the apron sink idea, but the all in cost once you purchase the sink and then either the materials to make the cabinet and or the cabinet itself just started feeling expensive. And the wall hung option was no different. Some of the wall hung sinks we looked at were over $1k which was NOT in the budget for a laundry sink. We kind of put the sink on the back-burner with bigger fish to fry when I remembered  Scott's Antique had sinks. Old, dust/rust covered vintage sinks.  Lucky for us Scott's was in town a few weekends ago so we loaded up our crew and headed down to see what we could find.

We found two whole rows of options in various sizes and condition and plumbing orientation.
While several of the options would of worked we really liked the 51" cast iron sink with side washboard. A classic. It was listed as $425 but Brent was able to get the guy down to $300. Way, way less than a brand new sink and this one was a true vintage piece with history and grit. It was perfect and we were so excited to get it!
Once home we started working on getting it all cleaned up. We started by simply wiping it down with soap and water. Then, we used CLR to remove all the rust. Once this step was done the plan was to get the sink mounted and then paint it with porcelain paint in place. 

This sink is HEAVY so we really had to think through the best approach to secure it to the wall. Obviously attaching to the studs was the name of the game, but we didn't want the stud locations to dictate our placement, so Brent made a brace, spanning the entire length of the sink. It attached to 3 studs and the sink itself is able to lip right on to it for ease of moving. Well, I say ease. The sink is probably 100lb so it's not easy per-say, but you get what I'm saying...

In the photo below you can see the brace I'm referring to. The piece of wood underneath that was another issue we had to over come...
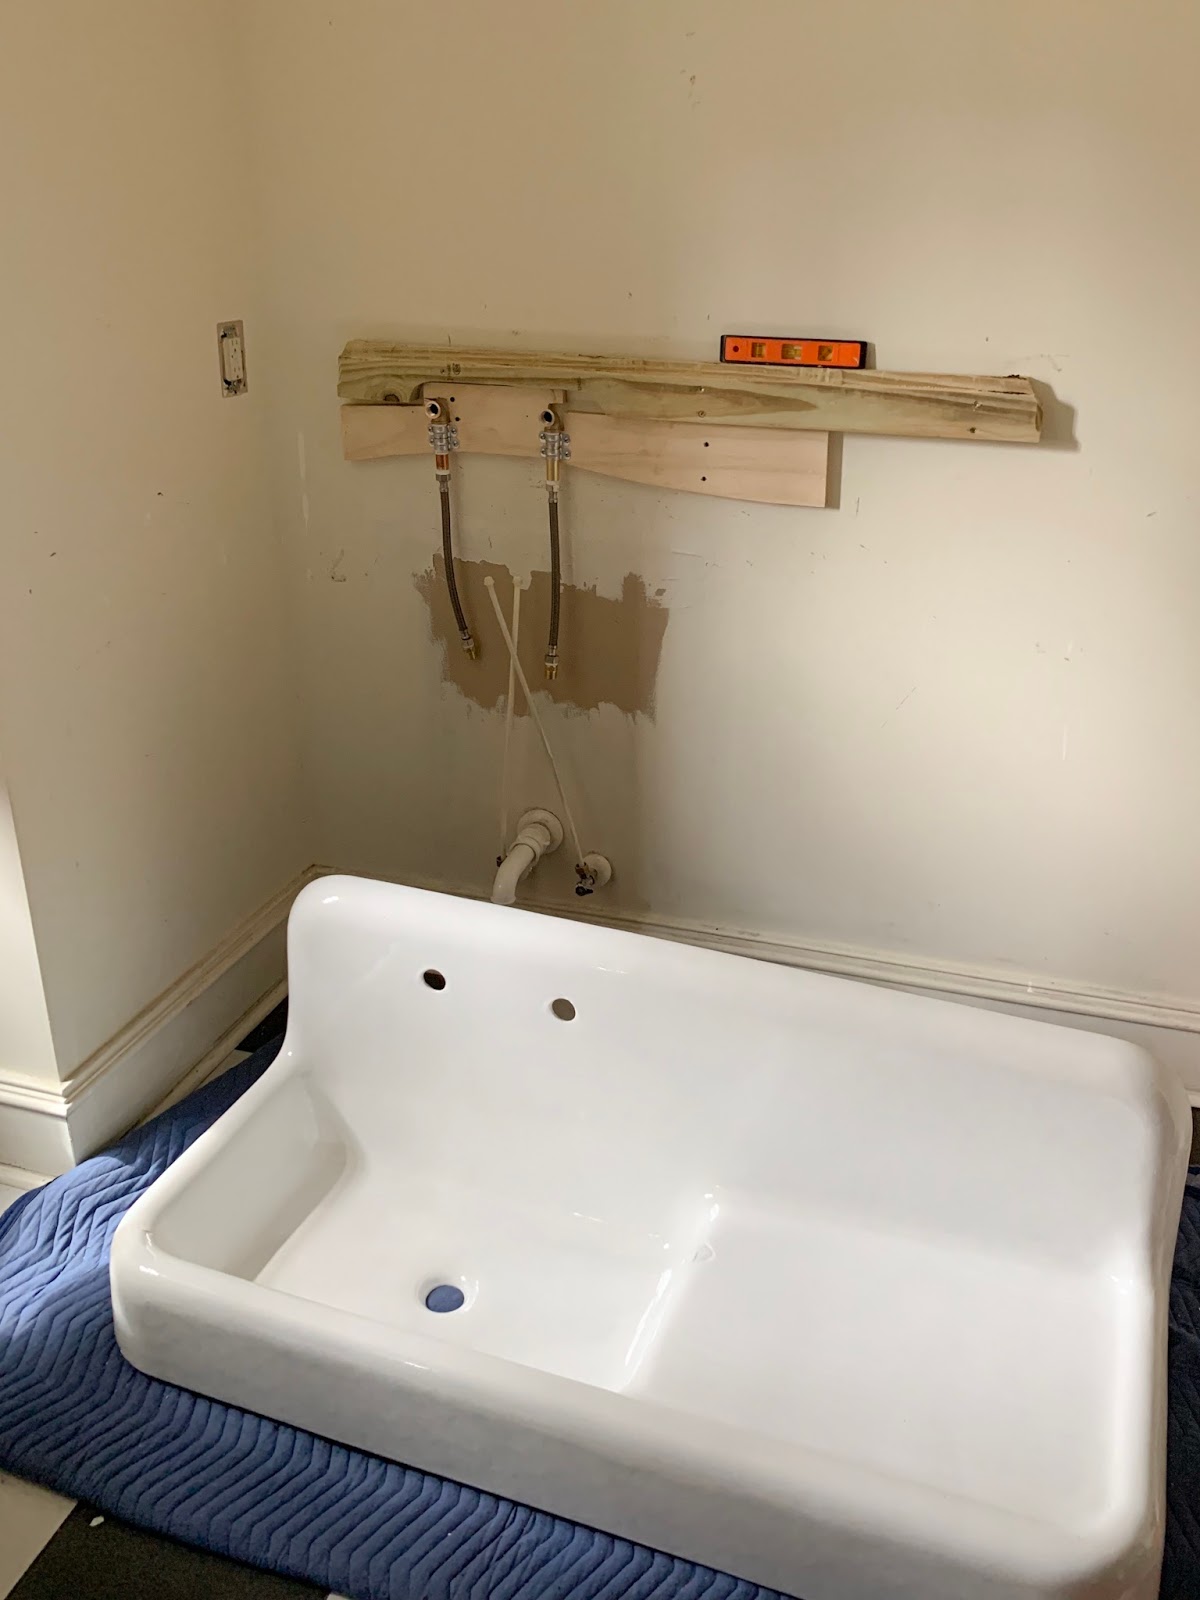
When a sink is planned to be wall mounted from the beginning all plumbing lines are installed in the wall. Because this sink was originally a standard sink, the plumbing lines came from underneath which didn't work with our faucet holes coming from the back of the sink. So, Brent had to create another wood piece to mount the plumbing supplies to. The sink was off and on the wall a few times during this whole thing. In order to get the exact location of the holes Brent laid underneath the sink and held up a piece of wood behind so I could mark the center of each hole. Then, he used that mark to mount the plumbing parts. After that, the sink had to come down so the new board could be mounted. Once the new board was in place we had to mount the sink again to make sure all was lining up...

... and thankfully it was! With all the rough-in plumbing in place it was time get the faucet hooked up. We found the perfect vintage-esque polished wall mount faucet here

  Not only does the sink give off a really cool retro vibe but it provides another counter space for me to stack folded clothes on AND it's the perfect location to sit my plants that need to drain when I water them once a week. 
I mean gosh, does it get more charming? 

All photos are my own. 

Friday, June 3, 2016

Patio Project - Part 3


Last we talked we had just finished the fireplace and had concrete steps poured from the den to the patio. Before we could go any further we had to hire a company to come and move the gas line that was in the brick smoke hut. They pulled the line out of the back of the hut and then ran it along the back and side of the hut and down the wall to where we planned for the grill to sit. With the gas line in place we were ready to start the cabinetry! 

We measured and schemed and worked out our plan.....Cabinets would be installed to the left of the fireplace, all the way down the wall to the brick smoke hut. 


The concrete patio has settled over time and is not level, so when it came time to frame in for the cabinetry we had to really play with the framing to make certain the top would be level. 


We wanted the cabinetry run to include the grill, a place for The Big Green Egg, two storage cabinets and an open shelf area, so we worked out our spacing and got all of the openings framed up. 


With the cabinetry framing done, we were almost ready to start the countertops, but before we could, we had a few loose ends to tie up, starting with the fireplace flue...

Running the flue for the fireplace was a bit tricky. Normal chimneys would just go straight up, but because we plan to place the pizza oven directly over the fireplace this would not work. Instead we pitched the flue to funnel the smoke through the back of the pizza oven which would allow the smoke to roll through the cavity of the oven and out the chimney. 


Next up Brent went to work installing the missing pieces of the fence. You may remember the fence used to be curved, but because the pizza oven will sit in this location, we needed to square it off. 


Meanwhile I was busy painting. We went back and forth on what color pallet we wanted to use out here, but ultimately decided to keep with the color combo already used on the house - taupe and a creamy white. Having the fence patched and the new color scheme start to take shape was a big turning point for the patio aesthetically speaking. 


Finally we were ready to get started on our concrete countertops. We made up a form and decided to get fancy and add a little extra wood detail in the middle of the edge (you will be able to see this more clearly later). 


What happened next = one of the most exhausting days...ever. Too dramatic? Maybe, but 
I can say with absolute certainty that concrete is officially our frenemy

Sooooooo it took 46 80 pound bags of concrete to do this countertop. If you know anything about concrete you know that not only is it messy, but when working with it, one has to move relatively quickly because it dries fast. At first it was just Brent and I going at it on our own.  We were just 2 or 3 bags in and I was certain I might die. Luckily, like an angel dropped down from heaven, Brent's brother Scott showed up and helped us. 

Carry heavy bag of concrete, dump heavy bag full of dusty concrete into tub, spray with water, stir around with shovel, pick up tub and dump wet concrete atop the cabinets. Over and over and over and over again x 46. 


It was brutal. 


At the very end, after Scott had left, we wanted to put our hand prints in the top. By this point Croix was getting cranky and was ready for his bath, bottle, bed routine. Brent and I were exhausted and covered in concrete dust, but if we wanted to do this we had to do it then before the concrete dried. Concrete is just totally unreasonable like that. ;) Brent did his hand first, then we did mine and then I carried Croix over to do his....we smushed his hand into the concrete and as soon as we lifted it out he shoved it right in his mouth. Yep, Croix ate concrete. He has never even eaten a piece of real food but he has eaten concrete. #parentsoftheyear Of course we immediately yanked his hand out of his mouth, but it was just the most appropriate ending to a grueling day. 

We let the concrete sit for several days and when we went to remove the form we were very happy to see this: 


And a close up of the wood detail:


We have a little sanding to do, but overall we are really happy with the end results. So much so in fact that the misery of that concrete filled day has disappeared and we have found ourselves friends with concrete yet again.

With the framework in place and the messy annoying tasks behind us it's finally time to get to the pretty stuff!

All photos are my own. 

Wednesday, August 7, 2013

Outdoor Kitchen Part 2


I'm backkkkkk and excited to pick up where I left off last week...

Once the countertop prep was complete it was time to start pouring the concrete. Using a wheel-barrow the concrete was mixed with water by surprise, surprise - a shirtless Shearer brother. 


The concrete process began on the far left side of the space which was the easiest side with no areas to work around.  


Essentially, blobs of concrete were dumped on the top and then spread smooth.

As the guys made their way to the far right side of the structure there was the Big Green Egg to contend with. We wrapped him in some insulation surrounded by metal sheathing to provide a gap between the concrete and the Big Green Egg as the concrete dried. This material also helped protect the BGE as we poured and spread concrete around him. 


Mix, dump, smooth, mix dump, smooth.......


Of course Luke was always close by monitoring our progress, mistaking pieces of wood for bones and trying to stay as far away from the water hose as possible. Hey Luke!


Once the concrete was poured, we let it sit for a couple of days.


Once dry, it was time to remove the wood template surround. 


Using his drill Brent removed the screws from the wood framing.


And then carefully pulled the wood framing free from the countertops. He did this along all edges of the counter surface.  


Once all of the wood was removed we had concrete countertops and suddenly it felt much more like an outdoor kitchen.


Before we moved into the next phase, Brent installed the grill into it's opening.


Finally it was time to finish the exterior. We considered several facade options but ultimately decided we wanted to go with a mix of cedar planks and stack stone.  The cedar siding would cover all parts except for the brick oven area which would be stack stone. Brent took some measurements and cut each plank to size. 


Then, I took the planks and stained the back of each piece before it was installed. 

We chose a Minwax stain which would not only pretty the planks up, but would seal the wood. We thought staining both sides would add double protection.


Once the back of each piece was stained, Brent installed each plank using his nail gun. 


And then I went to brushing the stain onto the fronts. 


In the midst of all the cutting and staining, we took a mini break and Brent put the stainless steel doors back on the grill which of course made such a difference and made the finish line seem closer and closer. 


The back of the outdoor kitchen was finished just like the front which got a little tricky as Brent had to measure and install the planks through the rails. 


Planks were even added to the Big Green Egg's hole.


The hole to the left of the grill was to be the cabinet for all of the grilling tools, so it needed a door to enclose everything. 

Again Brent measured and cut some wood for the frame of the door. 


He created his frame.


And then added planks to the front. 


Once all of the planks were installed he added the cabinet hinges.


And wah-lah - a door!


A little stain and a cute piece of hardware later and we were looking pretty good!

Somewhere between staining and making the door we took another break to revisit our concrete countertops. We were really happy with the overall outcome of the countertops but felt like the surface could be a little smoother. As you can see from the photo below the surface was rough, with pits and uneven spots. 


Not sure if you knew this or not but I'm a major blog reader myself and one of my favorite blogs, Little Green Notebook recently posted about a project where she used this product called Ardex which is a concrete overlay. She used the product over her laminate countertops. The results were awesome, so we figured we could use the same product over our concrete, just to smooth it out. 


We mixed the powder with water and poured it over our concrete. 


The material is super fine and easy to spread. 


We applied one coat, let it dry overnight and then went over it again the next day. 

We used a paint brush for the edges and then had some fun going over the whole thing once more, adding some texture with brush strokes. 


We were very happy with end results and while it was a little extra work we think it was worth it for the smoother finish.

Once all of the siding was installed and our countertops were smooth, Brent got started on the stack stone. At first Brent went to town stacking stone after stone but with one small hit of the hammer all of them collapsed. It was truly so sad. So, then we kind of decided we needed to do one row of stone a day, let that dry and then add another the next day. There may be a better way to go about this, but this plan has been working for us. 

So, there you have it - outdoor kitchen phase 2. What a difference right? We are working on the pizza oven now, come back next week to see the final results, you won't believe it!

All photos are my own.