Showing posts with label Home Depot. Show all posts

Monday, August 20, 2018

DIY Bunk Beds


What. a. whirlwind. weekend. 

In 3 1/2 days, 3 guys built-out and trimmed THIS:

For those of you that missed last weeks post, we have been planning out the transformation of our very large upstairs guest room into a cool and functional big boy room/playroom for Croix for months, and over the last 3 days a large part of that dream became a reality. 

Here is the official "before" shot of the future site of the bunks:

We taped out the location of the bunk beds, stairs and the fort. Croix was making sure the tape was in the right place on construction day!

Things got started on Thursday when Brent's Dad and Laura rolled into town. The guys reviewed, tweaked, analyzed and finalized the plan and then headed to Home Depot to load up on supplies. 

Once home, step one was covering the window. Initially we had hoped to keep the window, but it was just going to fall at a really awkward place, so we decided to cover it. From the outside the window looks just as it did, but from the inside, you would never know it existed. After that it was time to set the columns (2, 2x4s) against the left wall. These columns were especially important because they set the stage for the stability and overall layout of the bunks. The stud locations were really important here because the guys planned to anchor the columns to the studs for optimal stabilization.  So, the base was increased in depth 9" to catch the stud. This 9" space would allow us to create a lip along the front + a small ledge at the back for glasses, phone, cup of water, etc...

Next, they got started on the frames for the mattresses. The plan was to create Queen size bunks because A.) the room could handle this size, B.) we already had these mattresses and C.) we wanted bigger beds to give our home additional guest bed options when family or friends were in town. 
With the bottom mattress frame in place they installed the columns on the right side which were constructed of 2, 2x6s. These columns are bigger because more stability was needed since they would be free-floating in the space, not anchored to the wall. Remember, ability to anchor to the wall is dependent on stud location.

Electrical work was next. The guys tapped off an existing outlet to add an outlet, switch and sconce light for each bunk. 
With the framing of the skeleton up and the electrical in place it was time to start putting up the paneling. 
Croix and Gates were inspecting the paneling work on the bottom bunk, making sure everything was secure :)
Meanwhile, up top a small design change was made. At the end of the first day we had decided not to move forward with the fort. Not only was this portion of the bunk going to protrude into the space (left to right) more than we'd like but we realized the depth was going to be an issue because of the ceiling fan. In addition, Croix would definitely be able to stand atop it right now as a 2 year old, but it wouldn't be long before he would be too tall. We considered lowering the fort platform, but that would end up making the space underneath too short sooner rather than later, so we decided to just nix the whole thing. Because of this, the vertical boards going to the ceiling (look back, 2 photos before) could be cut down to make for a more open vibe.

Below is a shot that sums up Saturday....two guys working on top to cut down the verticals and two guys working down below on paneling. If we could have a house full of willing workers with every project we would be unstoppable! :)
Oh, I forgot the other guy that was around for all the action all weekend long - The Croix!
With the verticals cut down and the paneling up it was time to get the top rail installed. We added that vertical in the center so the rail would be stable, but I really like the craftsman look it brings to the whole piece. The tiny platform you see in the photo below is the landing for the stairs!
Next, came the most technical, pain-in-the-butt portion of the project....THE STAIRS. Oh the math, just typing about it makes my head hurt but here we go.... We couldn't use the standard pre-cut stairs that Home Depot offers because we had a fixed height (rise) and depth (run) that we had to achieve in order to hit the landing and ultimately the upper platform to enter the bed.  We knew we wanted a 2' platform at the top so we started from there.  We had to build the platform an extra 6"" deep to get past the column at the wall.  This left us with approximately 39" to get 5 steps up to the platform with one last step from the platform into the bed.  The steps wound up being approximately 8.5" high (rise) and approximately 8" deep (run).  The frames for the stairs were cut into a 2x10 board using precision cuts from expert craftsmen Bruce and Phillip Shearer.  
This was by far my favorite part of the project - does it get cuter than mini stairs?! 
Initially, the plan was to panel the side of the stairs, leaving only the small section against the wall for a little door. But the more we looked at it, we realized, covering up the small area right under the stairs was a missed opportunity for more storage and more charm, so....

We kept it! We will either leave it open or maybe add a little shelf inside for books/baskets.

The stairs were the last major construction element, so once those were in, the only thing left to do was to add the finishing boards over everything. This material is what gives the boards a nice smooth look - all ready to paint. The majority of this step went down on Sunday morning and by Sunday at lunch time, things were looking like this....
Talk about a labor of love! So many people took time out of their weekend to come and help us/cheer us on and we are SO happy with the results. Croix LOVES it and goes up and down the stairs over and over again. He's so excited!

Obviously we still have to sand, paint, add the little door, figure out a rail for the stairs, install lights, etc., etc. but for now we are relishing in the fact that THIS awesome beast is upstairs, only weeks away from being ready for Croix to move in! 

All photos are my own. 

Sunday, March 25, 2018

Shower Niches + Heated Floors - Croix's Bath Part 2


We've got some catching up to do! Last weekend was less about pretty progress and more about behind the scenes prepping. On Friday night we headed to Home Depot to pick up our tub.


As I mentioned in my last post we were kind of forced into upgrading the tub and after looking over the options we decided to go with this Delta tub. We were sold on the depth and the curve, both of which will give the Croix a more comfortable bathing experience and give the bathroom a more updated look. Getting the tub installed was no easy task. The tub is literally the same size as the opening it was to fit in to, so maneuvering this beast into place was a struggle.


In the image above you can see we started installing the durarock immediately after the tub was in place, but before we went any further we had to finalize our niche placement. A niche is a recess in the shower wall built to hold shampoo, soaps, etc...it's essentially a built-in alternative to sitting your bottles on the edge of the tub or adhering a basket to the wall with suction cups. A built-in niche can be whatever size or shape you choose and will be tiled to match the rest of the tub/shower surround for a cohesive look. This is a feature you can only really add when you have your shower walls down to the studs in a remodel like this or a new construction situation, so we definitely wanted to take advantage of our current state and add a niche.... or two.


That's right, we added two! Why? Well, number one, why not?  If Croix grows up to be anything like me he will likely have a plethora of bottles and soaps in the shower. And two, the long term plan is for this new bedroom of Croix's to be a shared space with a sibling so we wanted to be sure to have enough storage space for multiple people to utilize this bath.  (and no... that is not a hint towards any future announcements...)

Next, we took care of some sheetrock patching and then got busy with the next big install - heated floors. Just writing the words "heated floors" in a post about a 2 year old's bathroom makes me feel all kinds of ridiculous, but like shower niche's, this type of install is only really possible when a bathroom floor is gutted, so we thought, let's give it a whirl. We purchased the Sun Touch Floor Warming System from Home Depot.  The installation was pretty straight forward....Brent used his dremel to cut a box for the controls right next to the existing outlet. He pulled power from the outlet and then cut a another small hole at the bottom of the wall to run the wiring to connect to the coils at the floor.


Next, he and Croix rolled out the coils and we were ready to lay the tiles right on top. Here's a sneak peek of our new floors!!


This weekend we were able to knock out the floor tile and plan to grout one night this week. We have a plumber scheduled to come out tomorrow to hook up our new shower valve and then we can get started tiling the shower. We are rolling right along and can't wait to show you the finished floor and other tile elements next time we chat!

All photos are my own. 

Wednesday, January 3, 2018

Croix's 2nd Birthday


On Saturday we celebrated Croix' 2nd birthday with a Croix Town Party!!


Croix is obsessed with all things car and truck. Specifically red cars and red trucks. So much so in fact, I actually wrote him a song last year. Wanna hear it?

*Set to the tune of Twinkle, Twinkle Little Star*

Red car, red car where are you?
We've been looking all through town. 

Up, up, up the road we go.
Down, down, down but no one knows. 

Red Car, red car where are you?
Red car, red car, We love you. 

It was an instant hit :) 

As we started thinking about what to do for his birthday, one thing was for sure...He was getting a red car!  And what does any car need? A town to ride around in of course! So, Brent and I went to work and built him a town full of places he frequents often.  Places like......

Target:


Complete with popcorn and apples - his favorite items to purchase !

And Home Depot:


He got this little workbench and tools for Christmas and he has been obsessed! Now he can officially pitch in on all of our projects around the house.

And lastly, there was a Starbucks, a bad habit he picked up from his Mom. 

One of the cool things about this car is it can be operated with a remote control. So, everyone took turns maneuvering Croix + friends (Hi Aria!) around the town. 


Even his cousin Gates enjoyed some time on the road with a red car of his own!


The town turned out to be our last DIY of 2017 and was relatively easy to put together. Weeks ago we made a run to Michaels and picked up wooden letters to spell out our 3 stops (Target, Home Depot & Starbucks). We also picked up some foam pieces to form the Target symbol + the red balls that sit outside of Target.


A few days before the party we started getting everything painted.


For the roads we cut out strips of brown paper and painted them black. Once dry, we used white spray paint to make the lines. The day of the party we cleared everything out of the garage and put the town together. It was relatively simple and super cute and most importantly Croix was all about it, especially THE CAR. When we brought the car down he said"wow!" Genuine excitement, it was so cute!

It's hard to believe how much he's grown in a year. The night of his first birthday he was able to stand by himself for the first time and now only 1 year later he can say whole sentences and run, skip and dance anywhere and everywhere. He's growing up and it's equal parts thrilling and heartbreaking to watch. But from what I hear that's what this whole parenting thing is all about. Happy Birthday Croix or as he says it "HAPPY DOO-DAY!!"

All photos are my own. 

Wednesday, September 27, 2017

New Entry Door


Confession time - I'm a freak about lighting. An honest to God highly opinionated, overly critical freak about it. On one hand I love lighting and believe in the power of a great light fixture in a space, but most of the time I don't actually want to see that light turned on. Especially for a photo. I hate when the only light source in a room is from a fixture. The shadows, the light bombs, the coloring, oyyyy it makes my blood boil and my eyes hurt all at the same time. Now, I'm aware that task lighting is necessary, but to me, the happiest spaces are those that are primarily lit with natural light.

Well, guess what - the hub of our current project - the hallways right off the garage was a great example of a bad lighting situation. I've known it since the day we moved in. It has cans, it has a pretty little pendant, but it has only second hand natural light (powder room window and laundry room window) which makes it dark and shadowy. Annoyingly, it's not just the hallway, the breakfast room and stair landing are in the same boat. The latter two sit in the center of the house, and the garage is on the other side of the hallway so there has never been much hope for integrating a window BUT a few weeks ago a sliver of hope occurred to me.

Enter the existing door. 


This is the entry door from the open air garage which means just on the other side of this solid beast is sunlight. Glorious, glorious sunlight. This door needed glass. It would change everything, I just knew it. 

As I mentioned the idea to Brent I honestly had no idea how involved this change would be. Turns out, the whole thing was relatively simple.  The first step was to pick out the door so we perused the Internet to find that Home Depot actually had a pretty wide selection and their prices were pretty good at just over $200. As much as I was desperate for the natural light, I knew we didn't want a full lite door. Not the right look, plus we didn't like the idea of being that exposed from a privacy standpoint. We ended up selecting this 9-lite door and within the hour, the old door was off and the new door was on. 
Boom:


Just look at that light.

As excited as we were with the instant happy this little change had already made, this door switch-a-roo was not without some hiccups. The first, the door hardware. Brent measured the hinge location of the old door as compared to the new door before mounting and while that was all good, the latches in the door way were way off. Nothing is ever simple, sigh. Brent used his drimel to cut out new latch locations to match the new door and we used wood filler to cover the old holes, creating a seamless look. Next, it was time to paint the door. Initially we thought about painting the door white to match the shiplap walls (all just primed as of now) but then we decided NAY, let's do something fun. So, we settled on this dusty blue/gray color called Flint Smoke from Behr.

It took a few coats but I could tell we had a winner after just a few strokes. 


It's like the door was meant to be this color. So happy and so warm at the same time. And the natural light from the glass is a game changer y'all, not just for this mudroom area but for the breakfast room and stair landing as well.

We are so happy with the results, but I will say the one negative to the pretty new door is the fact that it just magnifies the ugly creamy trim color. We are still weighing options as to how to attack this. Do we paint the entire downstairs with a fresh clean white? Or do we go back with the creamier color to keep costs down and keep things consistent throughout the house. Perhaps with the new natural light flooding in the old paint color won't seem so yellow. What do you think?

All photos are my own. 

Wednesday, September 20, 2017

SHIPLAP


Last week I shared how inheriting a 100+ year old bench kick-started our mudroom and today I'm excited to show you some progress! So, as a reminder - this is the space we were working with:
The door you see with the letter magnets is the entry door from the garage. The hallway, directly to the left as you come into the house leads you down to the Powder Room straight ahead, which is where all of the light is coming from in this photo, and the laundry room and hall closet on the right side. It's a decent sized space with a lot of doors and very little natural light basically screaming....MAKE ME A MUDROOM!

To get the ball rolling on this project we could think of only one element that would really start to set the tone for this space....SHIPLAP! We wanted to add some interest to the walls and nothing says interest + mudroom like shiplap so we jumped right in.

To begin we headed to our local Home Depot to peruse the wood options. We found they actually sell 6" high shiplap and while that was tempting we really wanted the individual planks to be taller. So we decided to make our own shiplap using 8" high primed 3/4" thick x 16' long pieces of wood.
To start we talked through how we wanted the ship lap to integrate with the existing crown moulding and baseboard. Brent cut a small piece so we could hold it up against the mouldings and we quickly decided to do away with the crown and just let the planks go all the way to the ceiling. This was necessary because the 3/4" piece of wood was deeper than the bottom of the crown which would of created a weird intersect. As for the baseboards - we decided to keep those in tact. For several reasons, but mainly because the depth of the plank against the baseboard wasn't an issue and we knew  removing the baseboards would open a whole can of worms in terms of what do you do with the shoe mould that sits between the hardwood floors and the baseboards themselves? We didn't have an answer to that question, so we left well enough alone.

We started on the long wall, directly to the left when you enter through the garage. This was the longest wall so we knew there would be the least amount of cuts to do here. We started at the top of the wall because our ceilings are little over 8 feet high so we knew we would have one plank that was a bit shorter than the rest and we wanted that plank to be at the bottom.
For those unfamiliar with shiplap there is no set rule for spacing. You can make the gaps between the planks as big or as small as you want. We played with a few options and decided to leave a nickel space between our planks for a more classic look.
The process went something like this: We would measure the wall, Brent would cut the wood (when necessary) and bring it inside. Then,  I would dab wood glue on the back and we would lift the plank into place and use nickels to achieve the gaps we were going for before Brent used his nail gun to secure the wood in place. We moved pretty fast and with every board that went up we got more and more excited as the space really started to come to life! We loved the look so much we decided to continue the ship lap on the perpendicular wall that leads to the stairs. It just felt right....
Obviously those mitered + angled cuts were not fun, but Brent and his big math loving brain figured it out and we are SO happy with the results. It sounds crazy but this shiplap has completely transformed this space. This hallway used to just kind of be there and now it literally demands attention. It feels interesting and alive and the cool part is THIS IS ONLY THE BEGINNING! We haven't even painted it yet! There are so many more layers to add, but for now let's all revel in the fact that stacked pieces of wood can take a space from zero to hero.

All photos are my own. 

Thursday, March 13, 2014

DIY Console Table


Furnishing our home has been a slow process. We have really been trying to think through each and every decision before making big commitments, and as hard as it is, we are really trying not to buy things just to fill the space. It's a challenge, because every day you walk into your house and you yearn for certain rooms, especially those you spend a lot of time in to feel finished. When I feel that itch to go buy, buy, buy I remind myself that the warmest and most intriguing spaces are those furnished with items and pieces that have been collected over time with a story and soul of their own. So, instead of making impulse purchases we make mental notes of items we are looking for and then wait for them to come to us.

One item we had been after for sometime was a console table to fill the wall space to right of the entrance into the solarium from the living room. This is the wall you see as soon as you walk through the front door, so picking the right piece was essential. We had some criteria for our perfect console - we envisioned a table with open shelving perfect for housing books, knick-knacks and baskets. Because this piece would sit on the same wall as the large Barmoire, we wanted it to be shorter with plenty of wall space above for art.

We kept our eyes open for the perfect table for months and seriously considered a few options, but ultimately the contenders we found were lacking in one way or another. Then, one day we came across a picture on pinterest of a table made of plumbing pipe and wood. The wheels started turning and we realized we could make the table ourselves and customize it to incorporate all of our wants.

So, we headed to our home-away-from-home, Home Depot, to peruse their selection of metal piping.


We wanted the table to be 46" wide x 36" high so we bought an 8' piece of metal, which the nice guys at Home Depot cut and thread into (4) 18" pieces for us.   


We also picked up (10) 12" pre-cut pieces to form the top shelf and the cross bars.  Finally we topped off our basket with wall mounts, T joints, elbow joints and other miscellaneous metal pipe to create all the feet and fittings.


Once home we started putting all of the parts and pieces together.


We screwed 3" pieces into the wall mounts (the technical term would be a base flange) to create the feet.  


Next we connected T joints and used 18" pieces to create the space between the first and second shelves, using 12" pipe to create crossbars where the wooden shelves would sit. We repeated the process for the next level using 12" pipe rather than 18".


Once the metal structures were assembled, we spray painted them black. 


While the metal portion dried, we went to work creating our shelves. Using a 2" x 12" x 12' plank, Brent cut (3) 46" pieces with his miter saw to form the individual shelves.


Next it was time to stain the shelves. We chose the Rust-Oleum's Varathane finish - "Ash".

Brent applied the stain....


and then wiped it dry....


Once all of the various components were dry it was time to install!

Brent screwed brackets into each shelf to hold it in place.


And then he mounted the piece to the wall.


Success!! We hung some art on the wall and accessorized the shelves.....


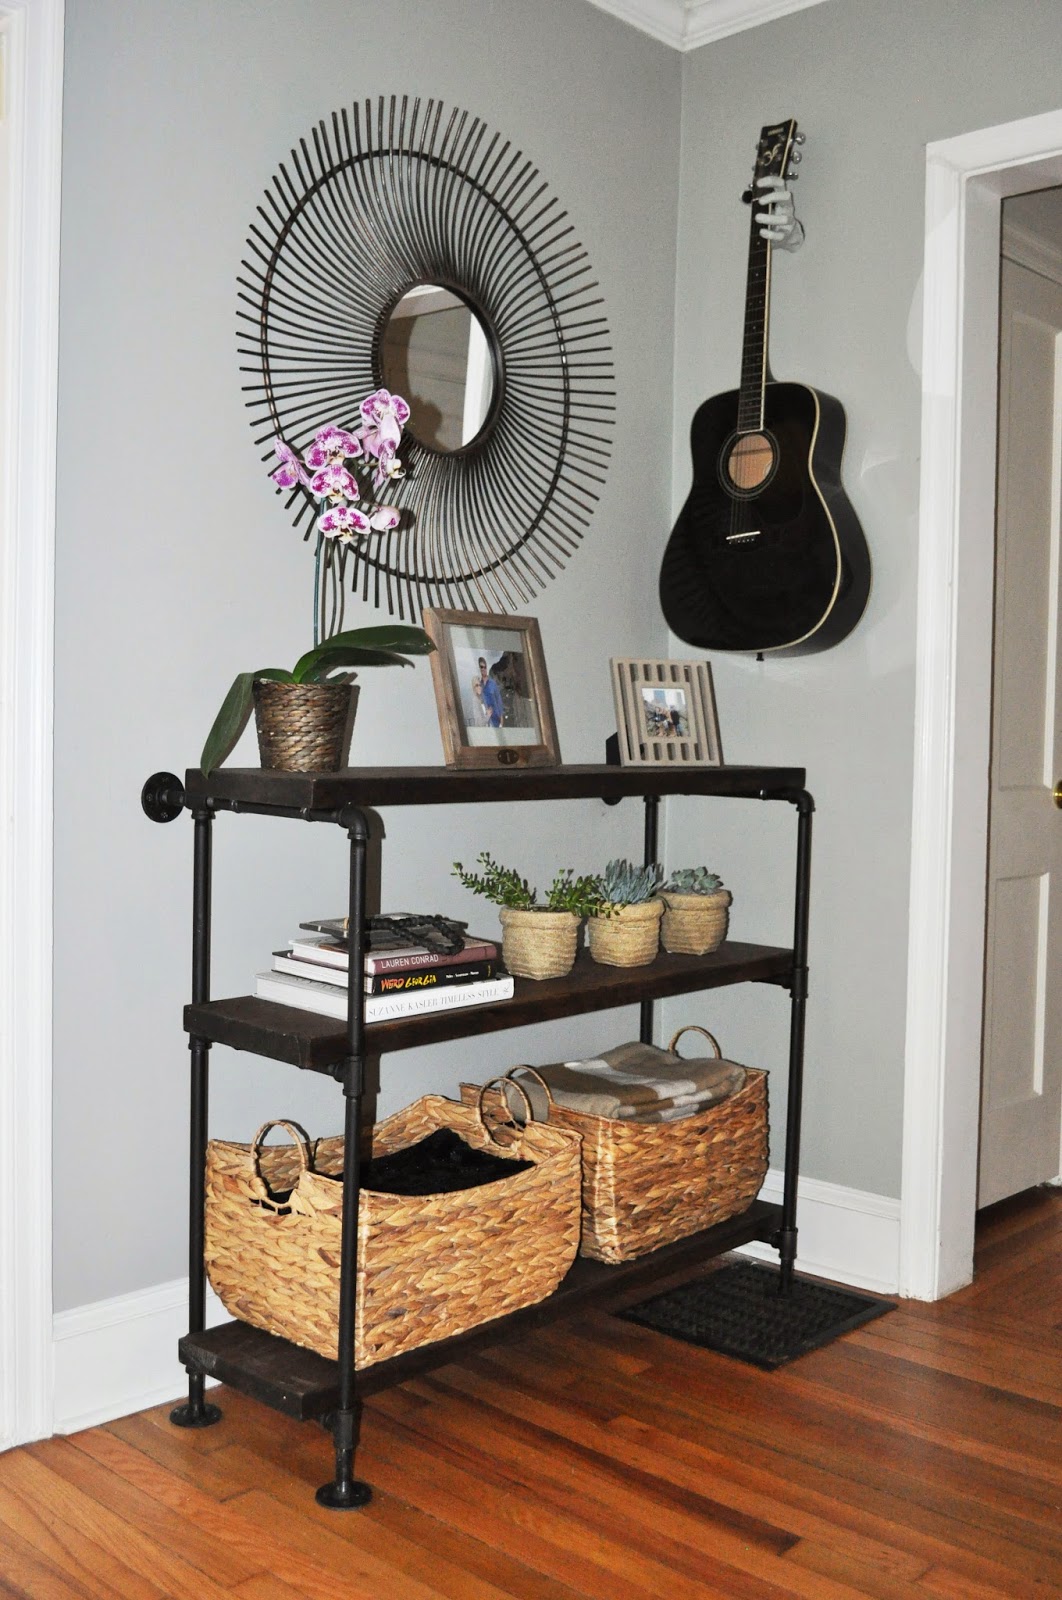
And just like that our console table dreams came true... (yes that is a hand guitar mount we found...LOVE!) 


I love all the extra storage space this little guy offers. We have this large block sub-woofer that was sitting on the floor in this location since we moved in...attractive, I know. I was bound and determined to find a basket that would hide that little devil so it didn't mess up our aesthetics. Luckily, I was able to find the perfect baskets to house not only the sub-woofer but also blankets, magazines and miscellaneous Playstation gear. 


Seeing this project completed is so satisfying. Not only does the piece look great and possess all of the features we were looking for, but it was pretty darn easy to make and much more affordable than a lot of the console tables we found online or at stores.  The all-in cost of materials was less than $100!!! And if you want to take on a similar project but don't have a miter saw, Home Depot can cut the wood for you! 

The living room feels SO much more finished now that this wall is filled and I love that we were able to fulfill a need for our home and create a fun piece without sacrificing aesthetic, function or budget. Three birds, one stone - DONE!

All photos are my own. 

Sunday, March 3, 2013

Everybody's Workin' For The Weekday

I swear this will be my last "my house" post for a few weeks. As many of you know, in addition to remodeling our first house, Brent and I are getting married in May. This weekend was our last full weekend without any parties, showers, trips or other wedding related activities so we were determined to take advantage of it.

We wanted to chip away at several big items on our "to do list", which happened to be DIY (Do It Yourself) face-lift-esque type projects.

The first item on the list was adding a little umph to the dining room. Below is a shot of one of the the dining room walls as it was Saturday morning. We liked the original chair-rail but wanted to jazz it up a bit.


After tossing a few ideas around we decided we wanted to add moulding under the chair-rail to create picture frames.  


We measured the walls and decided we would add seven picture frames around the room. So, we got out the tape measure and made marks where each of the frames would start and stop. 

Next, we headed to Home Depot to pick up our moulding. 


And.....TA - DA!!


How spiffy does this space look now? With a little paint and a few more finishing touches this room will be move-in ready! 

With a big check-mark on the dining room (for now) we headed back into the living room to focus on the fireplace and it's stone surround. Below is a "before" picture of the fireplace. It's kind of hard to see from this shot but the tile surround was a shade of peach. Ugh - it had to go. 


I like peach in clothing, in shoes and even in some textiles, but in tile... no, not for me. 


Like every decision, we tossed around several options, but we kept coming back to the fact that the tile met up with the hardwood flooring. Thus, options involving covering the tile with another surface, wouldn't work because it would create an uneven transition, and we didn't want to go through the process of busting up the tile. So we decided to paint the tile White, White Dove (OC-17) that is to match the fireplace and the trim in the room. 

While I'm typically not patient enough for primer, we decided it would be a good idea in this particular painting escapade because it will block stains and odors that may come from using the gas fireplace.


One coat of primer, one coat of White Dove and WHAM! BAM Thank you Brent....


OK, I'm exhausted. In the words of my Dad, I've got to get back to work so I can get some rest! Up next, the #StoneMountain Kitchen reveal, stay tuned you guys are going to flip. 


All photos are my own.