Showing posts with label Deck. Show all posts

Thursday, November 20, 2014

Have you ever wanted to stab a deck?


Living and learning is the WORST. 

I mean, can I get an amen? 

Mistakes, we all make em' and yes, they are a part of life but sometimes they can leave you wanting to punch something. This was the case a few weeks ago when we stained our deck.

It all started innocently enough; we were having a party and thought it would be nice to give the deck a refresh. There was nothing wrong with the existing deck, it was just looking a little drab especially in the presence of the newer outdoor kitchen.


Before we could dive into staining, we (Brent) first had to power wash everything to thoroughly clean the planks, railing and lattice all of which would be getting stained. That process went smoothly enough so we headed to Home Depot to pick out our stain. Let me just say, there was ZERO research done prior to selecting the stain. We literally stood in the stain isle and picked something out. If you've ever picked out stain at Home Depot, you know they have a display showcasing the different stains on wood, so you can get a better idea of what your end results will look like. We settled on Acorn Brown, which was a nice light, light brown with a natural vibe going on. Or so we thought...

As is typical when preparing for a party, the days fly by and the projects and tasks, both large and small start to add up. Before we knew it, it was Wednesday evening, 3 days before the party and we knew we had to start applying that stain. We started on the far end of the deck, the part with the swing and pergola. Brent began applying the stain to the higher areas with a roller attached to a long stick while I used a paint brush to paint the lattice. About 10 minutes in we both realized this was going to take forever and was really, really messy. The stain is really thin so in order to get coverage you had to literally slosh the stain everywhere which resulted in residual stain spray and drips galore. OK, well maybe you didn't HAVE TO slosh it on, but going all slow and meticulous would of taken days, and days we did not have. In addition to the mess and the torture that was applying the stain in all those nooks and crannies, the color was coming across pretty dark and kind of reddish.  You all know I'm all about instant gratification, so had the stain been pretty I may of been more motivated. But as the minutes passed I got more and more depressed because it was getting uglier and uglier and the ugliness was spreading with every stroke of the brush.

We forged on and finished all of the railing and pergola that first night. Eventually the sun went down, which made painting more difficult, but at least we couldn't see the red. The next day, we had no choice but to finish, an all red deck was better than a half red, half drab one.


Yeah, so it's not so much that the color is terrible in general, just terrible next to the outdoor kitchen wood and not at all what we had in mind. 


Oh, oh, oh AND as if the color wasn't bad enough it started raining just as we were finishing up so some areas ended up darker than others and some of the stain literally washed away leaving a spotty appearance. Fabulous, I know. 

Needless to say we were feeling REALLY smart right about now. The end results were terrible and we had nobody to blame but ourselves. In hindsight there are two obvious things we should of done differently: 

  1. Allotted more time to this project so we could take the more meticulous approach, we went fast and it showed. 
  2. Tested the color in a small little patch before committing and applying the stain color everywhere. 
SIGH. 

We lived with it for weeks, trying to figure out how to fix it, remove it, change it...etc...then, one day while we were having a guy give us a quote to paint the house we asked how much he would charge to power wash the deck and re-stain. The quote was good so we decided to go for it. DIY is all fun and games until a mess up costs you too much time and $$ and then you know it's time to hire a professional. 

The guys came out and began power washing, only to find that in doing so they were messing up the wood. Because Brent had power washed weeks before and the stain was brand new, the guys said power washing the wood to re-stain was not a viable option and the wood wouldn't hold up. So, we decided to have them paint everything. After a little deliberation we decided on white for the rails, pergola and swing. 


Doesn't the white make it look 10 times fresher already?

For the lattice on the back of the deck and the deck floor we decided on a light gray. 


Clearly Luke is a fan!

The new colors work SO much better with the house AND the outdoor kitchen, don't you think? Now the deck compliments the wood surrounding the outdoor kitchen instead of fighting it. 100% improvement in my book. 

Here's a shot of the back of the house:


So fresh and classic, eh? 

It's amazing what a difference a little paint can make, both good and bad. Thankfully we are on the good side of color again, WHEW!

All photos are my own. 

Sunday, August 25, 2013

Outdoor Kitchen Finale

Well, we are finally here.....the FINAL reveal of our Outdoor Kitchen Series. So, last we talked the outdoor kitchen was a few stack stone layers short of being complete. But, it was missing the cherry on top, the pizza oven.

To get the ball rolling on the pizza oven we first had to determine how large to make it, we settled on a diameter of 30". This dimension was basically pre-set by the size of the countertop slab and the estimated thickness of the brick pavers and stone facade we had in mind.

Prior to laying any bricks, Brent measured, made some marks on a piece of plywood, drew the 30"circle and then cutout the template.


We set the template in place, which was nice to have as a visual to see how large the piece would be once on the countertop. We wanted to make sure it was in scale with the space. 


Next, Brent added pavers around the template, essentially tracing the shape. 


As we began to think about the dome, Brent planned to make a mold to ensure we got an even sphere from the brick pavers. The plan was to cut flexible trim pieces to create this dome.

To do this we had to revisit high school geometry and by we I mean Brent, because math was never my favorite. Hold on to your hats, we're about to get technical:

The circumference of a circle is 2 * pi * radius. Based on a radius of 15", the circumference of the entire sphere would have been 94.25", however since we were only cutting strips to account for 1/4th of the sphere, we only needed them to be 23.6" each. 

That made my head hurt just writing it.....


Once the strips were cut, Brent attached them to a center pillar....


...and we had the skeleton of the dome.


Once the dome template was finished it was put aside and we went to work on the floor of the oven. Brick pavers were used for this area as well and we got all fancy and decided on a herringbone pattern. Of course this meant more measuring, cutting and


dust, lots and lots of dust. 


Once the floor of the oven was complete the dome template went back in and we started building up the walls, again using the brick pavers. 


The first few rows were relatively straight, so we didn't need to use the dome template; but after the third row of brick the template was necessary to ensure we captured the proper shape of the dome.  We used cedar shims to help form the curve. 


As you can see in the pictures, we are using basic brick pavers for the form of the pizza oven.  Midway through the process my PapaJack brought up the subject of fire brick.  We did some research and found two products that are commonly used in high temperature situations, fire brick and fire clay. Fire brick is a block while fire clay is a mortar set. However, neither of these products are carried by major home improvement stores (Home Depot, Lowes, Ace, etc.) but we found a local construction supply store that carried the fire clay. Because we had already purchased all the brick pavers from Home Depot we decided to proceed with the brick pavers to form the dome and planned to coat the entire inside and outside with the fire clay to ensure heat protection.  


Layer by layer the pizza dome took form. 


Once the pizza oven was completely formed, we coated the entire outside with the fire clay to ensure heat resistance. 


Next, we needed a door for the pizza oven. 
We used the template previously made up to create the opening to the pizza oven.


Added some simple gate hardware...


and wah - lah a door!


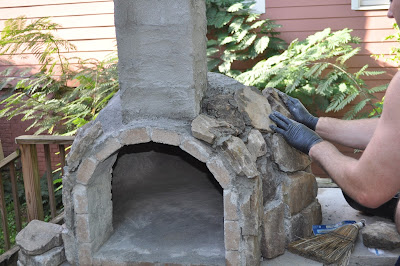
Now we were ready to add the stone. Every night Brent would add a layer all the way around the dome while finishing up the base along the way. 


Using the same brick pavers used to make the pizza oven frame we created our smokestack (chimney) cap. The pavers were cut in half to create the base of the chimney cap. When making any smokestack the height and width of the smokestack is key in ensuring proper air flow throughout the chamber. 


Once the legs were installed we topped it off with a large flat stone.


A few more layers of stack stone, some serious sweeping and cleaning and a firewood search (it's seasonal...who knew...) later and we were DONE! 

So, for those of you just joining us, this is what we started with....


And here is where we are today.....
Ta- DA!!!!


Pretty sweet transformation, huh?

Here's the view looking out from the solarium.


We installed a friendly lion head bottle opener to the side of the cabinet and added this leafy plant.


Here's a close up of the pizza oven. 


So, to answer the question I know you are all wondering....Yes, we have already had a test fire in the pizza oven and yes, it works! 


I did catch Brent sitting and staring at this outdoor kitchen for a good 15 minutes earlier today. He claimed to be "watching the fire" but I think he was admiring his work. Who could blame him? This outdoor kitchen is the bomb dot com and we plan to enjoy the heck out of it!

All photos are my own.