Showing posts with label Outdoor Kitchen. Show all posts

Sunday, November 4, 2018

Pool Update + Living & Learning Confession


I'm popping in on this Sunday with a quick update on our patio progress + a little confession about some stresses we've faced with this project...


The landscapers FINALLY started last weekend and have been moving full speed ahead since then. As exciting as it has been in theory to watch the work progress each day, it's also been a little nerve racking because we really don't know what we are doing. Well, let me rephrase, we aren't physically doing anything, but throughout this process we have realized we are kind of just going forward and hoping that the decisions we have made are the right ones. We clearly have great craftsman around us, but no real leader. Maybe I'm more sensitive to this because I play the role of this leader for so many of my clients when it comes to their homes, but for us and this big, expensive project we are kind of flying solo and it's scary!!

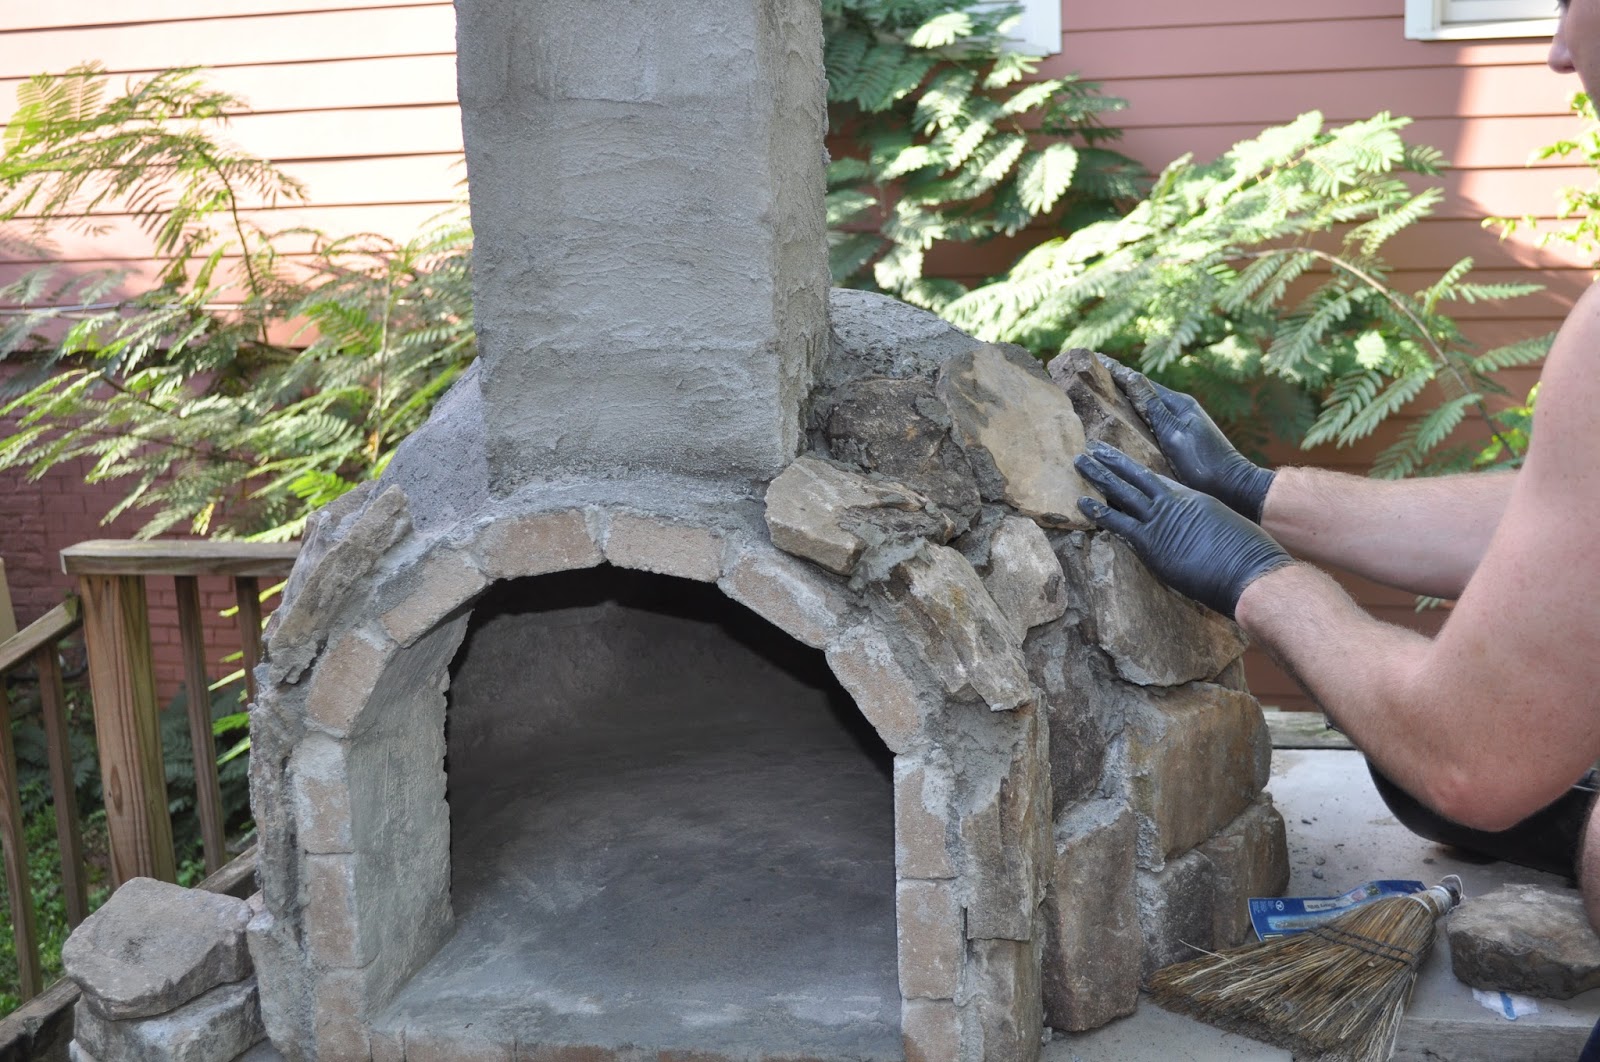
Here is a shot looking at the pizza oven. They still have to finish the stack stone up the wall by the hot-tub and they will be adding plaster on the face of the fireplace (covering the brick) to match the plaster already added to the body of the pizza oven. Still trying to decide what we will do with the chimney...leave brick or plaster? 


I'm admittedly on one far end of the spectrum when it comes to details and consideration. It's a great trait to have when it comes to ensuring all the i's are dotted and the t's crossed for my clients, but for me and my house, it can actually be somewhat paralyzing. For most projects we tackle, I'm far too aware of the abundance of choices and have a hard time nailing down a direction for fear of something more exciting or creative coming to me later. But with this pool, I know nothing. I know what I want it to look like at the end of the day, but I have no real frame of reference when it comes to materials, pricing, combinations, pros and cons of this vs. that. I'm completely at the mercy of the people around me and like I said, those people are not big picture thinkers. They are focused on their specific task at hand - stone, fence, concrete, demo, whatever. There is no person with a beautiful rendering of our future back yard that has spent months talking us through our decisions that is leading the charge. Nay, it's just me and Brent, Pinterest and our imagination.  I'm constantly haunted by the "what ifs" ....What if we spend all of this money and it doesn't end up looking like what we had thought? What if we go to work one day and come home and find that the work they did that day did not align with our contract or vision (this has happened). It feels so vulnerable and frustrating!

This is the progress on the side steps! Do you guys remember this area? It used to have that weird "hut structure?" Well, that was removed and the new steps are going in. Already looking so much better!


Could we have gotten a landscape architect? Yes and maybe we should have, but you know, money doesn't grow on trees.  At a point we honestly just didn't know what we didn't know. Thankfully, I truly do think it's all going to come together, but I thought it might be helpful to others out there to know of some of the struggles we have faced. Whether you are doing a pool, a bathroom, building a house or renovating a coat closet - I have a new found respect and sense of compassion for any of you out there going through that on your own. And let this post serve as a reminder to you and ME that there are professionals out there for a reason. To think that just because you are good at one thing makes you a good enough expert on another is a recipe for disaster. All the respect for those out there owning their corner of expertise, may we all be wise enough to find those people and lean on their experience and knowledge when it comes time to tackle our dreams.

And this is the shot of the progress for the steps coming from the house. We have a new awning coming (woo!) and the rest of the landscaping (grassy area) will hopefully be starting this week. 


All photos are my own.

Tuesday, May 10, 2016

Patio Project - Part 2


Last we talked we were in the thick of the demo phase and since then there has been a lot of concrete dust,  concrete lifting (ouch), math that makes my head hurt and progress...sweet, sweet progress. It really helped to get all of the clutter cleared out so we could start with a nice clean slate to really dig into the details of the new vision. One thing we knew for sure was the pizza oven was going to be the center point of our new patio plan, not because it is necessarily the favorite, but because it will literally sit in the middle, so we decided to start there and work our way out. As you saw a few weeks ago, the existing patio/fence has an angled bump out in the corner which was weird and random ,but strangely enough the perfect spot for the pizza oven.

The pizza oven itself will actually sit atop the existing angled concrete wall, so the first step was to remove the wood fence in this area. Our property actually goes back a bit behind the fence so once the pizza oven is built we will square off the fence behind it.


Next, we used cinder blocks to create the structure for the base of the pizza oven. The structure is 72" wide and 36" high.  The overall size of the structure was determined based off the fact that we want the pizza oven itself to be around 48" wide on the inside. We came up with a system where I applied the mortar and then Brent followed behind me with the cinder blocks.


It moved pretty fast and before we knew it we had our walls. 


Because the pizza oven is so large this time, we decided we wanted to create a fireplace underneath. Last time we left this space open below for wood, which was cool, but because this pizza oven is so much bigger we thought it would be a better use of the space to utilize it in this way. 

For the opening of the fire place, we had to make our form to pour the concrete arch. We stacked up two pieces of plywood and then drew out an arch on the top piece. The size of our arch was determined by the size we wanted the fireplace opening (24" high x 30" wide). Brent clamped the two pieces of plywood together so he could cut the arch out of both pieces at the same time. 


The form needed to be 8" wide (the size of the short side of a cinder block) so we took our pieces and nailed them together with spacers to create the form. To set the form of the actual arch we put a piece of sheet metal across the bottom arch, which we had just cut out. 


Once together, the arch form was set in place between the walls of our cinder block structure and Brent and Adam poured concrete inside. 


We let the concrete set for 2 days and then we removed the forms and......


BOOM! 
Next we framed out the inside walls of the fireplace; again using cinder blocks to create the walls. We left a hole in the back for the flue. We had to make sure the flue was pitched so the smoke would go out the back and not out the front hole of the fireplace, which was a bit tricky but we were able to accomplish using plywood forms.

Once the walls were up and the flue forms were set up we got got another couple hundred (exaggeration) bags of heavy, dusty concrete and poured the top. 


Here is a shot of the top....


And here is a shot inside the fireplace with a glimpse at the flue opening.


During this same time we decided to hire a crew to help us out with some grading and to pour the concrete for the new steps. 


Brent and I had to jet away for a quick over night trip on the big concrete day, so my sister and brother-in-law were in town to watch Croix Boy for the night. They were busy tending to his cute self so they enlisted Piper to keep watch over the progress outside. 


When Brent and I got home the next day we were super excited to see this:


We designed the top step to be longer than the rest to create a bench for additional seating. We are so happy with how this turned out! It's crazy what a difference removing the deck and adding these steps make. It's also crazy what a 3 man crew can achieve in 6 hours. If Brent and I had attempted this work we would probably have it completed by the time Croix goes to kindergarten...MAYBE... DIY is great and all but you definitely have to recognize your limits and concrete + steps = ours. 

We made even more progress this past weekend but I will save that for my next post so as to save my wrists from carpal tunnel. :)

All photos are my own. 

Thursday, April 7, 2016

Patio Project - Part 1


We started our first big project here at the new house last weekend - our backyard patio makeover! We have been in this house for almost 6 months and while we have done little things here and there, it feels really good to find ourselves with motivation and creative juices that are flowing again. Last year was a whirlwind to say the least. We did a lot of projects at our first house in preparation of the Junior League Tour of Kitchens, right after that we found out I was pregnant and then right after that we began the process of selling that first house and buying this one. Needless to say when we made the big move in October we were TIRED and that tiredness did not subside with the addition of Croix in December. BUT we are BACK and excited to tackle this new project! So excited in fact that one minute doodles were happening on a napkin in a restaurant and the next minute we were literally ripping our current patio apart.

Before we get into the nitty gritty, let me show you what we started with...AKA the before photos.

The backyard is long, so there are several views of this space, here is a shot standing in the grassy area looking at the patio/deck:


This patio came with few quirky yet cool features like this brick fireplace/grill you see in this shot. 


And this fire pit...


Here is a shot of the small deck leading onto the patio from the den:


And here is the view of the patio standing on the deck:


On the opposite side of the back yard, past the grassy area is this fence that is covering the air conditioning units + a door to our crawl space:


The backyard as a whole was one of the elements that really excited us about this house. We loved that it had a fence for Luke and loads of potential for us to create a fun area to entertain and relax. It's been used and abused and really needs a refresh, but beyond that we really want to make this outdoor space the best it can be so the plans we have dreamed up include: an outdoor kitchen complete with a pizza oven, a hot tub, a TV and a clean and tranquil vibe. Oh, and a shed of some kind to store outdoor equipment and tools. 

We are still working out a lot of the details but there were a few things we needed to do demo wise to get the ball rolling. First up,  we ripped up off the deck.


We decided the deck needed to go, because there was no real need for it. The backyard is only a few steps down from the den and the deck was making the space feel unnecessarily crowded and choppy. 

Next, we began tearing up the brick pavers:


We don't plan to keep the existing foot print of the patio, plus a lot of the pavers were in pretty bad shape so we decided to rip them out to create a clean slate. Interestingly, the pavers were just sitting atop concrete, so they came up pretty easily.

We made a lot of progress last weekend and as of now our backyard looks like a complete disaster zone; however, we all know sometimes it has to get uglier before it can get better!

All photos are my own. 

Wednesday, October 15, 2014

Man Caves & Man Crates


This post is for all you Cow Spot reading dudes out there. I was contacted by a company called Man Crates to create a design board for their Man Cave Makeover Campaign. I thought this was a perfect opportunity to revisit our outdoor kitchen a year later.

To me, a man cave is to a man what a giant walk in closet with an island, a chandelier and a whole wall of shoe storage is to a woman.  Or maybe that's just this woman. Regardless, this is their happy place, a space all about them and their hobbies, friends and weird boy obsessions. Because our house is on the smaller side, there really wasn't a room available to dedicate to a man cave for Brent. So we decided to turn our back deck into an outdoor kitchen/man oasis. For those of you new to the party blog we DIY'ed ourselves an outdoor kitchen last year. Long before we actually began working on the project we created a design board to organize our thoughts.


Brent was the driving force behind this project. He was very specific about certain things he wanted, all of which were very much man - grill, TV, pizza and the outdoors.

There was a specific rhyme and reason for every single element on the board. Let me show you around...

  • We got The Big Green Egg for a wedding present from Brent's coworkers and this gift kicked off the idea for the Outdoor Kitchen. 
  • After honeymooning in Italy, Brent came back bound and determined to have his own pizza oven. 
  • Brent's Dad had given him the grill the Christmas before and it fit perfectly within the design.
  • We loved the organic look of cedar siding with concrete countertops mixed with stack stone. The various textures are not only aesthetically pleasing, but hold up extremely well to the elements.
  • Extra storage was a must for all of Brent's grilling tools, of which there are many. 
  • And of course no man cave is complete with out a ginormous freaking TV (complete with surround sound of course).
Here's where we started:


And a lot of dust, tears and sweat later here is the finished product:


And we can't forget the icing on the cake.......the TV and it's house:


Over the past year we have enjoyed the heck out of this space. Georgia football has been watched, ribs have been smoked and pizzas have been made. This space is truly the gift that just keeps on giving. Speaking of gifts, I wish I would of known about Man Crates last year when we completed the project because their "Grill Master Crate" would of been the perfect present to christen our outdoor kitchen.

Man Crates truly is God's gift to anyone challenged with the task of purchasing a gift for a man. Man Crates has created a wide variety of themed crates, including the Personalized Whiskey Crate, Retro Gamer Crate, The Bacon Crate, NFL Bar ware Crate and for you Walking Dead fans out there the Zombie Annihilation Crate. You simply pick the crate that best suites your man and the crate will be shipped with a crow bar to open it up! A man's dream....just like this post.

To read all about our Outdoor Kitchen project, check out the various posts below:


All photos are my own.The design board was made with Olioboard - check out more of my boards here

Monday, September 2, 2013

TV in a Box.

THANK YOU for all of the positive feedback on our outdoor kitchen. We are so proud of how it turned out and it was so cool to hear that so many of you liked it too!

I'm back this week with another deck project to add to our repertoire. As if the installation of an outdoor kitchen wasn't enough, the posting of this project will likely have every guy on this side of the Mississippi flocking to our deck. I can sum this project up in one word: Television. I mean, no deck with an outdoor kitchen is complete without a T.V. right?? Apparently the answer to this is yes.

As I mentioned at the beginning of the outdoor kitchen series, we have a large deck that just screamed for an outdoor kitchen, and as that project was winding up we suddenly had a large wall on this same deck just begging for a TV. I've clearly lost all control.

Below is the open wall we had in mind for the TV. It is flanked by a guest room window and the doors into the solarium.


We found a TV, picked up our supplies and then we began the measure-cut-assemble dance to create a box for the TV.


A little roof was added to the box for protection from the elements. The wall is already partially covered by an eve, but we figured an extra roof couldn't hurt, plus it would be cute, so.....done. 


Once the box was constructed it was time for the doors. 


4 evenly sized doors were cut and installed with hinges so they would operate as bi-fold doors. This way they could fold back when the TV was on without obstructing the view. 


Now it was time to install this beast. 


Once the box was installed it was time to pretty it up. For paint we decided on white so the box would blend into the color of the house. We went with an exterior paint with a semi-gloss finish. 


We added some black shingles to the roof of the cabinet.  Using the same style shingle and lining up the pitch of the roof with the existing roof helped the unit blend in and look like a part of the house, rather than something we just threw up there.  So, basically it's a tiny, adorable replica of our actual house. 


About the time the roof was going on my parents showed up and my Dad was put to work. He gave some guidance on the roof and then installed some beefy ring hardware on the doors. 


Once we had the cabinet box looking good it was time for the TV. A mount was installed to the back wall.....


and the TV was carried out and installed. We all breathed a sigh of relief that it fit perfectly.


Brent installed some outdoor speakers and got the cable hooked up and we were good to go. 


Here's a shot of the unit closed:


and here's a shot of it open:


We hosted our first shin-dig at the new house on Saturday for the UGA vs. Clemson game and got to try out the outdoor kitchen and watch the game on the new TV. Brent cooked up some ribs, wings and sliced pork.  It was a great time up until the Dawgs lost and our hearts were broken. But, that's OK we plan to get a lot more use out of our new deck area for many football seasons to come!

All photos are my own. 

Sunday, August 25, 2013

Outdoor Kitchen Finale

Well, we are finally here.....the FINAL reveal of our Outdoor Kitchen Series. So, last we talked the outdoor kitchen was a few stack stone layers short of being complete. But, it was missing the cherry on top, the pizza oven.

To get the ball rolling on the pizza oven we first had to determine how large to make it, we settled on a diameter of 30". This dimension was basically pre-set by the size of the countertop slab and the estimated thickness of the brick pavers and stone facade we had in mind.

Prior to laying any bricks, Brent measured, made some marks on a piece of plywood, drew the 30"circle and then cutout the template.


We set the template in place, which was nice to have as a visual to see how large the piece would be once on the countertop. We wanted to make sure it was in scale with the space. 


Next, Brent added pavers around the template, essentially tracing the shape. 


As we began to think about the dome, Brent planned to make a mold to ensure we got an even sphere from the brick pavers. The plan was to cut flexible trim pieces to create this dome.

To do this we had to revisit high school geometry and by we I mean Brent, because math was never my favorite. Hold on to your hats, we're about to get technical:

The circumference of a circle is 2 * pi * radius. Based on a radius of 15", the circumference of the entire sphere would have been 94.25", however since we were only cutting strips to account for 1/4th of the sphere, we only needed them to be 23.6" each. 

That made my head hurt just writing it.....


Once the strips were cut, Brent attached them to a center pillar....


...and we had the skeleton of the dome.


Once the dome template was finished it was put aside and we went to work on the floor of the oven. Brick pavers were used for this area as well and we got all fancy and decided on a herringbone pattern. Of course this meant more measuring, cutting and


dust, lots and lots of dust. 


Once the floor of the oven was complete the dome template went back in and we started building up the walls, again using the brick pavers. 


The first few rows were relatively straight, so we didn't need to use the dome template; but after the third row of brick the template was necessary to ensure we captured the proper shape of the dome.  We used cedar shims to help form the curve. 


As you can see in the pictures, we are using basic brick pavers for the form of the pizza oven.  Midway through the process my PapaJack brought up the subject of fire brick.  We did some research and found two products that are commonly used in high temperature situations, fire brick and fire clay. Fire brick is a block while fire clay is a mortar set. However, neither of these products are carried by major home improvement stores (Home Depot, Lowes, Ace, etc.) but we found a local construction supply store that carried the fire clay. Because we had already purchased all the brick pavers from Home Depot we decided to proceed with the brick pavers to form the dome and planned to coat the entire inside and outside with the fire clay to ensure heat protection.  


Layer by layer the pizza dome took form. 


Once the pizza oven was completely formed, we coated the entire outside with the fire clay to ensure heat resistance. 


Next, we needed a door for the pizza oven. 
We used the template previously made up to create the opening to the pizza oven.


Added some simple gate hardware...


and wah - lah a door!


Now we were ready to add the stone. Every night Brent would add a layer all the way around the dome while finishing up the base along the way. 


Using the same brick pavers used to make the pizza oven frame we created our smokestack (chimney) cap. The pavers were cut in half to create the base of the chimney cap. When making any smokestack the height and width of the smokestack is key in ensuring proper air flow throughout the chamber. 


Once the legs were installed we topped it off with a large flat stone.


A few more layers of stack stone, some serious sweeping and cleaning and a firewood search (it's seasonal...who knew...) later and we were DONE! 

So, for those of you just joining us, this is what we started with....


And here is where we are today.....
Ta- DA!!!!


Pretty sweet transformation, huh?

Here's the view looking out from the solarium.


We installed a friendly lion head bottle opener to the side of the cabinet and added this leafy plant.


Here's a close up of the pizza oven. 


So, to answer the question I know you are all wondering....Yes, we have already had a test fire in the pizza oven and yes, it works! 


I did catch Brent sitting and staring at this outdoor kitchen for a good 15 minutes earlier today. He claimed to be "watching the fire" but I think he was admiring his work. Who could blame him? This outdoor kitchen is the bomb dot com and we plan to enjoy the heck out of it!

All photos are my own.