Wednesday, October 9, 2019

Chicken Drama


I have to tell ya, I never thought I would have a blog post titled - "Chicken Drama" but here we are....no really, here I am holding a chicken and a baby. Ha - what a sight :)


OK, on to the drama....

In mid July around 6:40am each morning we started hearing a loud crow coming from our backyard. Not an ideal sound to hear when you live in a neighborhood in the city, not a farm and you are under the impression that you had 3 female chickens.

Now let me tell you, figuring out whether you have a male or female chick is kind of a crap shoot to begin with. There are no obvious, um... "parts"... if you will, to confirm the sex of the baby chicken. What there is, is a lot of voo-doo-like tricks that are done to guess. In our case the guy held each chick in his hand and dangled a piece of copper wire on a string over the chick to determine the sex. Umm...yeah....maybe we should be thankful we don't have a backyard full of roosters.

The crowing culprit - Lou our Barred Rock chicken. In this post I described Lou as the undeniable leader of the group. When the crowing first started we dug deep into Google to find out if it was possible to have a crowing hen. Turns out, it is. From what we read, in small back yard flocks with only hens, it is not uncommon for one of the hens to take on the role of alpha and crow. We hoped this was the case, but even if it was we couldn't have a crowing hen, alpha or not. So, we decided to do what any sane-minded person with 3 chickens, one of which crowed and two children would do - we got another chicken. Actually we got 2 more.

Meet Dolly


& Pearl


Our thought - if we brought in a new chicken that was a bit older then it would be the alpha and Lou would stop crowing. So, we got Dolly - a Lavender Americana. Dolly is a year old and was already producing eggs when we got her. Because Lou, Dot and Pip had been together since day one we didn't want to introduce Dolly to the group alone so we got Pearl at the same time. She is a Silkie and a few weeks younger than the original 3. 

We quickly learned that a pecking order is real. The new chickens did not receive a warm welcome from the group. Maybe I'm naive, but in my mind, the girls would invite them in, show them the nesting boxes, Lou would stop crowing and the 5 of them would live happily ever after, producing an array of colored eggs for us. WRONG. The OG chickens were not happy to meet the new chickens and were down right mean to them. Especially Lou. Dolly, our hopeful alpha was clearly intimidated by Lou and quickly owned her lowly position on the pecking order.  So now we had chicken fights AND a crowing chicken. Sadly, we were forced to make the hard decision to send Lou to live on a farm in Tifton, GA. It was a bummer to lose her, but the flock as a whole as been better since. Now, a few months later all 4 chickens are friends, no one crows AND Dolly started laying eggs!


It took her some time to get acclimated, but once she did we started getting these pretty blue eggs just about every other day.

Once we started getting eggs we took right to Amazon/Etsy and got ourselves all set up with half dozen boxes. Once the other girls start laying too, we may go with the full dozen size containers, but for now, how legit do we look?

Life with our backyard flock is pretty sweet right now. It's fun to check the nesting boxes each day for an egg and the excitement in finding one never gets old! We look forward to the multi-colored eggs in our future, but for now,  we are just happy everyone is getting along and no one is crowing.


All photos are my own. 

Friday, October 4, 2019

Console Table Makeover


Well, I'd say the first week of October is a good time to come back from summer vacation :) We had a great summer and really did try to lay off home projects and enjoy all the work we had done, namely our pool + backyard (hello...chickens!!). It was nice to relax, well as much as one can relax with a 3 year old and a now crawling baby roaming around. But now that it is officially fall we are ready to dip our toes back into some home improvements.

The first project kind of fell into my lap by way of my friend - Facebook Marketplace. Every time I'm in a new town I like to peruse the site to see if there are any treasures waiting to be snatched up. Last Saturday I found this gem in Tifton, GA for $65.

Yes, her coloring is, well hideous, but look at the bones. I love the fluted details, the curves of the top, the leg positioning, etc. Plus, I've been in the market for a console table for awhile now for the stair wall off the mudroom.


We've had this hutch that belonged to Brent's Great-Grandmother on this wall since we moved in and while I like the piece it just wasn't working for two reasons. Number one, several rooms in our home open to one another in the center of the house. An open floor plan is great, but the issue I was having was too many wood furniture pieces with different tones in one line of sight. We have our breakfast room table, a china cabinet, the antique laundry room door AND this hutch, all wood and all in different tones. It was just too much and this hutch sat in the center of it all, so it only made sense for this to be the piece to go. And number two, I don't have very many surfaces to house picture frames and I felt like this hutch was taking up prime real estate for a nice family photo right when you walk in from the garage.

As soon as we got the table home I started testing out possible paint color contenders.


We settled on Elephant Ear a pretty, true gray by Sherwin Williams. The next step was to sand the beast down and get the shine off.


Next up we got to painting. We bought the Behr Ultra paint + primer in one from Home Depot (did a color match for the Sherwin William's hue) which worked out really well, because it only took one coat. There were a few areas we touched up after it was all dry but the paint went on nice and smooth and the piece became prettier with each stroke of the brush.

Things got fun when Croix decided he wanted to help, so I talked him in to letting me paint the body of the piece and he could finish it up by painting the top. He was SO excited and only asked me 100 times if I was done yet and ready for him. Finally, it was his turn, and while wet paint (inside) + his 3 year old bouncy self could of been a disaster he did a pretty good job.


As soon as the paint was dry I was maneuvering this piece into it's new home and wow - love, love, love the way it turned out.


I had plans to replace the hardware but the distressed, brass knobs that came with the piece looked great with the new color. This side of the house feels so much more airy now and I love having a place to check my teeth before I walk out the door :)


For now I put a family photo from a few year's ago on the shelf, but I'm excited to get an updated version with Lot in there soon!

All photos are my own. 

Sunday, June 30, 2019

Meet Our Chickens


OK, OK for anyone tired of chicken talk, today will be my last blog on all things chicken, but now that you've seen their house (coop) we figured you'd like to get to know the girls a little better, specifically what breed of chicken they each are and what color eggs they will produce. When we started researching chickens we had no idea there were so many different kinds. Their look, temperament, egg production and egg color were some of the main characteristics we honed in on.

Obviously a pretty chicken with pretty eggs was high up on the wish list, but the highest priority to us was the chicken's temperament. Because these animals would be in our back-yard and around us all the time as we grilled, played in the pool, worked on projects outside the shed and just hung out, it was important that our chickens be nice and friendly. There were some that had really pretty hair/fur (ha) but were known to be skittish and broody, so we marked those off the list quickly. Each of our chickens are a different breed and each will produce a different color egg, but the one thing they have in common is their easy going personalities. Oh, and they are all female....we think/pray ;). With that being said, let's get to the introductions...

Up first, meet Lou, she is our Easter Egger. 


Lou has always been the biggest of the 3, as she is older than the others by about 10 days. She is also undoubtedly the leader. We aren't sure if that's because she has always been bigger or if it's just her natural personality, but the other 2 follow her around wherever she goes. We figured out quickly, the fastest way to get the chickens to like us was to suck up to Lou, because if the other girls saw Lou sitting in our lap, then they would follow suit. 

Lou is prettier than most Easter Egger Chickens because she was crossed with a Barred Rock, so her coloring is striking -  black with white stripes. 

Easter Egger chickens typically produce about 200 eggs a year and the eggs can range in color from light blue to green to brown. Though the eggs can be a lot of different colors, whatever color she lays first will be the color we always get. 

Next, meet Dot, she is our Light Brahma. 


Dot was a tiny little yellow chick with fuzzy feet when we got her, but those yellow chick feathers have now been replaced by white feathers with black specs. Her fuzzy feet have remained though. This is a signature characteristic of a Light Brahma and gives them a fancy-schmancy look. She is already really pretty and regal looking. 

Her eggs will be light brown and she should lay 3-4 eggs a week, even in the winter when a lot of chickens don't lay as many. 

And finally, little Pip - Our Olive Egger.


Pip has always been the smallest of the 3. As a tiny chick she had dark black feathers and still has the same look today. She will likely be the most boring to look at of the 3 (sorry Pip) but her eggs should be really pretty. Olive Eggers lay olive green eggs.  Pip should lay 150 - 160 eggs a year. 

We got the chicks from the same farm so they have been together (at least with us) from the beginning. They are very close and travel in a little pack around the yard. They have eaten all of my mint and marigolds and like to peck around at the grass. We try to hold them a good amount to keep them used to human interaction which is working pretty well so far. Of course we have to remind Croix, pretty much every 2 minutes, NOT to chase the chickens and NOT to shoot the chickens with water guns, but all in all, they have adjusted really well.


Most chickens don't start laying eggs until they are 5-6 months old so we probably have a good while before we get our first bounty, but in the meantime we really enjoy just hanging out in our backyard, swimming, grilling and chicken watching. 

All photos are my own. 

Wednesday, June 26, 2019

6 Months of Lot


Today my Lot Thomas is 6 months old. 


This kid, ya'll....he's just so good. Like honest to God the best baby. He is so laid back and go with the flow. Wakes up happy, only really fusses if he's hungry or gets overtired (he likes a schedule!) and is so patient with the sometimes overwhelming "love" from his big brother. Speaking of big bro Croix....

 He has loved Lot every minute since he met him and can make him laugh like no one else.

People warned us that going from 1 to 2 kids would be such an adjustment and a lot more work, but honestly life as a family of 4 has been awesome. Lot fit right into our life and now at only 6 months in we can't imagine life without him. He's the kind of baby that could make you want 10 more. Just saying.....:)

All photos are my own. 

Monday, June 17, 2019

We Have Chickens + DIY Chicken Coop


As we approached the finish line for the shed we took a little detour down the road of, "hey, lets get chickens!" It's really all my sister's fault. We were at a family reunion back in April and she showed us this instagram account of this girl who lives in Greenville, SC that had the prettiest chickens. Who even knew chickens could be pretty?! Honestly, not me, but even better - these pretty chickens produced pretty eggs and lived in the most charming coop. She could tell we were intrigued so she pushed further and said, "y'all should build a coop and get chickens too!" We laughed it off, but the seed was planted and the next thing I knew we were laying in bed perusing chicken breeds and fantasizing about our kids growing up in the middle of Atlanta with a piece of the farm life right in the backyard.

Lucky us, there was enough space on the right side of the shed to add a little coop, plenty big enough for 3 chickens.
Just like the shed, we started with 4 posts in the ground to set the perimeter of the structure.
The plan was to create a chicken run, 5 feet x 5 feet. The run would have 4 walls covered in chicken wire with a door on the front that locks to let the chickens out or keep them safe inside.
Once the chicken run was complete Brent built the coop. The coop sits on top of the run and this is where the chickens sleep at night and lay their eggs.
In the photo above, do you see the 3 little compartments on the front of the coop? Those are the nesting boxes where the chickens will leave the eggs. Brent put a flip down door to cover this portion for easy access to the eggs.
Both the coop and the nesting boxes got the same roof detail as the shed and as you can see from the photo above the roof line of the coop matches that of the shed as well. The chicken wire was installed next. The specific chicken wire was a point of discussion because I thought it might be cool to do something different here. Maybe a black chicken wire in an unusual shape? I was initially opposed to the"standard silver chicken wire" because I didn't think it would go with the vibe of the space aesthetically, but upon more research Brent found that the standard silver chicken wire was really the best because the weave was tighter which kept varmints out. According to a lot of research and feedback from fellow chicken owners, weasels, rats and snakes were the main cause of death for chickens. So, we went with the standard stuff and I'm so happy we did. Not only does it give us peace of mind that the chickens are safer this way,  but aesthetically it just blends in, and I realized after the fact, the lack of  statement it offers was exactly what was needed.
The open counter space you see in the photo above is my planting bench!  We just used 2 x 8 boards and sat them atop the chicken run to create the table. This is definitely one of my favorite details of this addition and one that I have already utilized many times! Brent added 3 holes to the back side of the coop for breathe-ability and I love the charm the little holes with chicken wire bring to this side of the coop. 
Back inside the coop Brent cut a hole in the floor for the trap door. We purchased this door that you can set on a timer to open and close at certain times of the day. The door closes at 9:30pm when it gets dark and opens again at 7:00am. 
Brent built a ladder that connects the chicken run to the chicken coop so the chickens can easily scurry up or down. 
Brent also built a series of perches inside the coop for the chickens to sit on. They like to be up high, so he gave the several options to choose from. 

While Brent constructed the coop, I worked on painting both the coop and the shed. We painted everything the color Kendall Charcoal by Benjamin Moore. I love the color. I'm not sure if it's appropriate to say a shed is chic, but........
She is pretty sharp, eh?

We got the majority of the coop built before we brought the chickens home, but it was a few weeks before we could let them live outside full time. A few weeks ago we showed the girls their new home and we feel like they were pretty impressed with their digs. More on the chickens soon, but for now, here's a shot of the girls headed home. 


All photos are my own. 

Sunday, June 9, 2019

Shed Update


Graciouuuuusss! I am SO behind on blogging. Life has been crazy and we have been chugging along on projects so it has been hard to find free time, but I have a lot to share, so let's jump right into it.

The Shed. 

You know you are getting old when having a whole day or weekend (gasp!) to dedicate to shed building gets you excited, BUT, alas here we are. Between the weather and family activities, the shed kind of got put on the back-burner for a few weeks. Luckily we found ourselves with some good dedicated time to dig in so we did just that. Last we talked the posts had been set in concrete and the floor joists had been installed. Next up, Brent laid a piece of plywood over the floor joists and ran his electrical up through the floor in two spots. We had coordinated to have power pulled to this location of the yard when we were doing the pool, so Brent pulled the electrical first at the back of the shed for outlets that would be installed on the back wall and then again at the front of the shed so a switch could be run to operate the lights on the front wall. Speaking of walls....those were next!


The first wall the guys tackled was the back wall. The plan was to build it, install the siding and get it painted before it was installed.


The shed is only about a foot from the fence, which is why this sequence of events was our best bet; if we had waited until it was installed it would have been really hard to paint as the ladder wouldn't fit behind the fence...


Once that wall was up, the side walls followed. The front wall was the trickiest because it had the door. Brent ended up constructing it in the garage and then some of our neighbors were super gracious and helped him carry it over to the shed. It was HEAVY and not something Croix and I felt we could be super helpful with :)


Once all the walls were up, it was time to install the siding on the rest of the shed.


Next, Brent trimmed everything out with 1x4's which really started to give it a more finished look.


For the roof we originally planned on installing shingles similar to those on our house, but somewhere a long the way I started thinking it would be cool if the roof was metal. Just something different for this structure since it wasn't actually attached to the house. On one of Brent's many trips to Home Depot he came across this corrugated plastic roofing material and brought home a piece for us to consider. It has the look of metal, but will hold up a lot better and won't be too loud when it rains (even though I think that's about the best sound in the world).


The cute factor went up about a million points with the addition of the roof. The scalloped edge detail hanging off the front is just so good looking and we were and are super happy with our choice here.

Last, we worked on the doors.  Once the doors were cut, we played around with specifics on the ground before Brent got everything nailed into place.


The cross pieces had to be really considered here because those pieces would be what the hinges mounted on. After a lot of playing around with spacing, we got it all figured out and set the doors in place.

Now.....this would seem like the appropriate time to start painting, but it was about now that we decided to get chickens and add a coop to the side of the shed. Yep, you read that right, but you will have to wait until next week to see how that unfolded. For now, I will leave you with this shot of the finished shed, painted and all.


Paint color: Kendall Charcoal by Benjamin Moore.

All photos are my own. 

Tuesday, April 2, 2019

Laundry Room - DIY Countertops + Vintage Sink


I'm back with more updates over on the laundry room front! Today is all about our vintage sink and DIY countertops.

Last we talked I explained that Brent made a wood top and back splash/ledge to cover the dryer outlet + the access hole on the side of the washer/dryer cabinet. Well, we got the wood top secured into place and then set out to DIY ourselves some concrete countertops.
The plan was to use the Ardex Feather Finish to achieve the look.  It's a pretty simple process, mix the powder with water, stir and then apply over top the wood tops. 
The entire wood top + the back splash/ledge (separate piece) was covered with the Feather Finish and then left to dry.
As you can see the texture is kind of bumpy and rough, but once it was all dry the next step was to sand everything smooth.
With this product you can apply, sand and then apply again and sand to get your desired finish. Lucky for us, we were happy with the end results after only one coat and one sanding spree.
We have DIY'ed ourselves some real concrete countertops with our outdoor kitchen (read all about that here...Croix ate concrete at 6 months old... GASP!) and it was BRUTAL. This was way easier, cheaper and honestly, gives a much more finished look. 
Let's bounce to the other side of the room. 
The room originally came with a plastic utility sink. It was a good sink and we used the heck out of it, especially when washing out paint brushes. When we got the room cleared out for the tile demo we decided to remove the sink and start the process of looking for a replacement. We talked about several options, the two primary ideas being - making or having a cabinet made to hold an apron sink or purchasing a wall hung sink. We liked the idea of the added storage with the apron sink idea, but the all in cost once you purchase the sink and then either the materials to make the cabinet and or the cabinet itself just started feeling expensive. And the wall hung option was no different. Some of the wall hung sinks we looked at were over $1k which was NOT in the budget for a laundry sink. We kind of put the sink on the back-burner with bigger fish to fry when I remembered  Scott's Antique had sinks. Old, dust/rust covered vintage sinks.  Lucky for us Scott's was in town a few weekends ago so we loaded up our crew and headed down to see what we could find.

We found two whole rows of options in various sizes and condition and plumbing orientation.
While several of the options would of worked we really liked the 51" cast iron sink with side washboard. A classic. It was listed as $425 but Brent was able to get the guy down to $300. Way, way less than a brand new sink and this one was a true vintage piece with history and grit. It was perfect and we were so excited to get it!
Once home we started working on getting it all cleaned up. We started by simply wiping it down with soap and water. Then, we used CLR to remove all the rust. Once this step was done the plan was to get the sink mounted and then paint it with porcelain paint in place. 

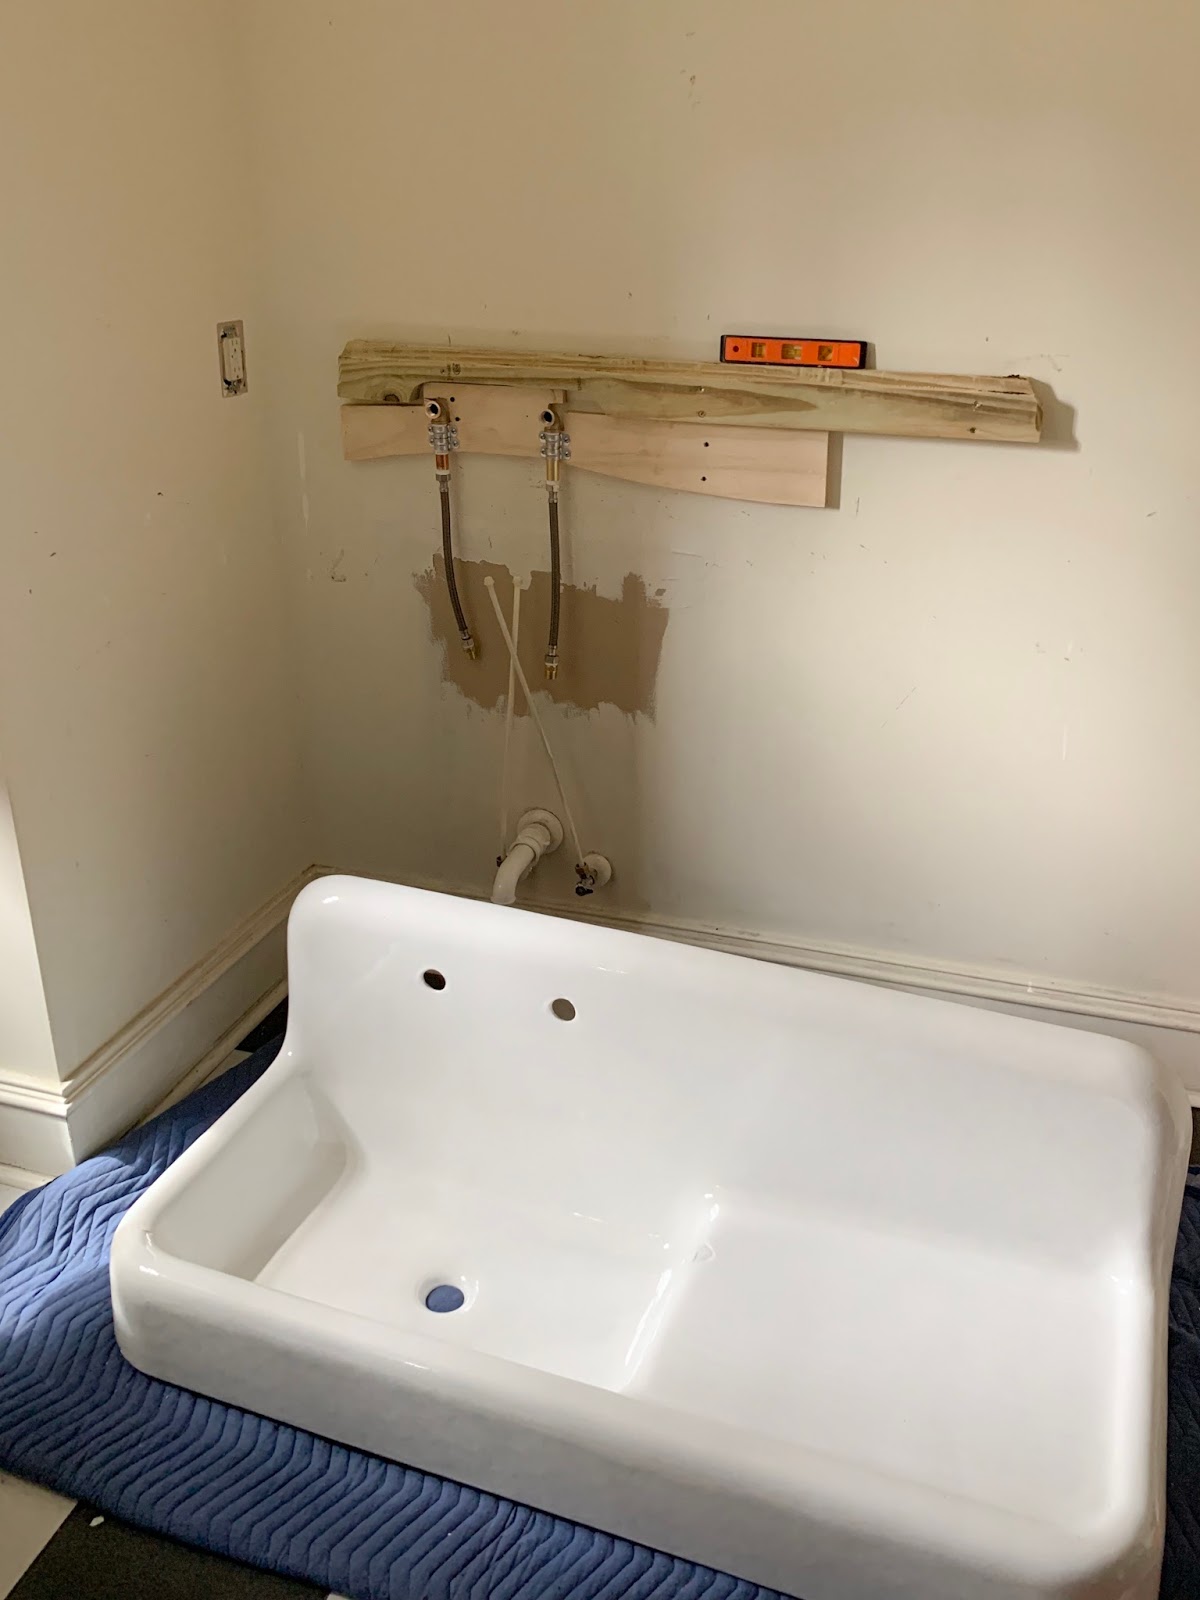
This sink is HEAVY so we really had to think through the best approach to secure it to the wall. Obviously attaching to the studs was the name of the game, but we didn't want the stud locations to dictate our placement, so Brent made a brace, spanning the entire length of the sink. It attached to 3 studs and the sink itself is able to lip right on to it for ease of moving. Well, I say ease. The sink is probably 100lb so it's not easy per-say, but you get what I'm saying...

In the photo below you can see the brace I'm referring to. The piece of wood underneath that was another issue we had to over come...
When a sink is planned to be wall mounted from the beginning all plumbing lines are installed in the wall. Because this sink was originally a standard sink, the plumbing lines came from underneath which didn't work with our faucet holes coming from the back of the sink. So, Brent had to create another wood piece to mount the plumbing supplies to. The sink was off and on the wall a few times during this whole thing. In order to get the exact location of the holes Brent laid underneath the sink and held up a piece of wood behind so I could mark the center of each hole. Then, he used that mark to mount the plumbing parts. After that, the sink had to come down so the new board could be mounted. Once the new board was in place we had to mount the sink again to make sure all was lining up...

... and thankfully it was! With all the rough-in plumbing in place it was time get the faucet hooked up. We found the perfect vintage-esque polished wall mount faucet here

  Not only does the sink give off a really cool retro vibe but it provides another counter space for me to stack folded clothes on AND it's the perfect location to sit my plants that need to drain when I water them once a week. 
I mean gosh, does it get more charming? 

All photos are my own.