Thursday, July 25, 2013

Homemade Bar

A few months ago we were riding around when we passed an antique store we had been in a few times. We decided to pull in and see what was new. As we got out of the car we saw this cool armoire sitting outside in front of the store. We checked it out and found it was an old TV cabinet with drawers and a turn table for the television inside.

The finish on the piece was really cool and it had these pretty metal X's in each frame of the door. The storage capacity was great in that there were three drawers, open shelves and a large open area at the top that Brent knew he could fill in with more shelves, depending on what we wanted to store in there. Overall it was a pretty nice piece, but would need some TLC to clean it up a bit. We weren't sure exactly what we would do with it but it seemed like a piece we could definitely use, in our living room, in a guest bedroom, somewhere.


So, we did the haggle dance for a few minutes and ended up buying the piece for $125 dollars.


We loaded her up and we were on our way. 

This was right in the middle of our major renovations so the piece sat in our solarium for months while we worked on the house. Every now and then we would admire the piece and talk about what we would do with it. Then, one day Brent had the brilliant idea to turn it into a bar. At the time we were in the thick of finalizing our cabinetry layout in the kitchen and we both realized we would not have a lot of extra space in the kitchen. In fact, we knew we would be storing a lot of our dishes in a china cabinet, so there definitely wouldn't be room for bar ware and alcohol in our kitchen cabinets. 

So, we held on to the bar idea and went on with our renovations. After we started moving furniture into the house we decided the armoire/bar would go in the living room and would flank the door heading into the solarium which leads to the deck. We figured when we entertain it would be nice to have the bar set up in the living room so everyone can have easy access whether they were over for a cookout on the deck or watching a UGA game in the living room. And when entertaining was not going on we would keep it closed and it would just be a nice piece of furniture to add to our space.


Now that we found the piece a home in our living room it was time for project re purpose TV cabinet into Bar. 

It started out like this:


We wanted to cover up the back of the piece with a mirror, not only to cover up the hole, but to give the piece some depth. We lucked out and found a piece of plate glass mirror at Home Depot that was the size we needed.  Brent covered the back of the armoire and the back of the glass with Liquid Nails. 


   and set the mirror in place. 
Once the mirror was in place it was time to frame it out. We bought some little rosettes and fluting at Home Depot. 


And Brent installed them around the plate glass mirror to create a frame. 


Because this piece needed to look as good open as it does closed we wanted to jazz up the frame a bit so we applied a nice gray stain that we thought would compliment the interior of the cabinet nicely.


We got a little stain happy and decided to paint the turn table as well. 


Wah lah! Isn't the contrast nice?

Our next step was to add some pieces to enhance the storage and make this piece look more like a bar. First we installed wine holders on each side of the cabinet. I was afraid adding these would make the bar top area seem crowded, but I was happy to see the space was still nice and open after these pieces were installed and our wine was in place.


 We ordered some wine glass holders and installed them on the top of the inside of the cabinet. 


Several of our friends and family members gave us wine glasses for wedding gifts, and now we have the perfect place to display and store them. 


We went to work organizing and storing bottles of various liquor and mixers on the shelves below.


Wait, I'm not finished yet.

What happened next was all Brent. As if turning this cabinet into a bar was not enough, we had to  take it to the next level. It all started one day when he put a dibs on one of the drawers.

Urban Dictionary's definition of Dibs:

"Dibs - the most powerful force in the universe, it is used to call possession of a certain object or idea. There are very few things that trump dibs." 


We had plans to store coasters, coozies, aerators, etc...in some of the drawers, but didn't have an exact plan for all of them. But all that changed the day Brent decided to turn one of the drawers into a humidor for his cigars. Yes, a humidor. By the time he mentioned the idea to me he had it all planned out in his head.

He took the measurements of the drawer and lined the inside walls and bottom with cedar wood. 


Next he cut a top for his drawer humidor. 


Once the top was in place it was time to add hinges and hardware.


And finally he stained the inside of the box using the same finish we used on the mirror frame and the turn table. 


How cool is that? He's crafty that Brent.

The humidor/drawer is the first drawer in the stack and such a genius use of the space. I'd say we got our money's worth out of this piece of furniture. We've tried the bar out a few times and it works well. We still have a decent amount of space left inside some of the drawers and the shelves. It's crazy how exciting it is to be organized, even if it's only party gear organization, it counts :) CHEERS!

All photos are my own.

Wednesday, July 17, 2013

#Agnes Bath Reveal

I love a good face lift story. No, not a housewives style face lift, I'm talking about a room face lift. There is nothing better than taking a room in need and giving it new life by doing a little nip here and a little tuck there. You may remember I introduced my #Agnes bath project back in April - a master bath in need of a makeover. Well, after much planning and finish selecting the space was gutted and put back together layer by layer and today it's ready for it's close up. 

Everyone knows a before picture to glance at before seeing the final reveal is like the cherry on top of that hot fudge sundae.  So, without further adieu, the before shots:

Photo provided by the homeowner.

Photo provided by the homeowner.

Photo provided by the homeowner.

And today.....


I wanted to start with this view of the room which is similar to the first "before" shot above. While you can't see many of the specifics of the space, you can already tell it's a much happier, brighter and welcoming room.

The cabinetry originally stretched across most of the left wall with a tall linen cabinet to the far right. While the amount of cabinetry was good the orientation and organizational opportunities were just not there. So, we decided to split the vanities into his and hers with a tall mirror in between. This way we could give each person the internal cabinetry resources they needed for their routines. 

The room is long, but somewhat narrow so it was hard to capture the long walls in their entirety. So I'm going to show you one vanity at a time. Let's start with "her side": 


For her side two wall cabinets with drawers underneath were installed on top of the countertop. 


The wall cabinets have adjustable shelves inside to house various toiletry products. An outlet was placed in the far right wall cabinet for her hair dryer to plug into and the adjustable shelf gives her hair dryer, brush and mirror their own resting spot. As for the drawers, a girl can ALWAYS use a drawer. Whether for make-up, q-tips, jewelry or other miscellaneous bathroom must-haves the more drawers the better. 

His side:


We designed the vanities to look identical from the outside, but sometimes what you see isn't necessarily what you get. His needs were different, so the inside of his cabinetry was customized to fit his requirements. 


While it appears he has the same wall cabinet with the drawer underneath, not so, his wall cabinets have adjustable shelving all the way up with no drawers underneath, just a door made to look like a door/drawer. 


Surprise! A trash pullout is hidden behind what looks to be a drawer bank. In my opinion a trash cabinet in the bathroom is genius. Every time you finish a bottle of shampoo, open a new tube of toothpaste, use a q-tip, a tissue, etc...you have to throw it away. How convenient to have that trash can right at your finger tips. Most people hide their trash cans away in the water closet or leave it out in plain sight, but how nice to have it tucked away, nice and neat, but still super accessible? Like I said...genius.

Notice it looks as though both vanities have a drawer bank under their sink. Nope - tricked ya again! What you're seeing is a door made to look like three drawers. Actual drawers under a sink can work, but after you maneuver around the plumbing, sometimes you are left with little storage space. These cabinets became a great place to store extra towels, toilet paper, etc...


And this is my best attempt at capturing this whole wall at once. Hello beautiful.


The vanity color is Sherwin William's Mega Greige SW7031 and the countertops are Cambria's Sussex. The cabinetry and the mirror were custom made by Bell Kitchen & Bath Studios

The finish and distressing for the mirror was a custom application for this project.

For years the homeowner would have to stand on the tub deck to get a full view of her outfit in the vanity mirror. I think we can all relate to this issue. I mean, the shoes are sometimes the best part of the outfit and if you can't see them.....failure. So, this tall mirror was our solution. And bonus, it adds an additional layer of texture and interest through the size and distressed finish. 

On the other side of the room, the garden tub was removed and the shower was completely gutted and enlarged.


The tub is MTI's Melinda, how beautiful is this piece?  Oh and that light! I don't have a picture, but the lighting before didn't work and was out of scale for the vaulted ceiling. THIS light is the perfect size and adds another layer of pizazz to this side of the room.


The shower and the bathroom floor were tiled in a beautiful porcelain tile. 


 We went with the herringbone pattern on the floor and a vertical installation on the walls, both in the shower and surrounding the tub. The depth of color and linear movement in this tile is beautiful. It looks like natural stone but because it's porcelain you get the look without the maintenance. 

The walls were painted Sherwin William's Incredible White, SW7028 which created a nice calming background allowing all of these finishes and textures to come alive. 

Well, there you have it, the #Agnes bath in all it's glory! It's always exciting to be a part of a face lift project. You spend so much time planning and dreaming and searching for just the right solutions and finishes. Once the demo begins it's such a joy to sit back and watch the space take shape as each component is added until it's finally complete and ready to be enjoyed for years to come! 

Unless otherwise noted all photos are my own.

Wednesday, July 10, 2013

Front Porch Love.

Y'all, I'm becoming so domesticated. This new house has me interested in doing things I never before thought I would care about. Like yard work for example. A few weekends ago it was numero uno on the ol' "to do list." Numero uno as in before shopping, exercising, catching up on the DVR and hanging out with friends. WHAT'S HAPPENING TO ME!?!

Here's the thing, I'm a proud homeowner. No, seriously a PROUD, obsessed homeowner. I've never owned a house before and I want this one to speak to you as much from the outside as it does from the inside. It's all about first impressions people. Think about it:

First impressions happen all the time. Whether you are meeting someone new, considering a book on the shelf, passing by a display in a window or find yourself mesmerized by the preview for next week's episode of the Bachelorette, first impressions are uber relevant and ultimately set the stage for things to come. Or, maybe more importantly first impressions set the stage for your overall interest based on your first glimpse of what could be. Deep I know, that's why they call me Yoda - HA. God knows the inside of our house has gotten it's fair share of love over the last few months, so what a shame it would be if our front porch didn't give people the right impression of allllll the hard work that has happened inside.

Below is a before shot of the front porch. 

Yes, that is Brent shirtless in the reflection. We have since spoken about wearing shirts for photos taken for the blog. OY VEY. :)

The house came with the cheery red front door, that may or may not stay. Still debating that one.....But do notice the engraved door knocker we got as a wedding present.


Awhile back I used some of our Crate & Barrel gift cards and snagged two metal planters. I loved the color and the size was just right for our little porch.

While shopping for our flowers, we went up and down each and every isle, noting our favorites and discussing various grouping options. Not sure if I mentioned this, or if you could of guessed, but I know NOTHING about plants and chose everything strictly based on it's pretty factor. Brent's a tad more knowledgeable, but ultimately we just plan to fake it till we make it in the gardening department. Finally, we settled on four different plants that would all share the space inside our planters.


We started with some soil .


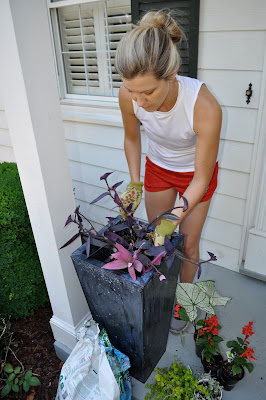
And then began loading in the various plants, one at a time.


Arranging and finagling the little devils into place.
  

A little pop of red.


Adding some Kool-Aid....
JUST KIDDING, it's some kind of flower growth potion.


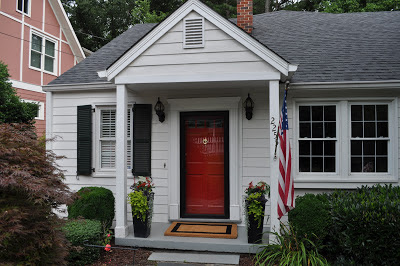
And finally....................TA DA!!! A Green thumb is born.


Pretty snazzy, huh?


Pretty planters filled with beautiful flowers - check! But that door mat was not working for me. While our front porch is by no means large, the door mat looked drawfed up there on the stoop. It was out of scale and needed to be larger. Unfortunately the door mat was new-ish with all tags ripped off and the receipt long lost, so I decided to be extra careful with my selection of door mat #2. I searched and searched until  I finally found just what I was looking for at Pottery Barn.  My final selection: a black picture frame EXTRA LARGE 30" x  48"doormat. 


So much better, right?


Now that's one happy porch right there! 

Confession time... We actually planted these flowers about a month ago, but I couldn't publish this post because I was on the hunt for the door mat.  It's been hot here in Georgia, so we feared for the lives of our new plants. But, one month in and I'm happy to report that because of watering the plants diligently, the growth potion (Miracle Grow) and the monsoon we got over the 4th of July weekend, our plants are plush and still intact. GREEN THUMB CITY RIGHT HERE. :)

All photos are my own.