Sunday, August 25, 2013

Outdoor Kitchen Finale

Well, we are finally here.....the FINAL reveal of our Outdoor Kitchen Series. So, last we talked the outdoor kitchen was a few stack stone layers short of being complete. But, it was missing the cherry on top, the pizza oven.

To get the ball rolling on the pizza oven we first had to determine how large to make it, we settled on a diameter of 30". This dimension was basically pre-set by the size of the countertop slab and the estimated thickness of the brick pavers and stone facade we had in mind.

Prior to laying any bricks, Brent measured, made some marks on a piece of plywood, drew the 30"circle and then cutout the template.


We set the template in place, which was nice to have as a visual to see how large the piece would be once on the countertop. We wanted to make sure it was in scale with the space. 


Next, Brent added pavers around the template, essentially tracing the shape. 


As we began to think about the dome, Brent planned to make a mold to ensure we got an even sphere from the brick pavers. The plan was to cut flexible trim pieces to create this dome.

To do this we had to revisit high school geometry and by we I mean Brent, because math was never my favorite. Hold on to your hats, we're about to get technical:

The circumference of a circle is 2 * pi * radius. Based on a radius of 15", the circumference of the entire sphere would have been 94.25", however since we were only cutting strips to account for 1/4th of the sphere, we only needed them to be 23.6" each. 

That made my head hurt just writing it.....


Once the strips were cut, Brent attached them to a center pillar....


...and we had the skeleton of the dome.


Once the dome template was finished it was put aside and we went to work on the floor of the oven. Brick pavers were used for this area as well and we got all fancy and decided on a herringbone pattern. Of course this meant more measuring, cutting and


dust, lots and lots of dust. 


Once the floor of the oven was complete the dome template went back in and we started building up the walls, again using the brick pavers. 


The first few rows were relatively straight, so we didn't need to use the dome template; but after the third row of brick the template was necessary to ensure we captured the proper shape of the dome.  We used cedar shims to help form the curve. 


As you can see in the pictures, we are using basic brick pavers for the form of the pizza oven.  Midway through the process my PapaJack brought up the subject of fire brick.  We did some research and found two products that are commonly used in high temperature situations, fire brick and fire clay. Fire brick is a block while fire clay is a mortar set. However, neither of these products are carried by major home improvement stores (Home Depot, Lowes, Ace, etc.) but we found a local construction supply store that carried the fire clay. Because we had already purchased all the brick pavers from Home Depot we decided to proceed with the brick pavers to form the dome and planned to coat the entire inside and outside with the fire clay to ensure heat protection.  


Layer by layer the pizza dome took form. 


Once the pizza oven was completely formed, we coated the entire outside with the fire clay to ensure heat resistance. 


Next, we needed a door for the pizza oven. 
We used the template previously made up to create the opening to the pizza oven.


Added some simple gate hardware...


and wah - lah a door!


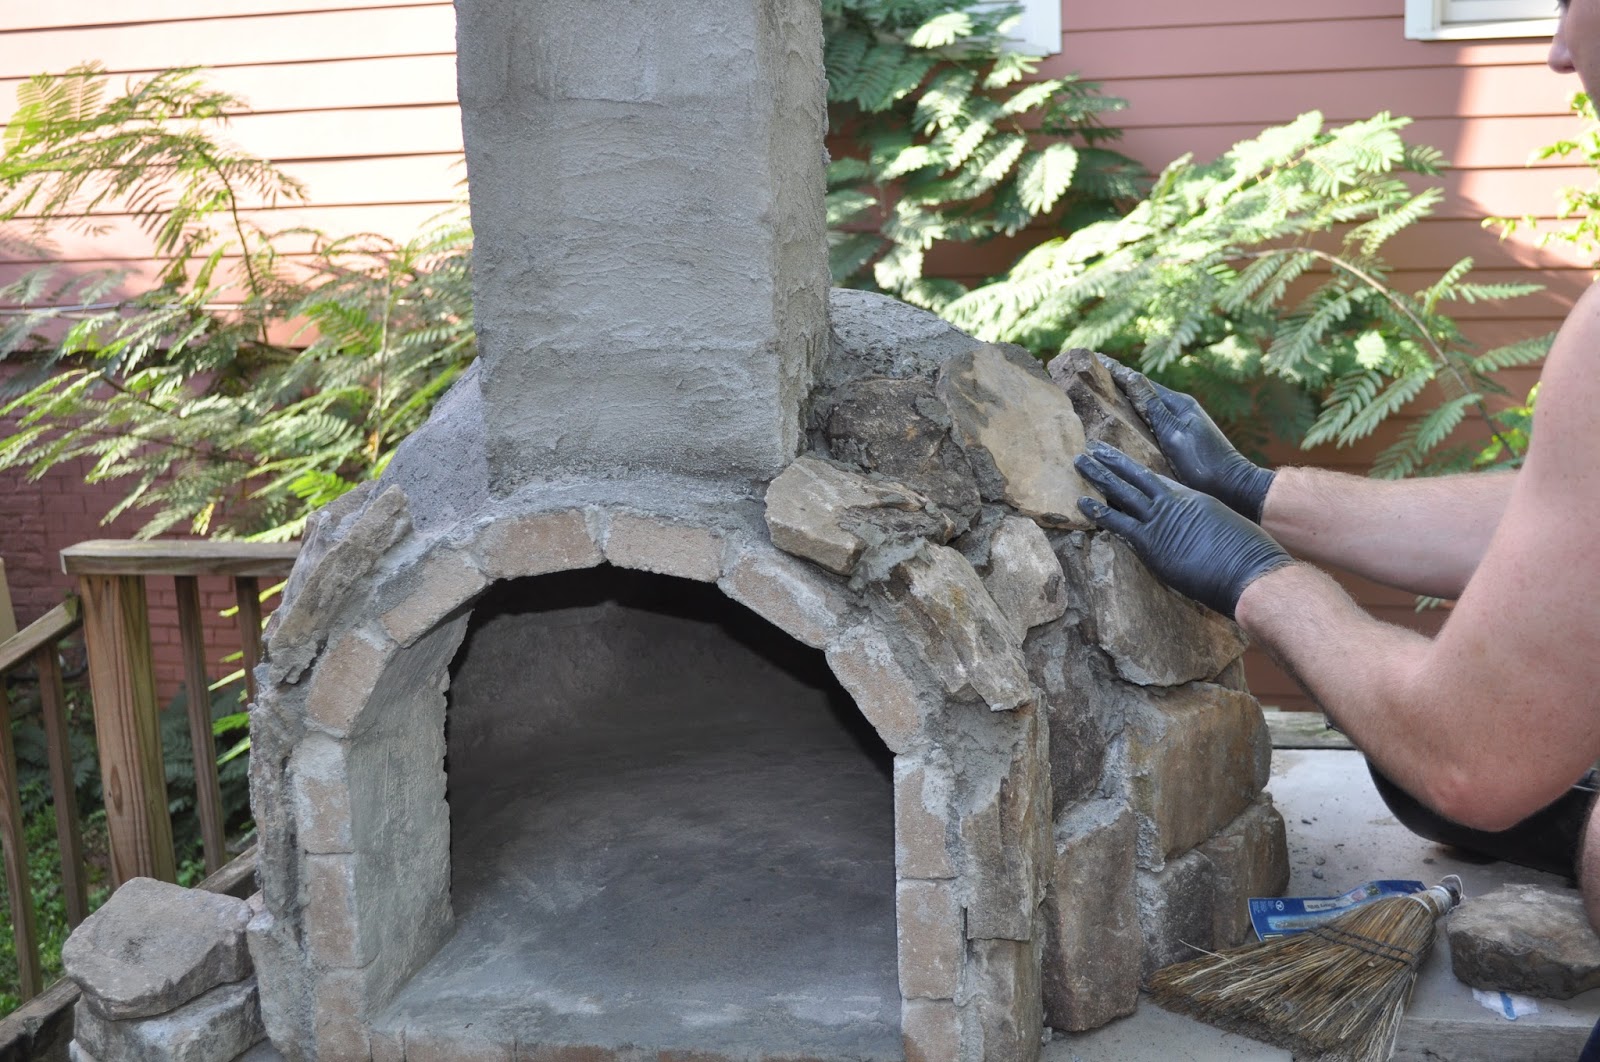
Now we were ready to add the stone. Every night Brent would add a layer all the way around the dome while finishing up the base along the way. 


Using the same brick pavers used to make the pizza oven frame we created our smokestack (chimney) cap. The pavers were cut in half to create the base of the chimney cap. When making any smokestack the height and width of the smokestack is key in ensuring proper air flow throughout the chamber. 


Once the legs were installed we topped it off with a large flat stone.


A few more layers of stack stone, some serious sweeping and cleaning and a firewood search (it's seasonal...who knew...) later and we were DONE! 

So, for those of you just joining us, this is what we started with....


And here is where we are today.....
Ta- DA!!!!


Pretty sweet transformation, huh?

Here's the view looking out from the solarium.


We installed a friendly lion head bottle opener to the side of the cabinet and added this leafy plant.


Here's a close up of the pizza oven. 


So, to answer the question I know you are all wondering....Yes, we have already had a test fire in the pizza oven and yes, it works! 


I did catch Brent sitting and staring at this outdoor kitchen for a good 15 minutes earlier today. He claimed to be "watching the fire" but I think he was admiring his work. Who could blame him? This outdoor kitchen is the bomb dot com and we plan to enjoy the heck out of it!

All photos are my own.

Wednesday, August 14, 2013

Taking Back the Spotlight

I know you were all expecting to see the finale to the Outdoor Kitchen Series, but I got some disturbing news the other day. My aunt Janis and I were chatting on the phone when she informed me there was a new star on my blog and it wasn't me. It was Brent. WHAT!?!?!? The truth is this news didn't surprise me at all. I've noticed all the e-mails and Facebook comments, all the "Rent a Brent" requests and "wow, Brent is soooo awesome"... Enough! This week I'm back to remind you that I got the moves too. 

Our living room has been coming together piece by piece, but one small element that we were missing on an every day basis was a small table to sit by the door. 


Sounds simple enough but we really needed a landing pad. A place to drop the mail, to keep our keys, to store Luke's leash, a place to keep my headphones for my morning runs, etc. The table couldn't be too big and it needed to have a drawer because we didn't want some of those things (leash, headphones) just hanging out for all to see. 

One day while perusing the isles of Homegoods I ran across this table:


Good lines, good size and a drawer with a metal front. I liked it and the price was great, but the finish had me a little worried. I actually liked the look of the piece but our barmoire (armoire we turned into a bar) was a similar finish and I didn't want all of the elements in the room getting too matchy - matchy. So, I decided it needed a paint job.

My color of choice: Martha Stewart's Holly Leaf.


I took my painting project outside and set up shop on a garbage bag. Using frog tape I completely covered the metal basket weave on the drawer front because I had a different color in mind for the metal detailing.

  
Once the drawer was all taped off I went to painting. It didn't take me long, the dark green color covered the piece easily. Once it was all painted I left it outside to dry.


Note my paint brush also skipped over the feet. My plan was to paint the metal front AND the feet gold.


I sprayed the drawer front first. I slowly sprayed over the metal and waited a few minutes before spraying again to avoid drips.


Once the drawer was golden I went to work on the feet. They were a little tricky because they were attached to the cabinet. So, I turned the piece upside down and sprayed each foot. Overall this approach worked pretty well, some of the gold got on the green legs, but it only took me a few minutes to touch up after my spray painting was complete.


For they keys I ordered some bulldog head hooks from Urban Outfitters in a dark blackish (technical term) finish and they were hung on the wall above the table.


After it was all said and done our wall transformed into this:


Luke's leash and my headphones are stored inside the drawer. 


The table top consists of my antique wooden man who is waiving Hi or Bye as you go through the door (although Brent prefers the Karate Kid pose), a handmade plate from Greece that is holding letters to mail, a monogrammed vase made by glass whisperer extraordinaire - Cindy Hammond and the happy print with a fun life motto to glance at as we leave for our day each morning. 


Down under I have two of my favorite design books, an oyster flower from Scott's Antique and a sunburst mirror from Ballards. 


Crazy how outfitting such a small area can up the organization factor 100% and make the room so much more inviting!

Go Courtney, Go Courtney - guess I'll be my own cheerleader :) JUST KIDDING, Brent is awesome and I'm beyond lucky to have the handy fool around. Truth is, the pizza oven is still in the works. We have been working away on it this week and will be back next week with the BIG REVEAL!

All photos are my own. 

Wednesday, August 7, 2013

Outdoor Kitchen Part 2


I'm backkkkkk and excited to pick up where I left off last week...

Once the countertop prep was complete it was time to start pouring the concrete. Using a wheel-barrow the concrete was mixed with water by surprise, surprise - a shirtless Shearer brother. 


The concrete process began on the far left side of the space which was the easiest side with no areas to work around.  


Essentially, blobs of concrete were dumped on the top and then spread smooth.

As the guys made their way to the far right side of the structure there was the Big Green Egg to contend with. We wrapped him in some insulation surrounded by metal sheathing to provide a gap between the concrete and the Big Green Egg as the concrete dried. This material also helped protect the BGE as we poured and spread concrete around him. 


Mix, dump, smooth, mix dump, smooth.......


Of course Luke was always close by monitoring our progress, mistaking pieces of wood for bones and trying to stay as far away from the water hose as possible. Hey Luke!


Once the concrete was poured, we let it sit for a couple of days.


Once dry, it was time to remove the wood template surround. 


Using his drill Brent removed the screws from the wood framing.


And then carefully pulled the wood framing free from the countertops. He did this along all edges of the counter surface.  


Once all of the wood was removed we had concrete countertops and suddenly it felt much more like an outdoor kitchen.


Before we moved into the next phase, Brent installed the grill into it's opening.


Finally it was time to finish the exterior. We considered several facade options but ultimately decided we wanted to go with a mix of cedar planks and stack stone.  The cedar siding would cover all parts except for the brick oven area which would be stack stone. Brent took some measurements and cut each plank to size. 


Then, I took the planks and stained the back of each piece before it was installed. 

We chose a Minwax stain which would not only pretty the planks up, but would seal the wood. We thought staining both sides would add double protection.


Once the back of each piece was stained, Brent installed each plank using his nail gun. 


And then I went to brushing the stain onto the fronts. 


In the midst of all the cutting and staining, we took a mini break and Brent put the stainless steel doors back on the grill which of course made such a difference and made the finish line seem closer and closer. 


The back of the outdoor kitchen was finished just like the front which got a little tricky as Brent had to measure and install the planks through the rails. 


Planks were even added to the Big Green Egg's hole.


The hole to the left of the grill was to be the cabinet for all of the grilling tools, so it needed a door to enclose everything. 

Again Brent measured and cut some wood for the frame of the door. 


He created his frame.


And then added planks to the front. 


Once all of the planks were installed he added the cabinet hinges.


And wah-lah - a door!


A little stain and a cute piece of hardware later and we were looking pretty good!

Somewhere between staining and making the door we took another break to revisit our concrete countertops. We were really happy with the overall outcome of the countertops but felt like the surface could be a little smoother. As you can see from the photo below the surface was rough, with pits and uneven spots. 


Not sure if you knew this or not but I'm a major blog reader myself and one of my favorite blogs, Little Green Notebook recently posted about a project where she used this product called Ardex which is a concrete overlay. She used the product over her laminate countertops. The results were awesome, so we figured we could use the same product over our concrete, just to smooth it out. 


We mixed the powder with water and poured it over our concrete. 


The material is super fine and easy to spread. 


We applied one coat, let it dry overnight and then went over it again the next day. 

We used a paint brush for the edges and then had some fun going over the whole thing once more, adding some texture with brush strokes. 


We were very happy with end results and while it was a little extra work we think it was worth it for the smoother finish.

Once all of the siding was installed and our countertops were smooth, Brent got started on the stack stone. At first Brent went to town stacking stone after stone but with one small hit of the hammer all of them collapsed. It was truly so sad. So, then we kind of decided we needed to do one row of stone a day, let that dry and then add another the next day. There may be a better way to go about this, but this plan has been working for us. 

So, there you have it - outdoor kitchen phase 2. What a difference right? We are working on the pizza oven now, come back next week to see the final results, you won't believe it!

All photos are my own.