Wednesday, November 27, 2013

100th Post - Ask & You Shall Receive


Today marks my 100th post! To celebrate I will be answering YOUR questions as promised. I figured a question or two may have come up over the course of 99 posts and boy was I right.  I was so stoked to receive so many questions over the past few weeks and I've done my best to answer them, so without further adieu, let's dive in:

Question: I enjoy your blog and notice that your husband, Brent, is often working with you on design projects. You make a great team, Beauty and Brawn! Have you ever come up with a design idea for your own home that he hated and you had to talk him into it? If so, can you tell us about it.


Who us? Disagree? NEVER!

...


OK, OK, fine.....The answer is YES, but before I elaborate let me explain a few things:

I'm always thinking about design, even when I don't mean to be, and I have a tendency to obsess over things. 

With that being said, because my world is so consumed with all things design, I'm often inspired by random things which cause me to think up ideas. Some of these ideas are good and some are wacky. Often times Brent does require some coaxing on certain ideas and sometimes he flat out squashes them. But there are other times when he wants to squash them but it's too late. I've already decided on it in my mind and begun the process of obsessing. Once that happens it's hard to talk me back off the ledge. 

A few examples of this: 

1. Painting the chair rail and paneling in our dining room black. 


After it was all said and done I think Brent is pretty happy with the outcome and we are both pleased with how the space has come together. 

2. Painting the brass chandelier blue


Brent was NOT on board with this but I talked him into it and....he was right. Gosh, that was even hard to write. But alas, he was, the blue was all wrong for the space. 

3. We have a three piece octopus painting hanging over our couch in our living room. Now, I know I haven't posted about our living room yet, so you are going to have to trust me here but this picture works. It's the perfect mix of weird and cool. I knew it the first time I laid eyes on it while shopping in Chattanooga. Brent literally laughed in my face, dead against the octopus. He now hangs in our living room and I'm pretty sure Brent likes him more than me. 

These are just a few examples, but the important thing here is the fact that Brent and I are truly a pretty good team. Sometimes I'm right and sometimes Brent's right. We both have our strengths and weakness and we both bring good qualities, ideas and expertise to the table. We balance each other out and, together we have completed some pretty great projects. The easier question might be how many projects do we start out completely in agreement? The answer: very few...but we aways end up on the same page by the time it's all said and done. 

Question: What was the final resting place of the turquoise chandelier? Have not seen it in recent posts?

Who, this guy? 


After the blue chandelier was replaced with our new chandelier in the dining room the blue one went to the basement where it resides to this day. It's final resting place is still TBD. 

Question: I have beige tiles around my fireplace (including the floor that connect to the carpet). I want to have a more cohesive look with the white mantle and trim. What are my options for painting the tiles white? The grout is an off-white color. 

Great question! I think a lot of people can relate to this issue. I know I had a similar situation at my house, except our tile was peach (yack) and connected to hardwood floors... 


To improve the look of the tile surround we simply painted the tiles white. Before painting we primed the tiles and then gave the entire fireplace including the mantle a fresh coat of Benjamin Moore's White Dove, OC-17. Our tiles were ceramic, so before we painted them we sanded the surface so the paint would easily adhere. 


The entire process was quick and easy and drastically improved the look of the space.

Question: So I love our Kitchen, but I feel like it is so builder grade and plain! What would you recommend to spice it up a bit and make it a little more unique? We have black appliances, dark granite counter tops, and oil rubbed bronze hardware on our light brown cabinets. You have seen it before, but I can send you another pic :) HELP please!

Another great question I think a lot of people can relate to!  To get everyone on the same page here is a shot of the kitchen in question:


When I look at this kitchen I don't think builder grade. The space feels warm and layered thanks to the contrasting colors and textures from the cabinets to the countertops to the hardwood flooring. To add another layer of interest you might consider adding a tile backsplash. Because the cabinets are a warm brown tone they will go with pretty much anything, so my suggestion would be to find a backsplash that compliments the granite countertops. Tile comes in so many different forms (travertine, ceramic, glass, metal, etc..) making it a great avenue to really add your own spin and personality to your space. I would also suggest looking into adding crown moulding to the top of the cabinets. You can buy crown moulding from Home Depot or Lowes and have it cut to the length you prefer and install it yourself. You would have to stain it to match the cabinets which might get tricky. If you can't find a stain that matches or  task of installing crown moulding seems daunting, then you might consider getting in touch with a local cabinet company to see if they could install crown moulding and color match it so it blends seamlessly with the stained cabinets. 


Question: You have mentioned the large Christmas tree in your front yard in several posts- what are the plans for decorating the tree this Christmas?

OH, we have plans, big plans. Decorating the tree for our first Christmas has been the only thing standing between the Christmas Tree and a big ol' axe. We wanted at least one holiday season so we could decorate it. Stay tuned for the final results of that! 

Question: Courtney, I love reading your blog and am fascinated by the way that you make seemingly-daunting home improvements seem relatively easy (though I know a lot of sweat - and maybe some tears - have gone into some of your projects!). My question is in regards to the outdoor kitchen. I know your post mentioned that you had to add some additional supports underneath the deck to support the weight of the concrete and the stone. How did you and Brent do that? And, how did you know how much extra support was needed? I'm curious to know if you built additional concrete supports or what!!

Great question and a popular one! During the process of the Outdoor Kitchen I was asked multiple times about the support under the deck. Now, to be fair, about 75% of the time my Mom was the one asking as she had this vision of the entire deck crashing to the ground due to the extra weight of the outdoor kitchen, but she wasn't the only one. As the posts started detailing the stacked stone for the pizza oven, the questioning became more frequent. I mentioned in this post that structural support was added but to ease EVERYONE's mind below is a shot of the supports under our deck. 


We started with 3 posts, but ended up adding 4 more as the process continued.  The 4 far posts are directly below the pizza oven and are connected at the top with (2) 2"x10" boards on either side.  The near posts provide additional support for the rest of the deck. As far as knowing how many supports to add, we kind of just guessed (welcome to Brent's process), but aired on the side of more is better. To install these columns Brent and Mark (Mark = major player in project outdoor kitchen, he helped with supports, stacked stone and concrete counters. It takes an army, folks) dug holes in the ground, placed the posts in the hole and then poured concrete in the hole to set the posts. So, FEAR NOT, our deck, outdoor kitchen, and the people enjoying them will NOT be falling to the ground anytime soon. 

Question: What is your favorite flooring for the kitchen?
Regardless of the specific type of flooring, my favorite look is when the flooring in surrounding areas matches that of the kitchen. There are so many finishes and surfaces throughout a kitchen. I like the idea of the flooring being a backdrop, instead of a focal point. Looks wise, I prefer hardwoods in the kitchen. I like the warmth they add aesthetically and the ease of maintenance. 

QuestionWhat are some creative options for storing spices so they are out of sight, yet easily and readily accessible to the chef?


This is a great question with all kinds of options! Today, I find myself placing spice storage in a variety of locations per the specific clients needs. A popular option for a lot of clients is pullouts to the side of the cooktop as shown in Chattanooga Project below: 


Photo by Gentle Giant Photography
This option keeps spices within reach and provides adjustable shelves for customization depending on the height of your various jars and containers. For those people turned off by the concept of bending down to retrieve spices, I also have some options for storing spices up higher. Another bonus, word on the street is it's not good for your spices to be too close to heat. So, with that in mind the next two options might be more appealing:

Photo from Rev-A-Shelf website. 
Spice storage installed to the back of wall cabinets is a great option for easy access storage. The model shown above is from Rev-A-Shelf and offers adjustability as well for various sized containers. Another plus, because this unit is installed on the door you still have usability inside the cabinet as well.

Photo from Rev-A-Shelf website. 
Spice storage inside a drawer is another great option. Again, the unit above is from Rev-A-Shelf and is tiered so you can see all of the spices you are storing in this space. Obviously, the number of spices you can store would be limited to the space allotted, but this is a great option for everyday spices you want on hand. 

Well, there you have it, answers to some of the most popular questions. This was such a fun post to write and I'm so thankful to all of my readers and everyone that submitted a question!  It was fun hearing from you all and I enjoyed answering your questions. THANK YOU for tuning in each week, you've made these past 100 posts a joy to write!

I hope everyone has a wonderful Thanksgiving tomorrow!

Unless otherwise noted, all photos are my own. 

Sunday, November 24, 2013

Happy Mail Home.


I love happy mail. Non junk mail. Non-bill = happy mail. 

There's nothing better than fetching your mail after a long day of work to find an unexpected piece of mail that instantly makes you smile. Over the last few years my mailbox has been inundated with all kinds of said happy mail - between engagement parties, baby showers, graduation announcements, wedding invitations and birth announcements my mailbox often smiles.


As much as I love receiving these announcements and invites, the question quickly becomes what do I do with them? Because these pieces typically include pertinent information regarding RSVPing, times, directions, etc... I need to keep them in an easy to find place that doesn't include laying on my kitchen counter or collecting dust on my nightstand. I know a lot of people hang these invites on their refrigerator but my refrigerator is panelized, A.K.A. has wood cabinet panels instead of stainless steel, thus no magnet will adhere.

What to do, what to do? Then it hit me. The pantry! The house came with a built-in pantry in the hall, right off the kitchen.


This piece has been huge for us. As I've mentioned before, our kitchen, while much improved from it's original state is by no means large, and storage space is tight.


We keep most of our food in the upper part of the pantry and all of Luke's food, medicine and bones in the bottom section. With the insides of this bad boy being so useful, why not allow the door to work for the cause too?


To kick off project transform plain pantry door into the holder of all fun mail, we picked up some supplies at Home Depot including Rust-Oleum's Magnetic Primer.


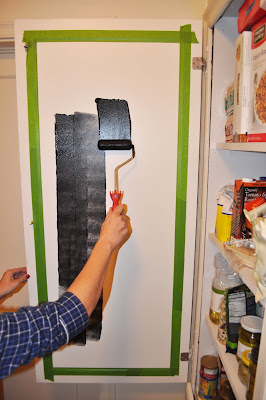
Once home, we taped off the center panel of the door. 


Next we poured the paint into a tray and mixed it up really well. The magnetic component is super thick so it's very important to mix it up thoroughly and often.


Once everything was mixed together I applied one coat of the paint using a small foam roller. 


The directions said to apply a coat, wait 30 minutes and apply another. So, we did just that and applied 5 coats total.


The next morning we tried to attach a magnet to the door and....nothing. It didn't work. RAGE! 

Disappointed and annoyed, I did what any normal person would do and googled this dilemma. Turns out this has happened to others and the suggestion was to paint coat after coat until the magnets start adhering.  Different number of coats worked for different people. So...back we went to paint and wait, paint and wait. Luckily the surface we were painting was small so this wasn't a huge time commitment. 

During the intermission between painting I went to town creating my own magnets. My supplies:


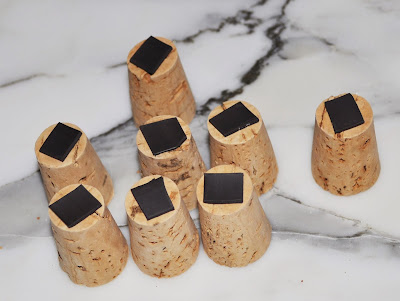
A few corks and some magnet tape.

What happened next gets very technical so pay close attention to the details...I cut small pieces of the magnet tape and stuck it to the bottom of the cork. 


I know you're tired from just reading about the work that went into that one....tough DIY, right there. :)

With my cork magnets ready to go and the happy mail gathered I was ready to get this party started. Sadly, 12 coats later and the magnets are still not adhering. We've been working on this project off and on for 5 days and while we can feel the magnetic pull getting stronger it's still not strong enough to hold the magnets. This was supposed to be a fast and easy project, but it has turned into a bust. We are going to continue applying coats so I will keep you posted on the status in the coming weeks. But as of now, 5 days and 12 coats later, I wouldn't recommend Rust-Oleum's Magnetic Primer.

So, that's that. There is no pretty finished photo on this one. Sorry folks, but I guess that's how the cookie crumbles sometimes. It's frustrating, but I'm determined to make this idea or some form of it, work for us. I know this pantry door is the perfect place for this type of organization, now it's game on to figure out how to actually make it work. Stay tuned....I'm on a mission, I WILL HAVE MY HAPPY MAIL HOME!

All photos and frustrations are my own, and Brent's. 

Sunday, November 10, 2013

2013 Home for the Holidays Designer Showhouse


It's beginning to look a lot like Christmas here in Atlanta! Santa is already sitting nice and comfy in his big chair at the mall. All of the the department stores are dripping with holiday decor. The gingerbread latte and peppermint mocha are back at Starbucks and The Atlanta Homes & Lifestyle's Home for the Holidays Designer Showhouse opens this Friday!

Photo from Atlanta Holiday Home website
For those of you unfamiliar with this showhouse, let me fill you in. This showhouse was formerly known as the Christmas House and is one of Atlanta's "must see" attractions during the holiday season. Like most showhouses, each room in the house has been furnished and decorated by a different designer. Where this showhouse stands apart is the Christmas decor and ambiance added to the mix. 


This year's house was built by Dovetail Homes and is a combination of American Colonial and Southern charm. See the rendering below for a little preview of the outside facade. 


Photo from Dovetail Homes' website
As is the case with all showhomes this one was a giant collaboration. For the second year in a row Bell Kitchen & Bath Studios has provided all cabinetry throughout the house. For a lot of rooms, the cabinetry defines the layout and vibe of the space. Mike Bell and I have been working on the cabinetry designs for months, striving to show new ideas and play outside the box while still maintaining the fundamental roots that make for a classic southern home. We have worked with Dovetail as well as Harrison Design Associates to finalize color selections, hardware and specific design details and we are all very excited with how everything has come together.  

If you follow me on Instagram you may of seen some of my sneak peek photos over the last few weeks. 

Like the day we had custom antique brass straps made for the hood.


Or this shot of the vanity for the Master Bath. 


I even have a WAY early shot of this "X" we made for the kitchen.


Now that you're all excited to see all of these elements and more let me fill you in on the details:

The house opens for tours starting this Friday, November 15th and will be open every Thursday through Sunday until December 8th

Hours:
Thursday: Saturday 11:00 a.m. - 5:00 p.m.
Sunday: 1:00 p.m. - 5:00 p.m.
Closed: Thanksgiving Day

Where: 
The house is located at 58 Blackland Road NW Atlanta, GA

Tickets:
Tickets can be purchased on-line here. $20 in advance, $25 at the door.
Several companies are selling the tickets around Atlanta, including Bell Kitchen and Bath Studios in Alpharetta. For a complete list of the ticket outlets follow this link and scroll to the bottom.

Proceeds from this year's event benefit the Southeastern Horticulture Society whose mission is to "promote the knowledge, art and enjoyment of horticulture throughout the Southeastern United States."

It's been a fun process watching this home come together. I was at the house last week and the space was buzzing with activity. The finishing touches are being applied and things are really coming to life. I can't wait to see the finished product later this week!

So, if you know you will be in or near the Atlanta area this holiday season, make plans to check out this home. Whether you find yourself looking for inspiration and ideas, or if you're just in the mood to be surrounded by beautiful things, this Holiday House will be sure to deliver. Nothing says Happy Holiday's like a beautifully decorated home bursting from the inside out with inspiration and charm. I hope to see you all there! 

Wednesday, November 6, 2013

Tory Burch Home Collection


Fashion and Interiors collide again in the most exciting way ever. Some Most of you will need to sit down for this little announcement: Tory Burch has come out with a Home Collection!

  :::JUMPING UP & DOWN::: 

If you can't tell, this is very exciting news to me, as I love Tory Burch. For those of you who may not be familiar, Tory Burch is an American fashion designer. Her style is a little hippie meets a little bohemian meets a whole lot of classic fun. Last year I posted about her home, which was featured in Vogue magazine. I loved reading about her home, her vision and her interior style. Lucky for us, a year later Tory has come out with this Home Collection, allowing us to have a little piece of Tory in our own home! Many of the items in her home collection were inspired by pieces from her own home or were created from a memory from Tory's family.

Sit back, relax and come along on a tour of my Christmas List  favorites from the collection...


These needle point pillows were inspired by Tory's parent's love of folk art. Her parents learned to do needlework on a cruise and her father stuck with the craft, becoming an avid needle pointer. The pillow on the far right, shows a man writing a letter that says: "Everything begets thee to me" which Tory's father said to Tory's mother often. He even needle pointed this phrase on to a cushion for her and she had it engraved in her wedding band - so sweet!  


I especially like the fluffy tassels at every corner. For anyone taking notes, my home needs to have this pillow, I will take the lion and I will adore it every day. 


The Henry and Nick double sided picture frame, named after Tory's twin sons, would be the perfect addition to any table. I love the linear lines of this frame as well as the gold finish. So chic! 


Speaking of gold, how about an adorable golden nut? This Robinson nutcracker is random and fabulous and pays homage to Tory's family tradition of shelling and eating nuts during the holidays. My house also desperately needs this piece....my coffee table is all but begging for this little jewel.  


The baily BOX.....Sigh...how striking is this piece? I love the graphic pattern and black and white color scheme. An accessory like this could easily stand alone or play well with others styled on a bookshelf.  


These Rae Coasters, named after Tory's Grandmother, are perfect for any bar or any coffee table for that matter. I always have coasters around and I love that these come with their own little matching box for storage. The whole set up is so modern chic. Each of the clear glass crystal coasters has a gold Tory Burch logo in the middle. Simple, elegant and functional...doesn't get much better than that!


How fun is this Madison cork screw/bottle opener? I love that it's actual purpose is cleverly disguised in this random, yet fabulous golden screw. A piece like this is a great accessory and an even better conversation piece when you bring it out to use. 

I could go on and on and show you a picture of every item, but that would make for a long blog and could make me appear obsessed unable to filter. So, if you are interested in seeing more of the collection follow this link to the Home Collection page on Tory's website

It's no surprise that someone with such a defined fashion sense would seamlessly transfer their abilities into interiors. I love that so many of the items would be instant conversation pieces, like the needlepoint pillows, golden nut and cork-screw. Not only are the pieces in this collection relevant stylistically but they have depth. They were designed from a memory or experience, making them that much more desirable. Well done Tory, any home would be lucky to be adorned with your pieces!


All photos via Tory Burch website