Last we talked we had just finished the fireplace and had concrete steps poured from the den to the patio. Before we could go any further we had to hire a company to come and move the gas line that was in the brick smoke hut. They pulled the line out of the back of the hut and then ran it along the back and side of the hut and down the wall to where we planned for the grill to sit. With the gas line in place we were ready to start the cabinetry!
We measured and schemed and worked out our plan.....Cabinets would be installed to the left of the fireplace, all the way down the wall to the brick smoke hut.
The concrete patio has settled over time and is not level, so when it came time to frame in for the cabinetry we had to really play with the framing to make certain the top would be level.
We wanted the cabinetry run to include the grill, a place for The Big Green Egg, two storage cabinets and an open shelf area, so we worked out our spacing and got all of the openings framed up.
With the cabinetry framing done, we were almost ready to start the countertops, but before we could, we had a few loose ends to tie up, starting with the fireplace flue...
Running the flue for the fireplace was a bit tricky. Normal chimneys would just go straight up, but because we plan to place the pizza oven directly over the fireplace this would not work. Instead we pitched the flue to funnel the smoke through the back of the pizza oven which would allow the smoke to roll through the cavity of the oven and out the chimney.
Next up Brent went to work installing the missing pieces of the fence. You may remember the fence used to be curved, but because the pizza oven will sit in this location, we needed to square it off.
Meanwhile I was busy painting. We went back and forth on what color pallet we wanted to use out here, but ultimately decided to keep with the color combo already used on the house - taupe and a creamy white. Having the fence patched and the new color scheme start to take shape was a big turning point for the patio aesthetically speaking.

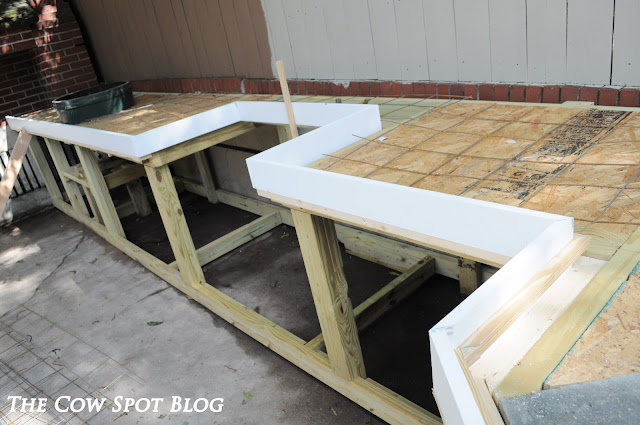
Finally we were ready to get started on our concrete countertops. We made up a form and decided to get fancy and add a little extra wood detail in the middle of the edge (you will be able to see this more clearly later).
What happened next = one of the most exhausting days...ever. Too dramatic? Maybe, but
I can say with absolute certainty that concrete is officially our frenemy.
Sooooooo it took 46 80 pound bags of concrete to do this countertop. If you know anything about concrete you know that not only is it messy, but when working with it, one has to move relatively quickly because it dries fast. At first it was just Brent and I going at it on our own. We were just 2 or 3 bags in and I was certain I might die. Luckily, like an angel dropped down from heaven, Brent's brother Scott showed up and helped us.
Carry heavy bag of concrete, dump heavy bag full of dusty concrete into tub, spray with water, stir around with shovel, pick up tub and dump wet concrete atop the cabinets. Over and over and over and over again x 46.
It was brutal.
At the very end, after Scott had left, we wanted to put our hand prints in the top. By this point Croix was getting cranky and was ready for his bath, bottle, bed routine. Brent and I were exhausted and covered in concrete dust, but if we wanted to do this we had to do it then before the concrete dried. Concrete is just totally unreasonable like that. ;) Brent did his hand first, then we did mine and then I carried Croix over to do his....we smushed his hand into the concrete and as soon as we lifted it out he shoved it right in his mouth. Yep, Croix ate concrete. He has never even eaten a piece of real food but he has eaten concrete. #parentsoftheyear Of course we immediately yanked his hand out of his mouth, but it was just the most appropriate ending to a grueling day.
We let the concrete sit for several days and when we went to remove the form we were very happy to see this:
And a close up of the wood detail:
We have a little sanding to do, but overall we are really happy with the end results. So much so in fact that the misery of that concrete filled day has disappeared and we have found ourselves friends with concrete yet again.
With the framework in place and the messy annoying tasks behind us it's finally time to get to the pretty stuff!
With the framework in place and the messy annoying tasks behind us it's finally time to get to the pretty stuff!
All photos are my own.


3 Appreciated Comments :
FANTASTIC PLAN, PROGRESS, AND BABY STORY. Of course, baby Croix is gonna eat some concrete!
He'll be just fine, and y'all can laugh about this when you're making pizza in your oven!
Can't wait for the final post.
It's true....the crazy events make the best stories! :)
Wood patio fence domestic layout pics houzz. Houzz timber patio fence layout ideas and pix. The biggest collection of interior layout and decorating ideas at the net, which include kitchens and bathrooms.wood fence gate
Post a Comment