Showing posts with label Dreamweaver Properties. Show all posts

Thursday, June 5, 2014

Nesbit Lakes Basement Bar


Welcome to every sports fanatics dream - a basement remodel complete with a beautifully stocked bar, SIX televisions, a pool table and loads of sports memorabilia adorning the walls. 


Speaking of sports memorabilia - check out the fun stadium seating from the old Braves stadium...love the pop of red!

Chris Pfahl of Dreamweaver Building & Remodeling gave this entire basement an overhaul and invited me to the remodeling party to design the bar.


Bars can be tricky little devils to design. Often times bars have a lot of the same components as kitchens - appliances, sink/faucet and cabinetry. So it's important to focus on creating a space that feels more "Bar" and less Kitchenette. There are several ways to go about this, starting with the appliances. Nothing screams kitchenette like appliances, especially full sized units. So, we kept the appliances, all FIVE of them under counter and panelized everything we could.
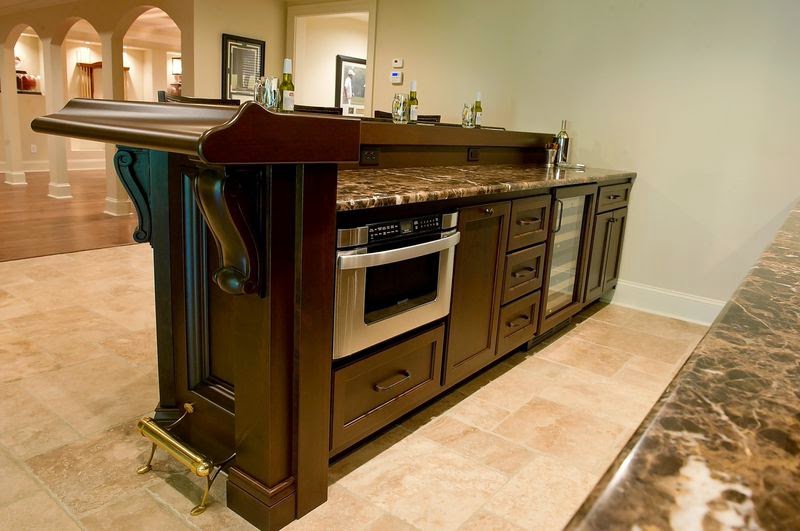

From the get go we knew this space would play host to hungry, thirsty, sports crazed friends and family, so it was important that it pack a lot of functionality. As I said, there are five appliances in this bar including a microwave, under counter refrigerator, dishwasher, under counter wine unit and ice machine.  All of that in addition to a trash pullout, sink base and roll outs offer plenty of space to store bar ware, liquor, wine, beer, coozies, napkins, snacks and other bar necessities. 

For the back wall I designed open shelving flanked by wall cabinetry to the countertops. Antique mirror was installed for the backsplash and on the wall cabinets. The cabinetry to the ceiling in addition to the mirror gives the room height and depth and the open shelving provides the perfect place to store and display liquor bottles.


The clients really wanted the bar to be a place you could "belly up" and hang out. To create this vibe a bar rail was added to the wood top and a brass foot rail was installed along the bottom, both of which  create a bold visual and a comfortable space to have a drink and relax.


Every angle of this bar is relevant because depending on which way you enter the basement this bar is always in sight. For the back of the bar, which you see upon entering the basement from the upstairs, I designed deep dish panels to be installed along with posts and large corbels. These types of beefy details are a bar's best friend.


 I'm so pleased with how this space transformed and I could definitely see myself enjoying the ambiance and relaxing with a cold drink - especially around football season! Again, a huge shout-out to Chris Pfahl of Dreamweaver Building & Remodeling who was responsible for all of the ins and outs of this project, once again he delivers an exceptional experience and product to his clients! All cabinetry is by Bell Kitchen & Bath Studios and the photography is by Jen Wunderlich Photography

Cheers to great clients and a beautiful space!


Photography by Jen Wunderlich Photography.

Wednesday, May 7, 2014

Bridgett Court Kitchen - Before & After


I believe a good Before & After story is good for the soul. To see a room totally transformed can awaken your imagination and encourage you to consider the abundance of options awaiting you and your space. Today I want to feed your souls some serious grub AKA show you a recently completed kitchen remodel I did with Chris Pfahl of Dreamweaver Building &  Remodeling.

Let's face it, there are 101 ways to layout any given room, but for most - knowing that is overwhelming. Plus, it's hard to imagine what could be, when what you have, is what you look at everyday. That's where bringing in a fresh set of eyes can be a good idea. Like most projects I do, I met this one on paper. As I've said before I truly think this is the best way to start the creative process, because it allows me to focus in on functionality only.  All I could see was the black and white reality of what was going on, which allowed me to pinpoint areas that could use improvement right off the bat. Here's where we started:

Photo my own. 


Unlike some spaces we dive into, this Before was not begging for love. In fact, overall it looked fine. There were no glaring issues, but there were certain aspects the homeowners wanted to improve upon both aesthetically and functionally in the space. One of the main requests was to move some of the major components of the kitchen around, namely - get the cooktop off the island. They also wanted to increase the storage and brighten the space up.

After...


As you can see the cooktop was moved to the back wall which created a beautiful focal point with the wood angled hood and the dramatic marble accent piece. The cabinetry was taken to the ceiling, allowing the homeowners additional storage. The perimeter cabinets were painted Benjamin Moore's Smokey Taupe 983, which really brightened up the space, making the room feel larger.

Photo my own. 
The above wall had a large amount of open shelving and some storage, but because of it's positioning in the old kitchen design it felt sort of out of the loop. When we moved the cooktop to the back wall, we had to find a new home for the refrigerator. The above wall made the most sense and allowed for a larger refrigerator.


There was a little space left over which made for the cutest breakfast (coffee, toaster) + TV area you ever did see.


Across the room sat the sink and double ovens, both of which stayed in the same location in the new design. 


For a wall that changed very little layout wise, I think it's one of the most beautiful.


How pretty is this shot? I love the apron front sink, the beautiful tile all the way to the ceiling and the cabinetry proportions. The cabinetry is Bell Custom Cabinetry by Bell Kitchen & Bath Studios and is Inset Construction. I really love the delicate detailing of each and every door, not too heavy but subtly elegant.

The original island had a small overhang for stools. As practical as this is for a lot of kitchens, it really wasn't necessary for this one. The breakfast table sits a few feet away, plus utilizing stools in this location would of encroached on a heavy traffic zone. So, in the new design we scrapped the overhang and added shallow depth, full height cabinetry to the back of the island instead.


Not only does this approach offer more storage, but it gives the island a more furniture-like vibe. Speaking of furniture-like vibe - the island was constructed in alder wood and stained. I love how this finish offers a nice contrast to the floor and the perimeter cabinetry. 

So, what do you think? Pretty radical transformation, eh? I love the light, airy, elegant vibe of the space. The natural light is so good and the details are plentiful. The original kitchen was fine, the new kitchen is, let's see, how do I put this...awesome? Yeah, I'd say that adjective fits the bill! :)

Unless otherwise noted all photography is by Jen Wunderlich Photography

Wednesday, December 18, 2013

#Northcliff Kitchen Reveal


There's really nothing quite as satisfying and fascinating as a good Before and After project. So, my gift to you on this day, one week before Christmas, is one of my favorite Before and After reveals to date. I posted a little intro to this remodel back in January where I dubbed this project #Northcliff. If you missed out on that post, here are some of the Before photos to get us all on the same page as to where this story started.


The best before and after projects begin with a client who is open minded. With every project there is an owner. The person who lives in their space every day. . For some everyday for 30 years, for others everyday for 3 months. Regardless, when you live in a space and see it day in and day out it's hard to imagine it any other way. Even for me, a lot of times I like to design a space before actually seeing it in person, this way I don't get the existing layout stuck in my head. When you're working with wall dimensions and anything is possible, you can truly re-imagine a space allowing it work to it's optimal potential. Luckily, these clients were super open-minded, and because of that, the whole space was completely re-designed.


The new design featured an island, a focal wall, loads of symmetry and storage solutions around every corner. The space wasn't terrible before, but even on paper you can see how open the space became by deleting the peninsula, repositioning the cooktop and adding an island. 

As great as ideas on paper can be, you actually need someone to make it all happen. For this project that someone was Chris Pfahl of Dreamweaver Building & Remodeling. I can't stress enough how essential a good, dependable remodeler is. While the design is essential to the redesign of a space, you are no where without someone who can bring the ideas and drawings to life. There are a lot of contractors out there, but few of them can get the job done without making you want to pull your hair out. This is your house, your dream kitchen/bath/basement, your money - you want someone who can see the big picture and make the process as painless as possible. These projects end up being a huge collaboration and it's amazing how much a good team attributes to a great experience. I think we are all proud of how this one turned out, let me show you around:
                      

Isn't she pretty? The cabinetry is Bell Custom Cabinetry by Bell Kitchen & Bath Studios. The cabinetry construction is beaded inset and the finish is Benjamin Moore's Smokey Taupe - 983.


I love a good focal wall and this one was created by rearranging some key components in the space. By removing the existing pantry and relocating the cooktop and oven to the back wall, a well balanced and symmetrical focal wall was born.

With the oven and cooktop on this wall, accessories and design details were added to complete the cooking hub in this space.


Deep pot drawers were designed under the cooktop for easy access to pots and pans. Pullouts were placed to either side of the cooktop for easy access to spices and crockery. Yes, crockery - the fancy word for spatulas, wooden spoons, etc...basically all of those utensils typically shoved in a drawer or set in a container on the countertop. 

As a symmetry lover, I designed the wall cabinet to the far right to come down to the counter so as to balance with the oven tower on the far left of the cabinetry run.


An Aventos lift was installed on this cabinet for easy access to the toaster and coffeemaker stored inside.

Here's a shot of the other side of the kitchen: 


The refrigerator is the only appliance that stayed in the same general location. I really like the refrigerator and microwave drawer on this wall. 


To me, this location is ideal for both the refrigerator and microwave because it's close enough for the cook to access when preparing a meal, but out of the way enough that should someone want to pop in to grab a carrot or warm their coffee, their not an interference within the cooking zone. 


This whole corner of the kitchen provides ample storage. We even added a LeMans corner pullout so the blind corner could be easily accessed and utilized. These pullouts are God's gift to kitchen corners - it will save you from getting down on your hands and knees to retrieve stored items. They are so smooth, so easy and so functional. 

As I mentioned above the house pantry was demolished to make way for the focal wall, so two tall cabinets were installed to house all of the pantry items. 


These pantries are not very deep due to the walk space behind the island but they are super functional. 


Roll outs were installed in each pantry for easy accessibility to all that is stored inside. When it comes to a pantry, deeper is not always better. The deeper a space is, the easier it is for items to get lost. Roll outs allow the goods to come towards you so you can easily see everything inside. 

The breakfast room sits right off the kitchen and came with a desk:


It was decided the desk would be eliminated and a wet bar would be added to the space instead. The wet bar was going to be placed on a different wall between the breakfast room and the living room. Because this piece would be seen from the kitchen we wanted it all to tie together. So the cabinetry construction and color stayed the same, but some custom mullions were designed to give the bar it's own unique personality. 


So beautiful. 

A space totally transformed, a kitchen with a new life - it doesn't get much better than that friends. If only all clients could be this great and all contractors this easy to work with. Merry Christmas and a Happy Kitchen!

All Before photos were provided by the homeowner and all After photos were taken by Jen Wunderlich Photography.

Wednesday, September 26, 2012

Details are a Rooms Best Friend

I've got a lot of projects rockin' and rollin' right now. It's been a busy summer and it doesn't look like it will be slowing down anytime soon. The jobs I'm working on at any given time can range from new construction projects where we are doing cabinetry for an entire house, to remodels where we may be working on a powder room vanity. Regardless of the type of project, those projects with heart and consideration ALWAYS turn out the best. Earlier in the summer I talked about the importance of details and with every project I start and finish I'm reminded of what a difference the details can make.
We recently completed a fun laundry/mud room project that takes functional to a whole new level. The project consists of new laundry room cabinets and the addition of a mud bench right outside the laundry room. The space is not very big, but the homeowner is SUPER SAVVY and was determined to get as much functionality out of this space as humanly possible. Every square inch of these spaces was considered. Countless items such as the ironing board, iron, laundry detergent, spray bottles and baskets have been measured and re-measured to ensure they will fit in their designated areas. We have literally squeeeeeeeezed every last drop of usable space out of this room and it turned out great.


Is this not THE cutest little mudroom/bench area? In order to create this space the contractor, Chris Pfahl of Dreamweaver Properties, had to modify the wall to the right of the door by pushing the wall into the garage to create this niche'.  This space is just big enough to house the little backpacks and jackets on decorative hooks. Additional storage space was captured in the drawers under the wooden seat and the open shelving at the top of the unit is the perfect place to house baskets. 

What you see above may seem like a pretty, updated shot of a laundry room, but it's oh so much more....
This wall of cabinetry literally explodes with storage! As I mentioned above, every inch of this space was considered to ensure that as much storage was captured as possible. We installed a partition in the far left tall cabinet to house the ironing board. Adjustable shelves were installed to the right of the partition. The partition as well as the shelving sit back 4" from the front of the door so the broom, mop and other items hung on the back of the door have a place to land when the door is shut.


The tall cabinet to the right houses three adjustable rollouts, adjustable shelves and a pullout trash can. As you can see the homeowner is utilizing baskets both in the mudroom/bench area as well as on the adjustable shelves. It's a great way to store miscellaneous items in a drawer like setting without having to actually have the drawer or rollout. Also, the adjustable shelving lends itself to a lot of flexibility in that the shelves can be moved or removed to accommodate stored items in various shapes and sizes.


A countertop was placed over the washer and dryer which creates a nice uninterrupted folding area.


 Wall cabinets & a hanging rod were installed above the washer and dryer. This addition offers plenty of drip-dry hanging space and even more storage.


 The washer and dryer take up most of the space on this wall, but it should come as no surprise that leaving valuable storage space on the table just wasn't an option. The homeowner gets 100% credit for thinking up this smart little cabinet sandwiched in between the washer and dryer. This cabinet serves as the perfect space to house laundry detergent, dryer sheets, fabric softener, etc...


The adorable shirt/short hardware was another customer find and really adds another layer of personality to the space.

All cabinetry for this project was Bell Custom Cabinetry and was constructed in Paint Maple. The Mudroom/Bench area was painted in Benjamin Moore's Frostline AF-5 and the wooden seat was stained to match the floors. The laundry room cabinets were painted in Benjamin Moore's Metropolitan AF-690.

There is no doubt about it - this client had done her research, she had talked to friends, surfed the web and utilized sites like pinterst and Houzz to find inspiration photos of what it was she was looking for. She gathered all of this ammunition and then set out to make her space work for her and her family. All of her hard work paid off because she has a truly functional and aesthetically beautiful space that others will be pinning and adding to their idea books for years to come!

All photos in this post are my own.