Showing posts with label Dining Room Updates. Show all posts

Sunday, October 22, 2017

Dining Room Curtains


We are in the process of wrapping up the mudroom remodel (2 posts left to share!) but before we bounce back into that project I wanted to show you the newest addition to our Dining Room....

Curtains!!!


It never ceases to amaze me what an instant difference curtains make in a room. It's like the room has it's eyebrows and is giving you a hug all at the same time. I talked a bit about our curtain journey back in August and shared how we decided to use some antique brackets to separate our dining room from the foyer. This allowed us to purchase more expensive fabric for the dining room curtains because we wouldn't need AS much.

We considered several options in various colors and patterns....


And while any one of them would of worked we fell in love with the texture and dimension the raised flower pattern brought to the table.


Once we made our decision we lined up our favorite super-star seamstress - Cindy (Brent's Mom) and she got to work creating the curtains. In no time she was back in Atlanta, curtains in hand and we (Brent) got them installed. One tricky element was the bay window. We decided we didn't want to hang curtains within the bay window because we didn't want to block the natural light, so we had to find a rod that could make a 45 degree turn.


The curtains add such a nice layer to the space and I love how they pop against the background of our antique mantle


The  room feels so much fancier with the addition of the curtains. Brent and I both agree this is definitely the fanciest room we've ever created (in our own house that is). But I guess if you're going to have a fancy schmancy area in your house a dining room is the best space for that to be! All in all this room is feeling SO good and while it definitely needs some fluff - a rug, art, lighting, etc...it has come a long way this year and is definitely one of our favorite spaces in the house. 

All photos are my own. 

Tuesday, August 29, 2017

Architectural Details - Foyer


After we finished up the mantle rehab in the dining room, we started seriously thinking about curtains for the space. I'll get more into the selection process of those later, but while considering options and talking through costs, we realized that because the dining room and foyer kind of bled into one another, the foyer windows would need to be treated too. But 5 single windows and a bay of windows was going to be a lot of fabric and the options we really loved were not inexpensive. THE STRUGGLE! So, then we started talking about treating the foyer as it's own space and doing something different on those windows. It could work as there was a slight floor height transition between the rooms plus two faux columns separating the spaces,  but neither of these elements felt visually strong enough to make this idea work. The concept felt forced and off.  

Here is an image standing in the dining room looking into the foyer. You can see the columns I'm talking about. 


What happened next I'm going to blame on our new found love with all things Fixer Upper.  Brent said, what if we mounted antique brackets to the columns to accentuate them more. Not only would this add another layer of interest to the space but it would be a great way to visually separate the rooms without building walls. I loved the idea!

Lucky for us Scotts Antique Market was the next weekend, so we loaded up The Croix and headed out to find our brackets. We perused several options, but ultimately ended up landing on these beauties pulled off a front porch in Ohio. $200 for the whole unit (which we broke into two separate corbels). Not cheap, but they were much larger than a lot of the options and we liked the details. Not too plain, but also not too gingerbread house.


We got them home and separated them..... 


Next we knocked all of the loose paint off. We didn't want to mess with them too much, but we also didn't want paint shards falling on the heads of our guests, so we got them cleaned up a bit... 

And then placed them on the columns:


Once we identified the exact placement, Brent mounted them to the column and ceiling. Meanwhile Croix focused on an intense activity of loading and unloading his box whilst overseeing the progress. #management


With only one of the brackets up, you could already feel how well this was going to work....


and Boom...it did work! Like a charm!


Visual interest, check. Defining room boundaries, check. Another layer of charm and interest, check. This whole concept worked so well that I may even go nuts and wallpaper the foyer!

All photos are my own. 

Wednesday, July 19, 2017

Musical Chairs


So, the funniest thing happened. I literally shopped my own home for the answer to a long time hunt for our dining room - chairs!

OK, so after we got the mantle all painted up, the space was feeling good, which made us even more eager to keep the ball rolling. The room definitely had/has a ways to go but one obvious element that was missing was chairs.  Ever since we had the table made and purchased the blue wing back chairs last summer we have been on a quiet hunt for dining room chairs but could never find anything just right.

Then a few weeks ago, my Aunt Janis offered us a set of dining room chairs from a house she is selling. They are a more traditional style antique (ish) stained wooden chair with an upholstered seat. While the current state of the chair would not work with the aesthetic of the room we were optimistic we could sand them down and reupholster the seats to make them jive. We hadn't had the chair 24 hours when Brent started sanding the finish down on one side of the chair and we immediately began the conversation about what color we would paint them. But, with every idea we threw around, it became more and more obvious to me that painted chairs would not work in this space. The table was stained, the wing back chairs were a blue upholstered fabric, painted dining chairs with another fabric on the seats just seemed like way too much going on. I knew the chairs needed to be stained in medium color similar to the table. And then it hit me.....I have chairs like that. Sitting just a few rooms over in our breakfast room were the chairs I needed.

Do you guys remember these chairs from our first house


They came with us when we moved and had been sitting around our breakfast room table. We had 6 of them and they were a wedding gift from my parents. We could only fit 4 around our little table in the first house, but needed 10 to fit around our much larger breakfast table at the new house. Unfortunately  they stopped making this exact chair so we ended up purchasing these other chairs from World Market and mixed the two styles around the table. It has looked good for the past 18 months, but in a flash I knew I needed those 6 upholstered chairs in the dining room stat....and guess what?


I was right. 

They are PERFECT and instantly felt right in the room. So now, all I need is 6 more of the "X" back bistro chairs to fill in the gap in the breakfast room and I'm back in business.

 I have to say it's pretty exhilarating making pretty things happen and spending zero dollars. I'm sure Brent would be thrilled if I started making a habit of this new shopping style. #eyeroll

All photos are my own. 

Wednesday, January 25, 2017

New Marble Fireplace Surround


GUYS!!!!!!!!!!!!!!!!!!!!

We got a new marble surround for our dining room fireplace! To recap, we inherited this beautiful 100 year old beauty a few months ago.


Immediately upon getting the new fireplace in the house Brent went to town tearing the old one out.

And we were left with this:


And like this it sat and sat......

We knew the first step to getting this ball rolling was to figure out the fireplace surround before we could put the new mantle in place. So late last fall, we made our way over to Construction Resources where we picked out the most beautiful remnant piece of white marble. They had a LOT to choose from so we had them pull several contenders.....


And after a little deliberation we made our selection.   


We loved this slab because of the beautiful color and movement in the veining, plus the size was right for our particular application. Once the slab was picked out we were ready for the Construction Resources' crew to come out and measure, but we knew this would not be your typical, measure/template/fabricate/install situation. Because of the integration with the antique wood mantle, our fireplace surround would have to be done in 3 phases.

Phase #1 - The Hearth 


Once the hearth was in place Brent moved the wood mantle into place and nailed it to the wall, so the guys could come back out for template round 2.

Phase #2 - Legs & Back


This was definitely the most visually exciting phase, what with all the exposed bricks finally getting covered up. However, because the wood mantle doesn't sit flush with the walls we were left with holes that bridged the new marble backing and the back of the mantle leg.


So the guys came out for a 3rd and final trip to template and a week later the last few pieces were added....


And we had ourselves a beautiful, finished marble fireplace surround.


We are so so so happy with the finished look. The elegance of the marble goes so well with the decorative grandness of the mantle. Basically this whole side of the room is just so fancy now and I love it. 

Now that the there is (finally) a check mark next to this item on the to-do list, what's the next step? Figuring out how we want to finish the wood mantle....dun, dun, dun......

So.Many.Options.

We are currently stewing on this one and hope to make a decision soon so we can keep this room chugging along. 

PSA: If you are an Atlanta local, do yourself a favor and visit Construction Resources if you are in the market for anything countertop related. I've been to a lot of countertops companies and in my opinion, Construction Resources is always the best. Not only do they have a ton for you to look at in all different genres - granite, marble, quartz, quartzite, etc...but they are so nice and accommodating. Every single experience I've ever had with them has been great. From the showroom to the install and every piece of coordination in-between they make the whole process fun and easy. 

#notsponsored #justfacts #:)

All photos are my own. 

Wednesday, September 21, 2016

100 + Year Old Mantle


My grandparents, who live in Atlanta have a 2nd home in Carnesville, GA a little town north east of Atlanta. They both grew up in Carnesville and each July my family spends a weekend there.  In 1985 they purchased their home, a beautiful house built in 1910. It is everything a country home should be...warm, inviting and just oozing with southern charm. This past July, my PapaJack was showing us some items in his garage when we came upon a mantle. It was hard to get a full glimpse of the mantle as it was partially covered with other furniture, but we could tell it was cool and it became even cooler when he told us it belonged to his mother. 


He said we could have it if we had a place for it. Brent and I talked it over and decided we thought it could be a really cool feature in our dining room. We have two fireplaces in our house, one in the living room and one in the dining room. 

Here is a shot of our dining fireplace situation:


While this fireplace is fine, it's no 100+ year old family heirloom so after confirming the dimensions would work we knew we wanted it! 

We headed up to Carnesville to pick her up and brought reinforcements with us in the form of Brent's mom Cindy and his brother Scott because PapaJack let us know this piece was REALLY heavy. He wasn't lying! At 85 1/2" tall,  57"wide and solid through and through, this mantle was a challenge to load, unload and maneuver into the house. 


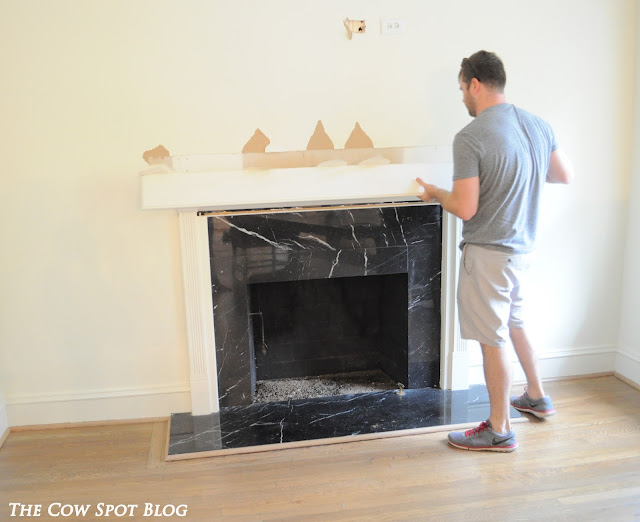
Within the hour of getting the mantle into the dining room, Brent got out his tools and began removing the existing fireplace surround. 


We knew going into it there would be some modifications needed before the mantle could officially be set into place. But seeing the surround totally stripped down really got our wheels turing at the possibilities like the black marble....do we keep or change? We haven't decided...


As for the mantle itself we haven't quite nailed down what we are going to do with it finishing wise. 


If you look closely you will notice there are a lot of intricate details in the mantle, some of which have been damaged over the years, so we are definitely going to have to refinish and repair (where needed). Obviously we are not professionals in this arena, so we are going to do our research and plan to talk to professionals before attempting to do anything that would alter the integrity of the piece. 

We are so excited and honored to be entrusted with this family heirloom and we can not wait to watch this piece play an intricate part in bringing our entire dining room to life. 

All photos are my own. 

Sunday, August 21, 2016

Dining Room Progress & A GOOOOOD DEAL!


I feel like we have been working on our Patio Project F O R E V E R and as excited as I am for that space to really be taking shape, I'm literally itching for some progress INSIDE. Thankfully last weekend we happened upon a great deal and made some unexpected progress in our dining room!

Soooo let's recap for a minute, since introducing you all to the new house we have made some decisions/changes to how we will use the spaces. The room that was dubbed the dining room when we purchased the house is actually going to be our home office and the room that was the formal living room is now the dining room. A formal living room is just not practical for our needs, but another eating area is something we can always use, especially when we entertain.  This room sits at the front of the house, gets great natural light and because it opens up to the foyer, feels really long and open.

A few months ago we had a dining room table made by a guy Brent found on Craigslist. We happened upon this craftsman by inquiring about the size of another table he had listed. When that table wasn't the size we were looking for he let us know he could make us a table whatever size we wanted. So, we got our thoughts together and sent over our vision. He literally made the table in his garage to our exact specifications and we are SO happy with it. I think we paid $600 and it took him about a week to complete. Thankfully Brent's brother Phillip was in town when the table was ready for pick-up, because it took all three brothers to carry that beast in the house.

For months this side of the room has been empty with the exception of the table, that is until last weekend when we fell into some seriously good luck.  On Sunday we popped over to Scott's Antique around 2:00. For those unfamiliar, Scott's Antique Show comes to town (Atlanta) the second weekend of every month. Vendors from across the country wheel in to town with all kinds of furniture, decorative pieces, rugs, art, etc...Anyways, because it was the last day of the show and late in the day at that, a lot of the vendors were packing up. We perused around and while we weren't looking for anything in particular, we always have a list of certain items we are in need of in our head, and this time that list consisted of:
  • Coffee table
  • Sofa table 
  • Dining Room Chairs
Randomly we came upon a booth that had a pair of really cool wing back chairs. We had long talked about the concept of having two nice, big chairs at the ends of the table, captain chairs if you will, with other chairs or a bench along each side. As we walked over to take a closer look we noticed the price tag said  $1200 dollars each...YIKES! We really loved the chairs...they are equal parts funky and classic and the blue color is literally our weakness. Brent and I are bad, we both love blue and if we don't watch ourselves we would have blue on every singe interior item we purchase! However, as much as we liked these chairs there was no way we were going to pay that price, but before we could walk away, one of the sales guys walked up and randomly told us he would sell us the chairs at $699 each. A better price, but still more than we were looking to spend on this particular trip.  We verbalized this and his response was "OK, how about $299 each? I really don't want to load them back on the truck." Umm.....We did love them and at that price, what could we do!? So, we pulled the trigger and took the chairs home.

And here they sit.


And happy we are. 

Oh, and the best part? This same chair retails for $1,650 (on sale for $1,237) at Restoration Hardware. GO US!!!!!!!!!!

Unless otherwise noted all images are my own. 

Friday, September 13, 2013

Dining Room Details

You may have noticed that I kind of went MIA regarding my kitchen remodel. Oh, that's right, I have two kitchens now, let me clarify, I'm talking about my INSIDE kitchen...:). Earlier this summer I realized I had to pump the breaks on posting the reveal of the kitchen because some contest opportunities came up and I entered my space! To be eligible to win, the project can't be published. So, until I hear the results I have to keep the kitchen reveal under wraps. Fingers crossed!!

Since the kitchen is off the table I thought I could show the dining room some love. In getting ready for the kitchen space to be photographed we completed several projects in the dining room, just in case it came into play. If you remember, the dining room sits right off the kitchen. The only thing separating the kitchen and the dining room is the peninsula, because we tore the wall down during the kitchen renovation.

Below is a shot of the dining room standing in the kitchen.


Let's dig into some details starting with the chandelier. Back in June I posted about transforming our brass chandelier to blue. I ended that post  kind of on the fence about the results. While I loved the color and the concept, the chandelier just didn't fit the vibe of the space. In July, we were in Highlands and found the chandelier you see above. The colors and proportions were perfect and we knew it was "the one." Lucky for us my Mother-in-law Cindy gave it to us as an early birthday present! The whole room changed the moment it was installed.

The next big improvement was the curtains. My mom, sister and I went fabric shopping one day and came across this fabric.


The material and pattern really spoke to me in an elegant-meets-light-and-airy and sophisticated-but-still-fun kind of way. It took a little convincing Brent to go with a floral pattern, but I knew the space could use the pop of color and once the panels were made it wouldn't read girly, it would just read awesome. He agreed and again, Cindy helped us out by sewing the curtains herself! I swear this blood line has it going on in the crafty department! 


The moment these panels were installed the whole room, heck, the whole house felt more pulled together. It's our first window treatment we've added to the house and this one packed a lot of punch. The antique brass rod was hung just under the crown moulding and the panels pool ever so slightly at the floor. Not only do the curtains make the room feel taller, but the added color these curtains bring to the space really makes the room feel warm and happy. 

As you can see, only one wall has wall decor. We plan to take our time and not rush into any decisions regarding art, especially because we have plaster walls. Plaster walls = devil to patch. But, I'm so glad we took the leap and completed this corbel/succulant idea of mine. 

For awhile now I've been collecting cool corbels I would find at antique stores. I wanted all of the corbels to be different in shape and size and I didn't want to spend very much on them (I believe the most expensive one was $22.) Below are the corbels I ended up with:


I painted each corbel the same color as the walls - Benjamin Moore's White Dove OC-17.


I realized one thing present in every well designed space is plant life. It adds such depth and texture to the space not to mention color.  So I went out in search of some succulents. I ended up finding my succulents at IKEA of all places.  Who would have thought???   They actually have a pretty good selection of both large and small live plants and you can't beat the price! 

One by one the corbels were installed. 


Because there wasn't as much open wall next to the curtain we put the biggest corbel there and the other three went on the perpendicular wall installed at varying heights. I wanted the corbel locations to be random, so we just eye-balled the locations and went with what felt right. Next, we potted the succulents in little white pots (also from IKEA) and put the succulents atop the corbels. Again, we played around with which succulent goes where, until we felt like everything looked balanced. 


What a happy little corner! Notice the little antique brass dangle hanging from the highest corbel? The corbel had this piece when I bought it and I decided to let it stay gold. It's my favorite part!

As far as the furniture pieces go - the round table was from my house growing up. My parents got a new kitchen table a few years ago and let me have this one. We sanded it down to lighten the color and then moved it right in. It's as if this table was made for this small dining room - it fits perfectly. The chairs are from World Market and were a wedding present from my Grandmother & PapaJack. The hutch piece is from Crate & Barrel and was the first piece of furniture Brent and I bought as a couple. We weren't even engaged yet and had decided if we broke up I would get the top of the hutch and he would get the bottom - haha. 

Well, there you have it, you're all filled in on the recent dining room happenings. The dining room/kitchen area is definitely one of the most finished spaces in our house. We really like how everything is coming together - hope you do too!

P.S. I'll keep you posted on the contest....wish me luck!

P.P.S.... yes that is a horse head made out of drift wood in the middle of the table. Brent is still learning to love this one.......... :)

All photos are my own.